This guide provides step by step diagrams for popular stitches and explains their uses. It's designed to be a companion to our video tutorials which can be viewed here. Use the links below to jump to specific stitches or scroll through them all for inspiration.
Use these links to jump to the steps and diagrams for key stitches.
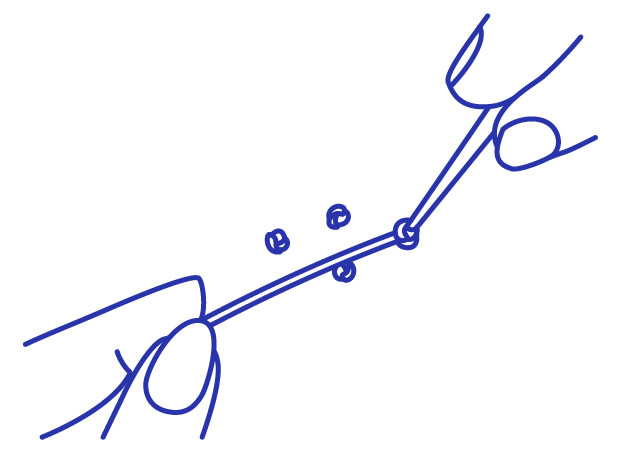
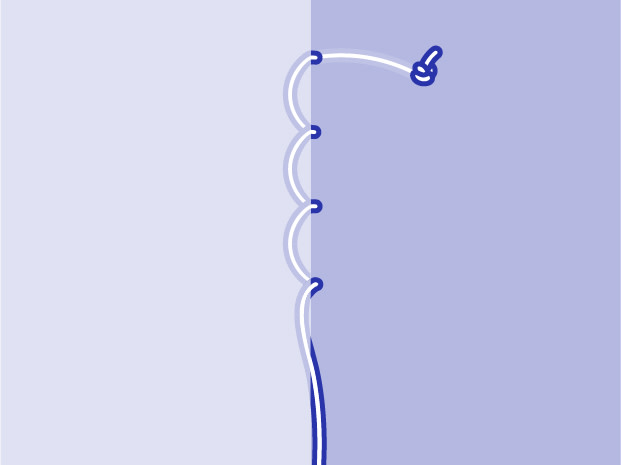
Back Stitch
An essential flat stitch that gives a continuous solid line. Very useful for creating outlines.
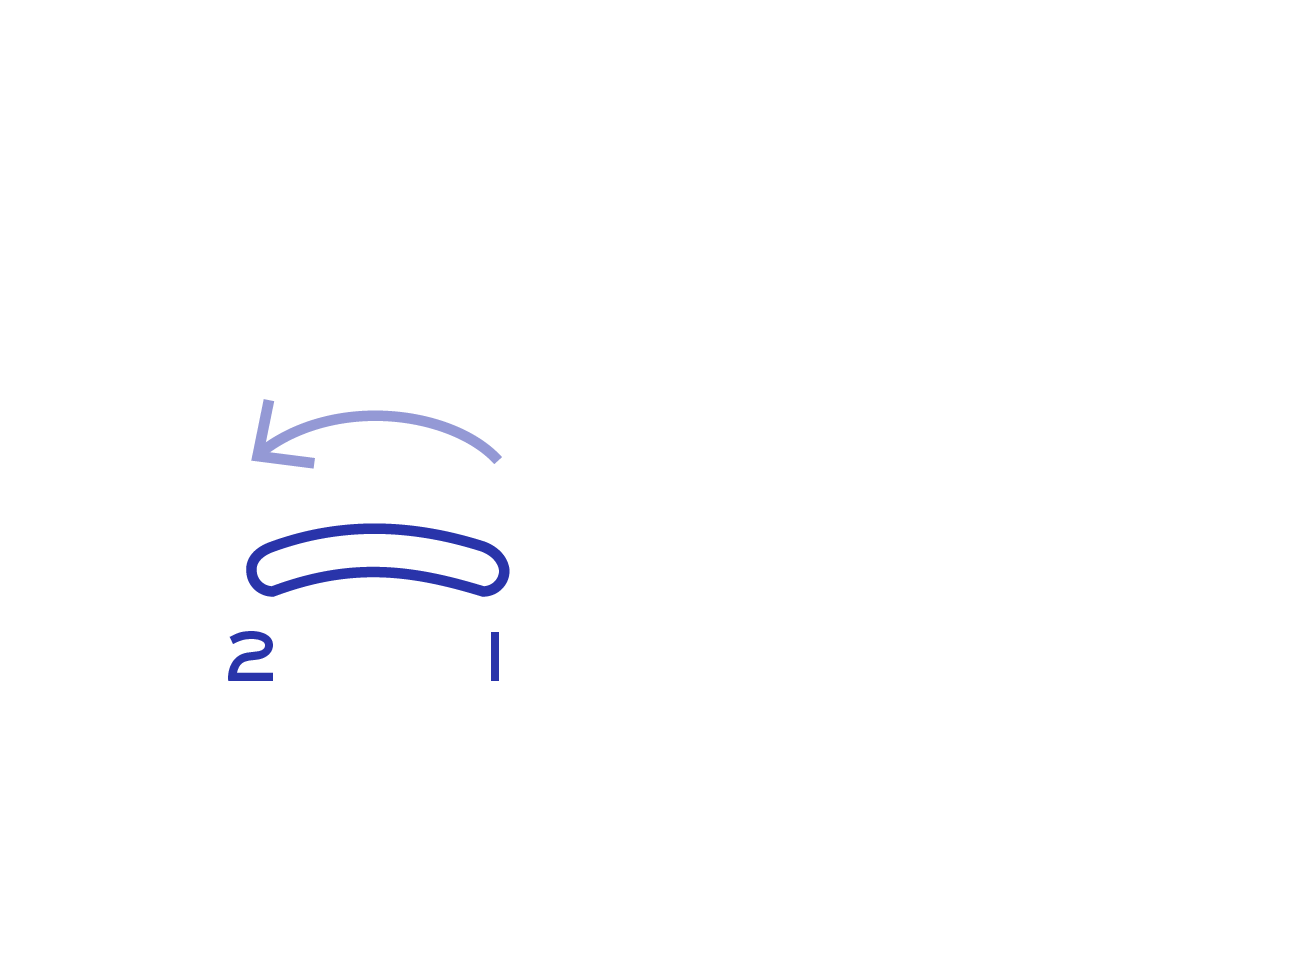
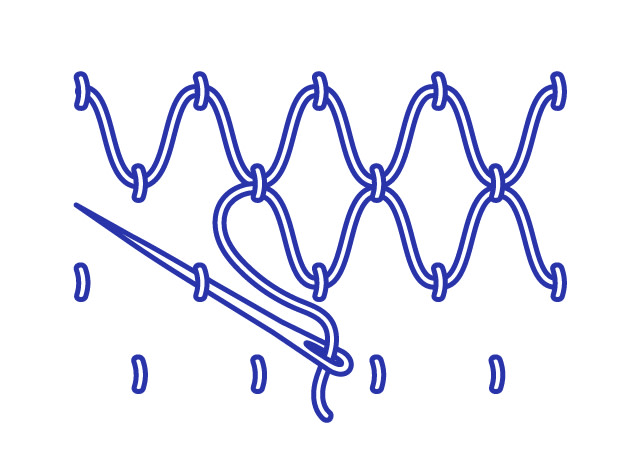
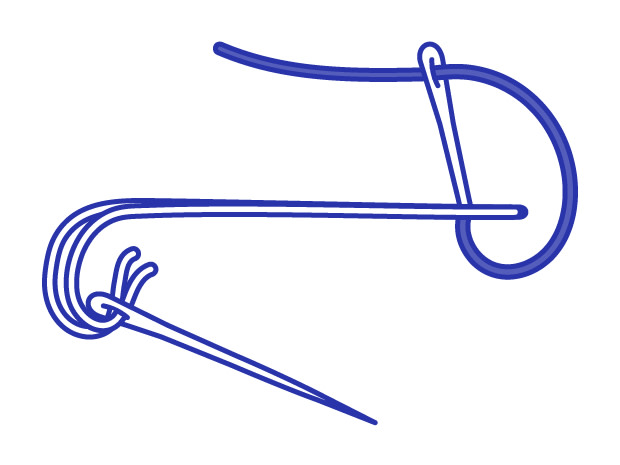
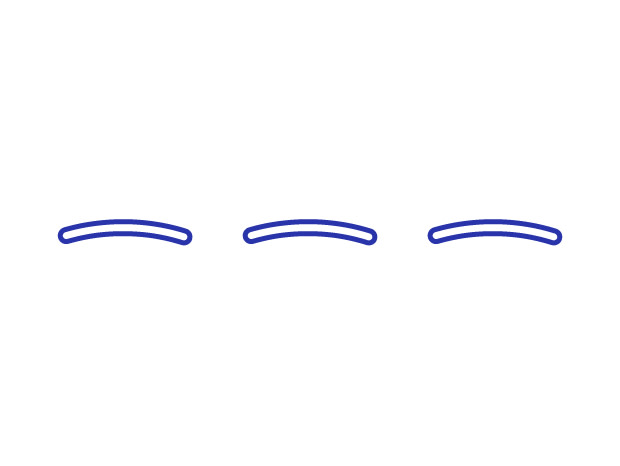
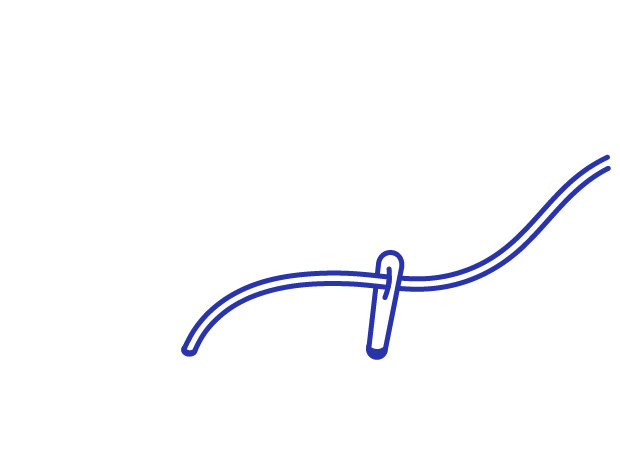
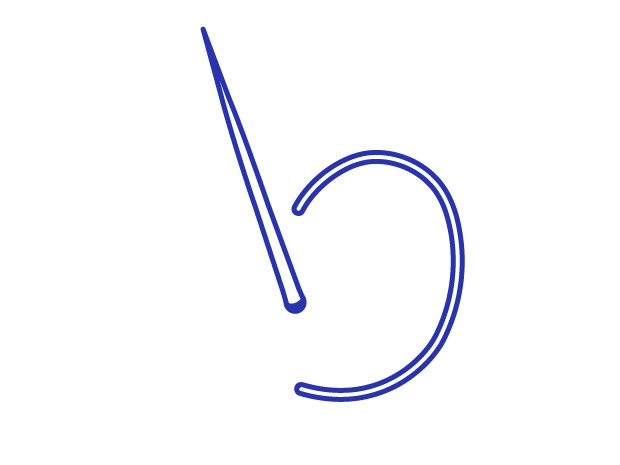
Bring the needle up when you want your line of back stitch to begin. Decide how long you want your stitches to be and take the needle down through the fabric to make the first stitch.
Leave a gap the same length as your stitch and bring the needle up. Working back towards your first stitch, make the second stitch by taking the needle down at the end of the first stitch.
Continue making stitches of equal length coming up one stitch length away and closing the stitch where your previous stitch ended.
Back Stitch (For Filling)
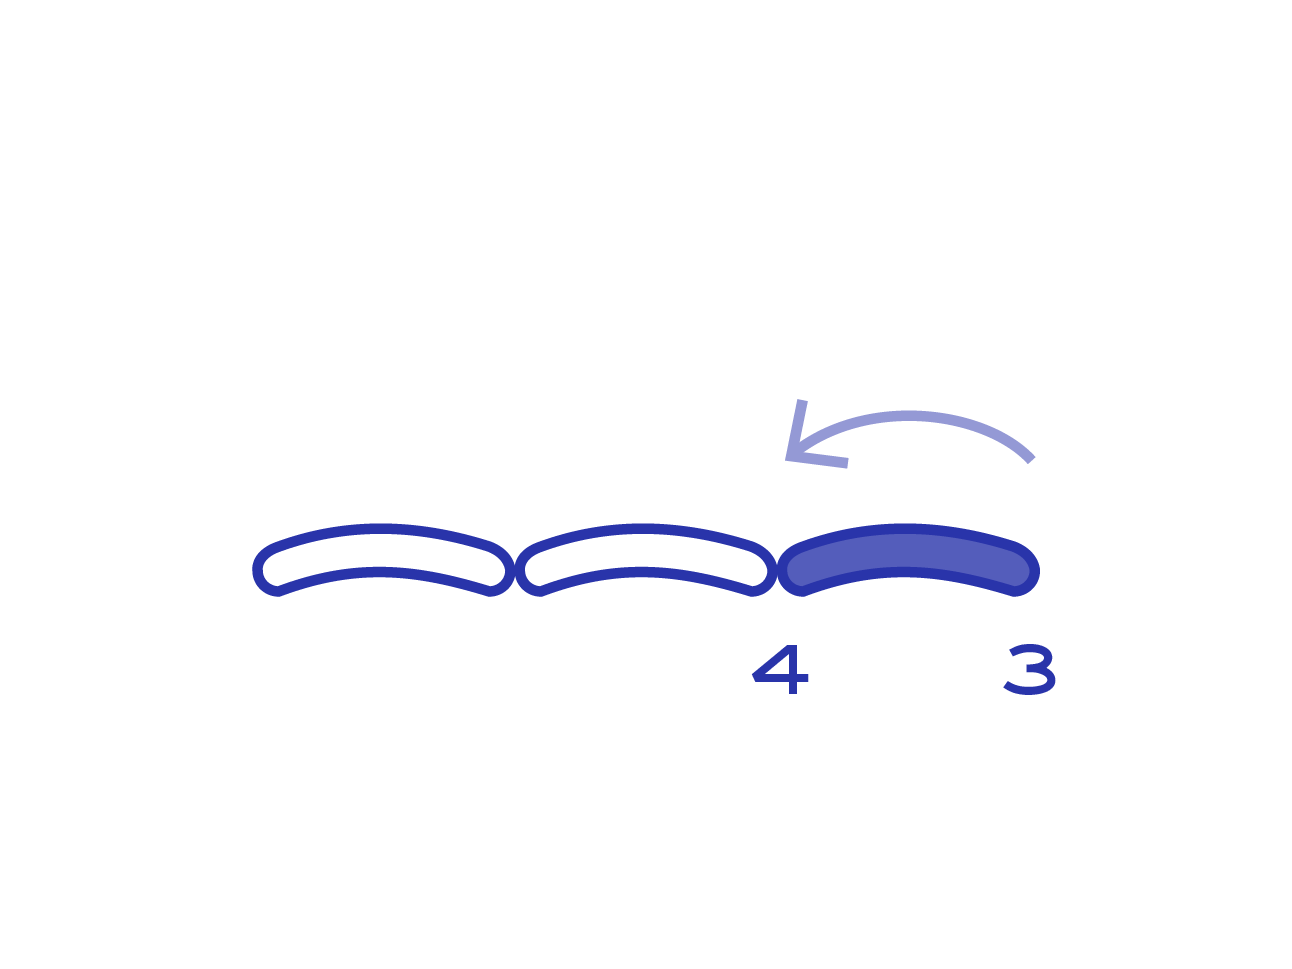
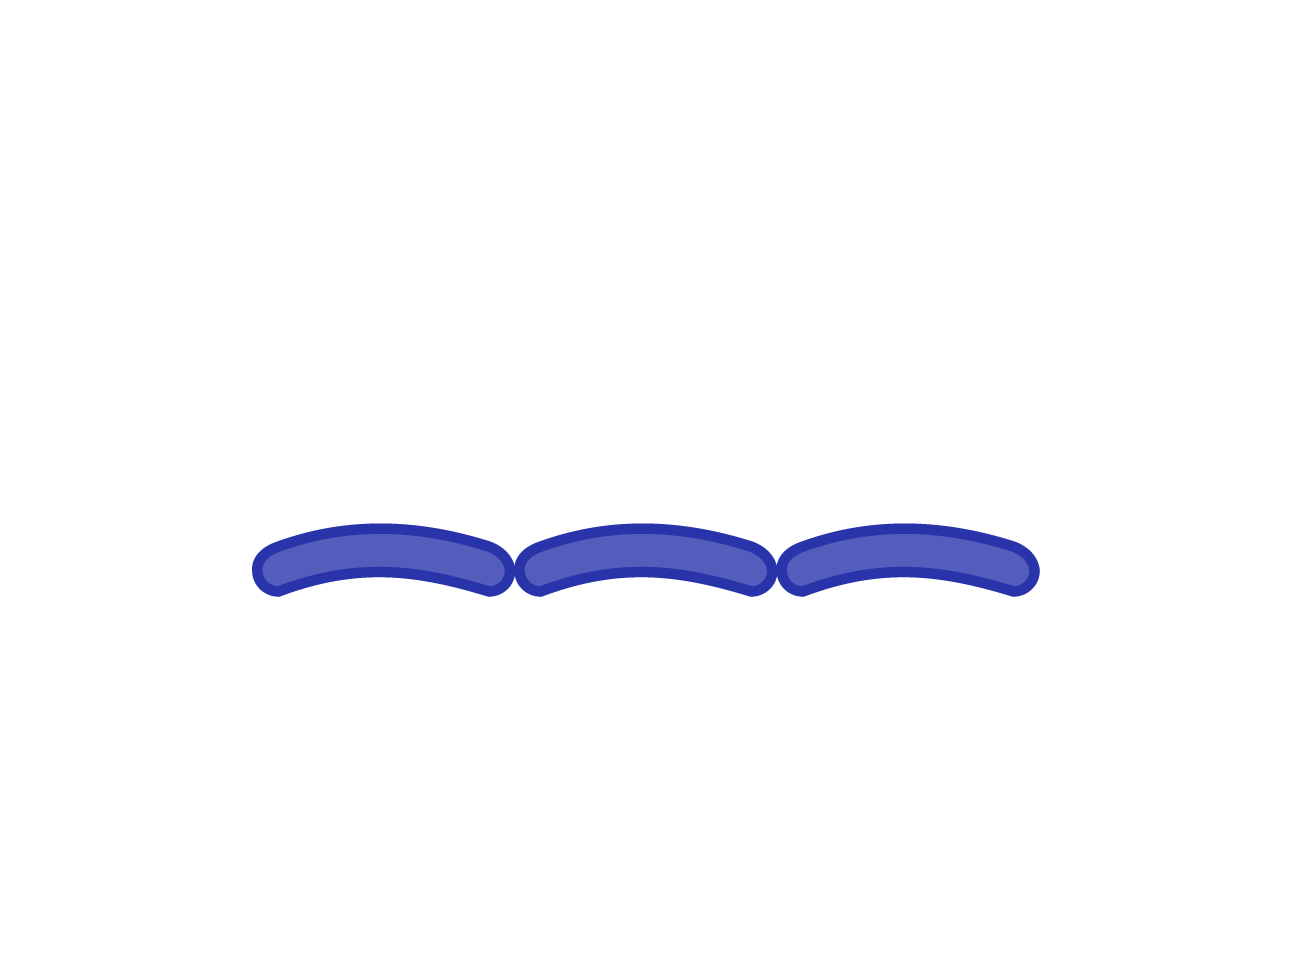
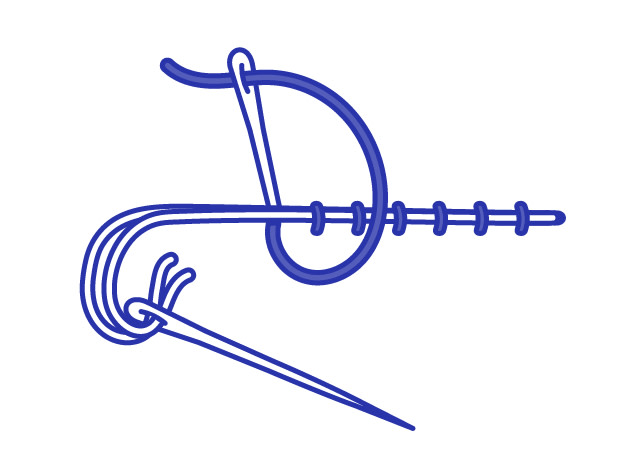
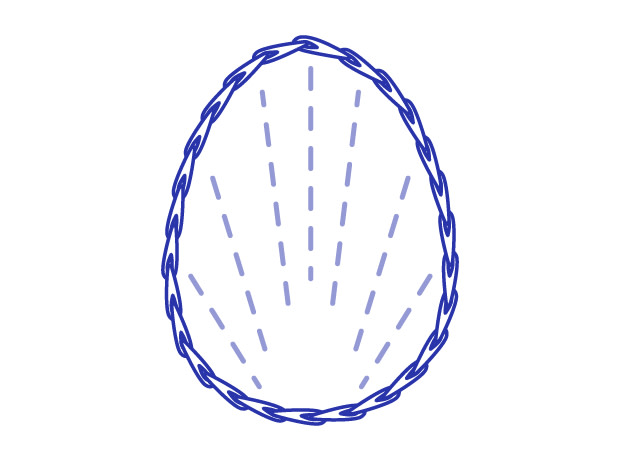
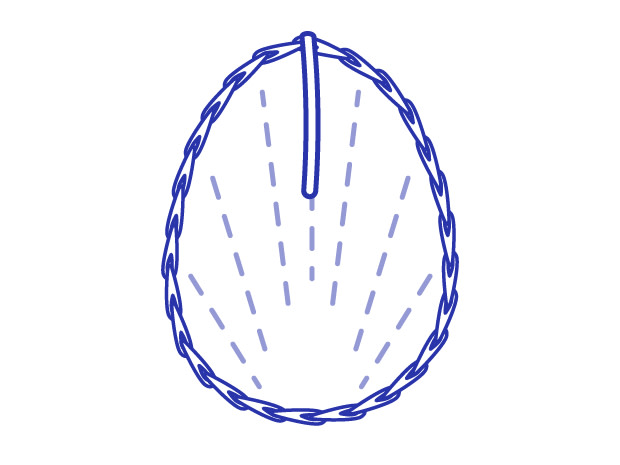
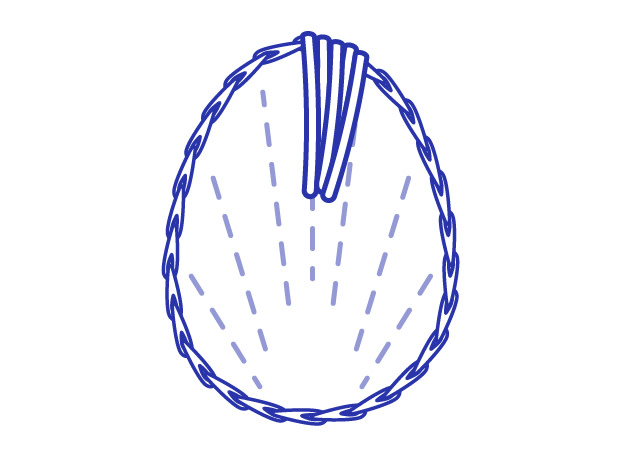
Start by stitching a line of back stitches across the center of your shape. This will set the stitch length and the angle of your stitches.
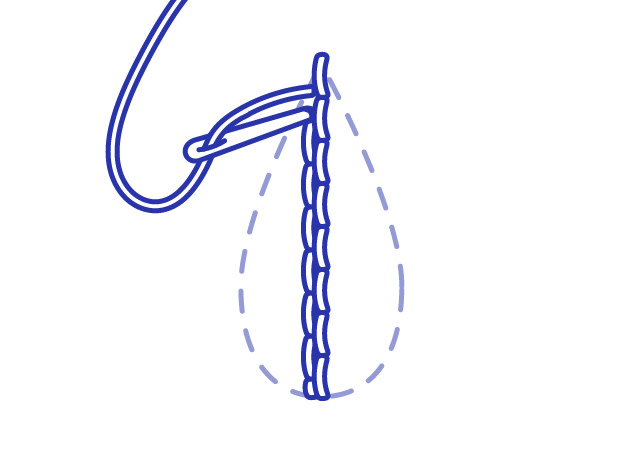
Stitch the following row of back stitch next to the first row so that the center of each stitch lines up to the end of each stitch of the first row.
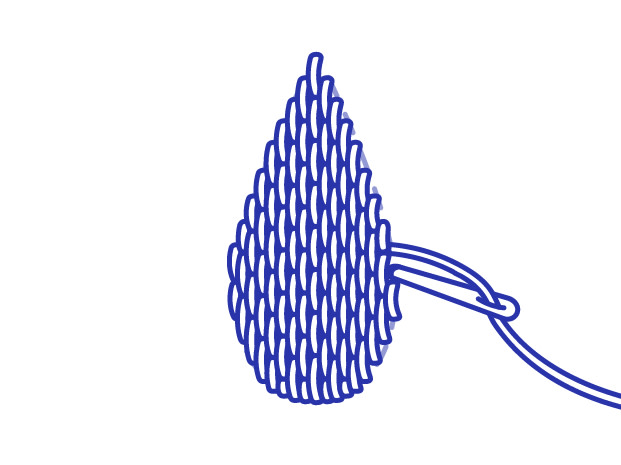
Continue filling the shape with back stitches working from the center out to the edges until the shape is filled.
Start by stitching a line of back stitches across the center of your shape. This will set the stitch length and the angle of your stitches.
Stitch the following row of back stitch next to the first row so that the center of each stitch lines up to the end of each stitch of the first row.
Continue filling the shape with back stitches working from the center out to the edges until the shape is filled.
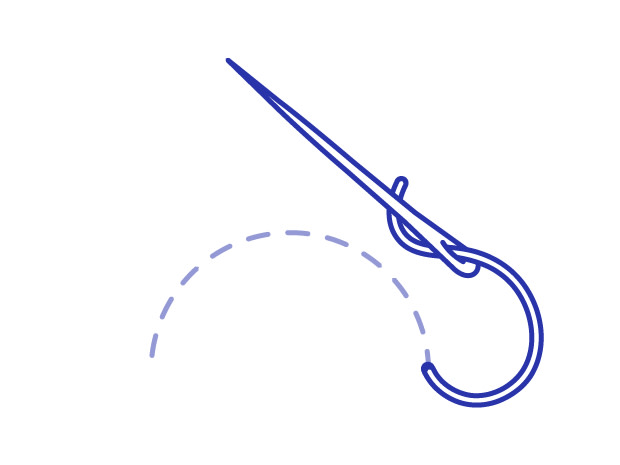
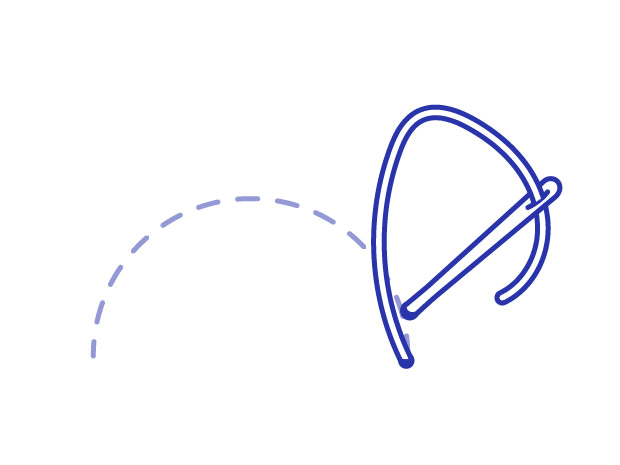
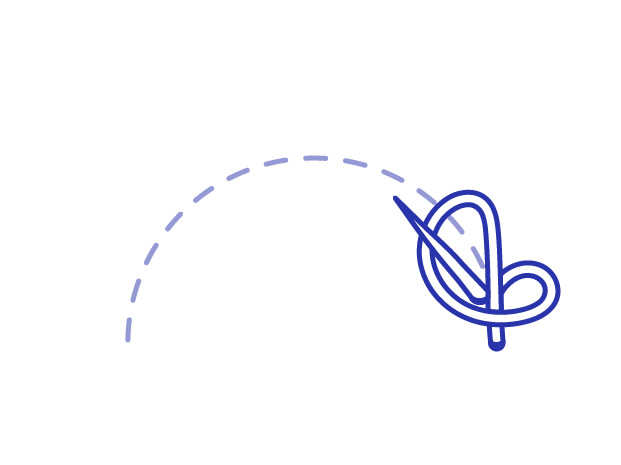
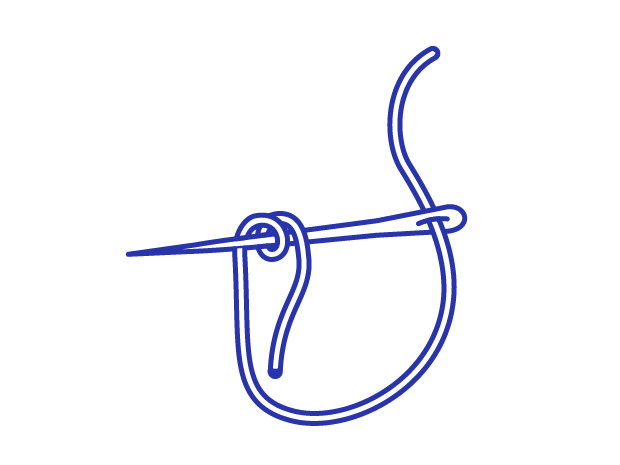
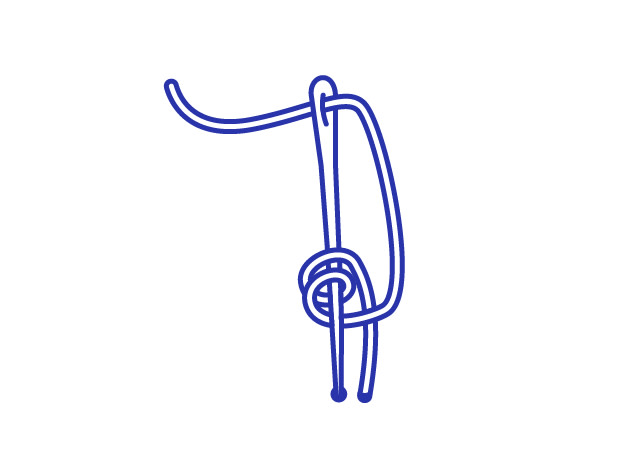
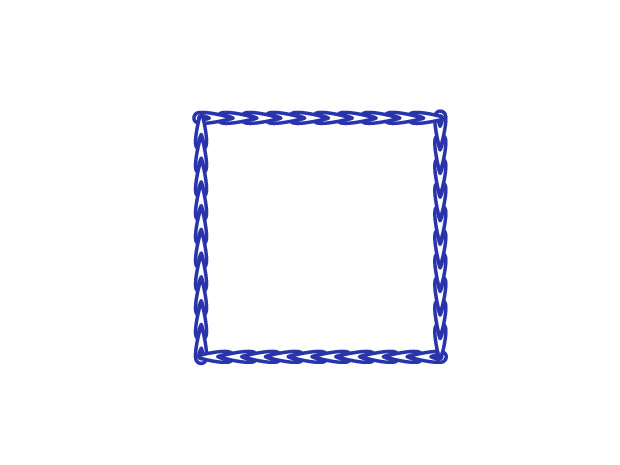
Bullion Stitch
Bullion stitch or bullion knots are a lovely way to add texture. Use them to create the stamens of flowers or stitch larger groups to create animal fur. This stitch is believed to originate in the 10th Century.
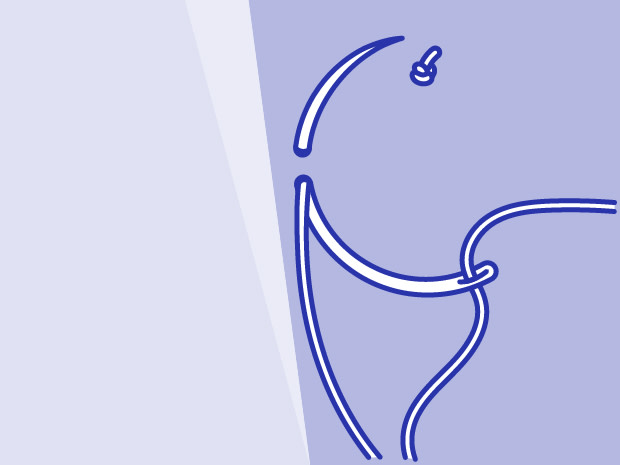
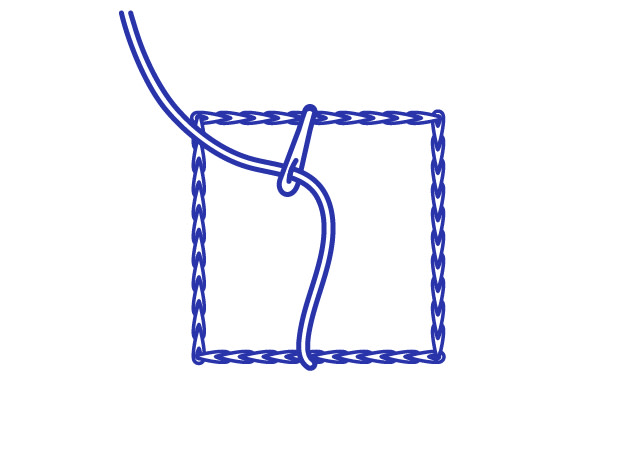
Bring your needle and thread to the surface of your fabric and decide how long you want your bullion knot to be and take the needle down.

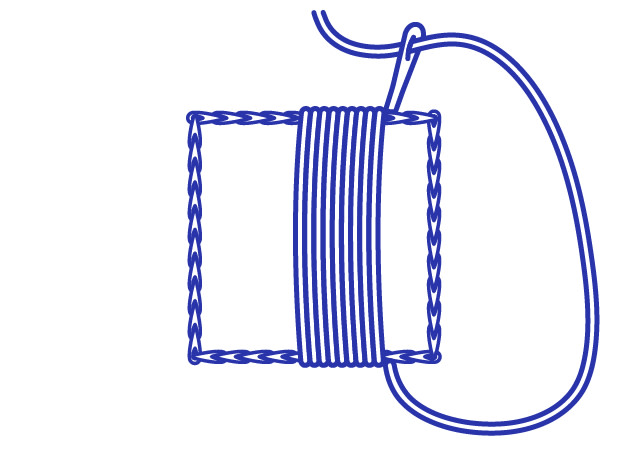
Leave a loop of your thread on the surface and bring your needle up through the same hole you started the stitch with. Carefully wrap the thread around the needle the number of times needed to create a bullion knot the same length as the stitch space you left in step 1. (You can check by laying the needle down on the fabric and adjust the number of wraps to fit.)
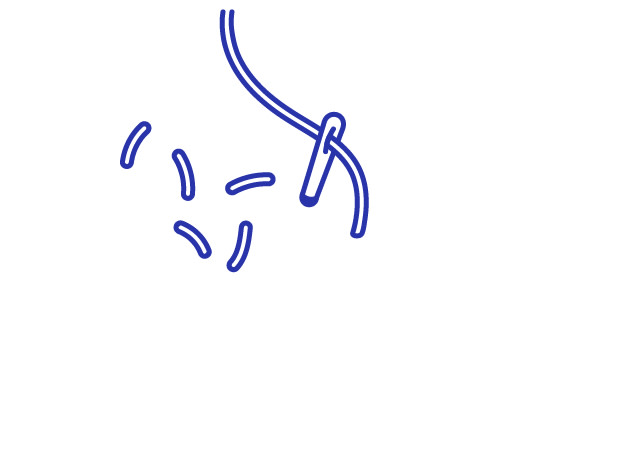
Grip the wrapped thread whilst you pull the excess thread through and then gently pull the needle through the wraps. Pull the working thread in the direction you worked the knot to ease the knot into place and then take the needle down the second hole.
Bring your needle and thread to the surface of your fabric and decide how long you want your bullion knot to be and take the needle down.
Leave a loop of your thread on the surface and bring your needle up through the same hole you started the stitch with. Carefully wrap the thread around the needle the number of times needed to create a bullion knot the same length as the stitch space you left in step 1. (You can check by laying the needle down on the fabric and adjust the number of wraps to fit.)
Grip the wrapped thread whilst you pull the excess thread through and then gently pull the needle through the wraps. Pull the working thread in the direction you worked the knot to ease the knot into place and then take the needle down the second hole.
Buttonhole/Blanket Stitch
Originally used to reinforce buttonholes in clothing this stitch can be used decoratively as well as functionally. The only difference between buttonhole and blanket stitch is the spacing between the stitches. It can be worked along a straight edge or in a circle or spiral. In this example, we have illustrated buttonhole stitch where the stitches are packed closely together. But, if you want to do a blanket stitch follow the same steps but space the stitches evenly with a few mm between each.
Bring your needle up on the outside of the shape or line you want to stitch along, then down on the inside.
To work from left to right, hold a loop of thread on the surface to the right and bring your needle back up on the outside edge of your shape, making sure the needle is inside the loop of thread.
Bring all the thread to the surface and take the needle back down as close as you can to the right of the previous stitch (on the inside edge of the shape). Again, leave the loop and ensure you bring the needle back up inside the loop of thread on the surface.
Continue until you have filled your shape. Finish by making a small holding stitch on the outside edge of the last loop.
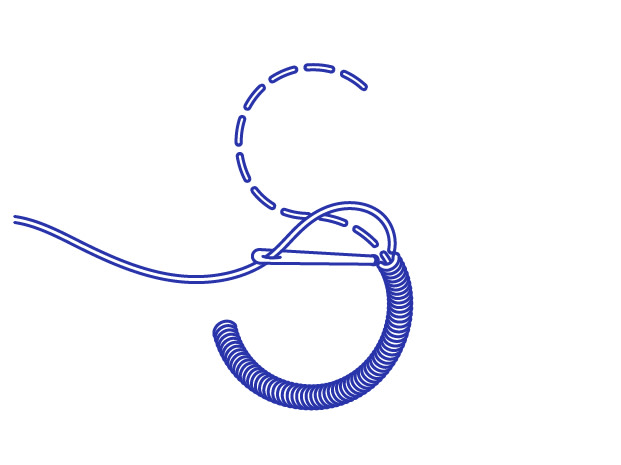
Buttonhole Wheel
Buttonhole stitch can be used to fill circles known as a buttonhole wheel. Each stitch is worked through the same hole in the center which can be perfectly in the middle or off to one side for an asymmetrical look.

Bring your needle up on the outside of the circle, then down in the center.
Leave a loop of thread on the surface to the right and bring your needle back up on the outside edge of the circle close to your first stitch. Make sure the needle is inside the loop of thread.

Pull the thread through and then take the needle down the same hole in the center. Keep working stitches in the same way, moving anticlockwise around the cirle. To close your circle pass the needle under the first stitch you make and down the same hole in the center.
Bring your needle up on the outside of the circle, then down in the center.
Leave a loop of thread on the surface to the right and bring your needle back up on the outside edge of the circle close to your first stitch. Make sure the needle is inside the loop of thread.
Pull the thread through and then take the needle down the same hole in the center. Keep working stitches in the same way, moving anticlockwise around the cirle. To close your circle pass the needle under the first stitch you make and down the same hole in the center.
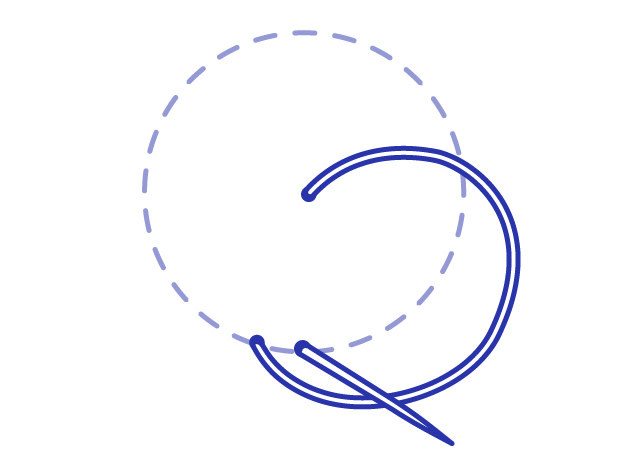
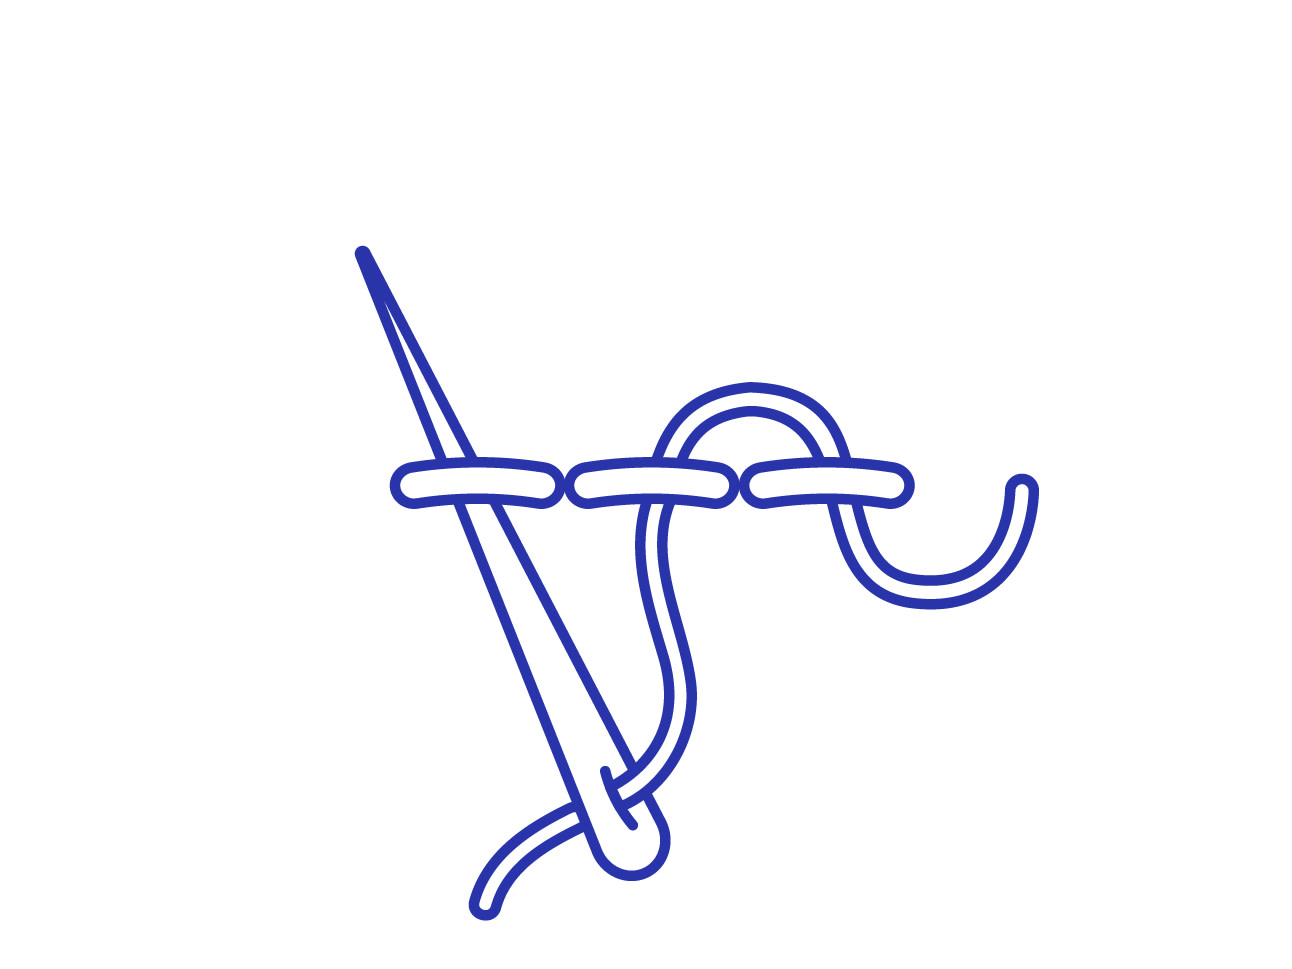
Chain Stitch
A decorative stitch that can be used for outlines and borders as well as filling shapes. It consists of interlocking loops of thread that hold each other in place.
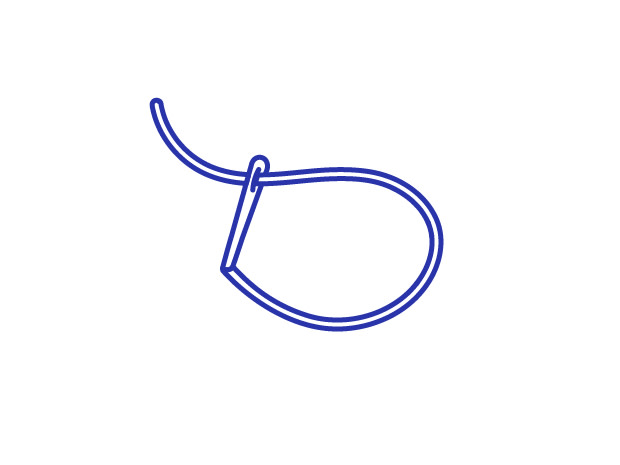
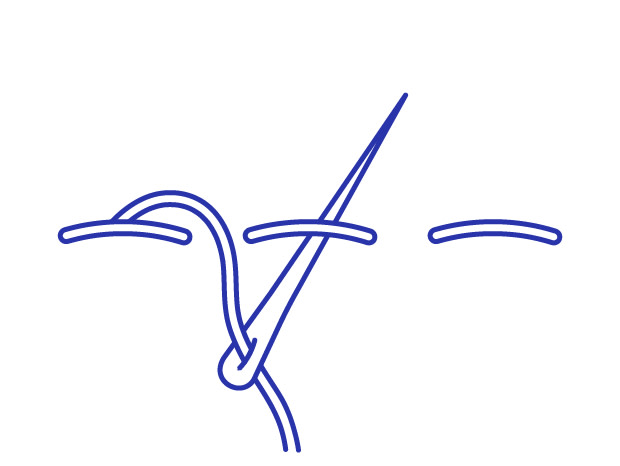
Bring your needle up and then immediately down again through the same hole leaving a small loop of thread.
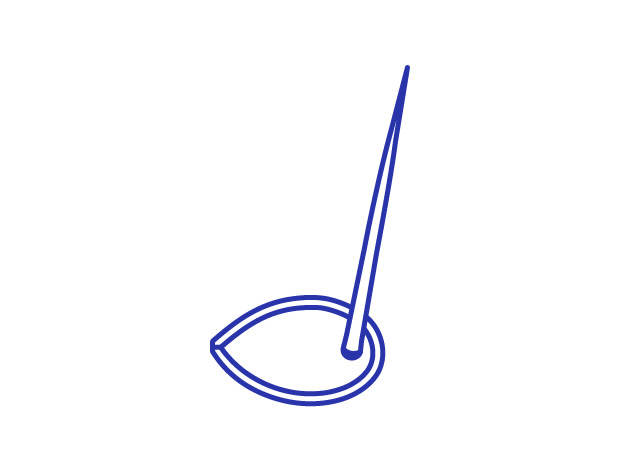
Bring your needle up half way at your desired stitch length making sure it is inside the loop of thread you left. Tighten the loop of thread against the needle.
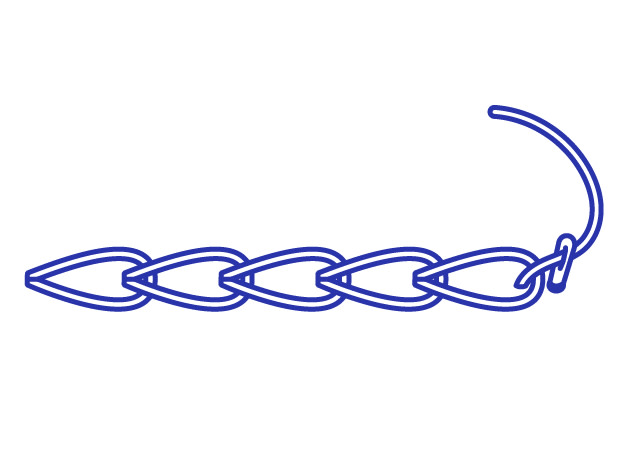
Bring the needle all the way up to begin the next stitch. Repeat until you have completed your line of chain stitches. Secure your last chain with a holding stitch.
Bring your needle up and then immediately down again through the same hole leaving a small loop of thread.
Bring your needle up half way at your desired stitch length making sure it is inside the loop of thread you left. Tighten the loop of thread against the needle.
Bring the needle all the way up to begin the next stitch. Repeat until you have completed your line of chain stitches. Secure your last chain with a holding stitch.
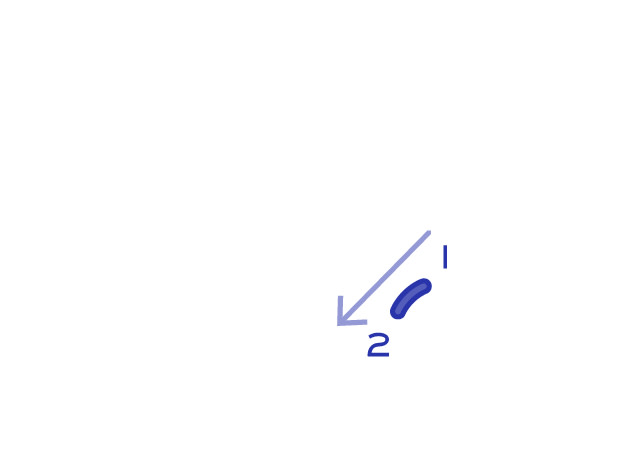
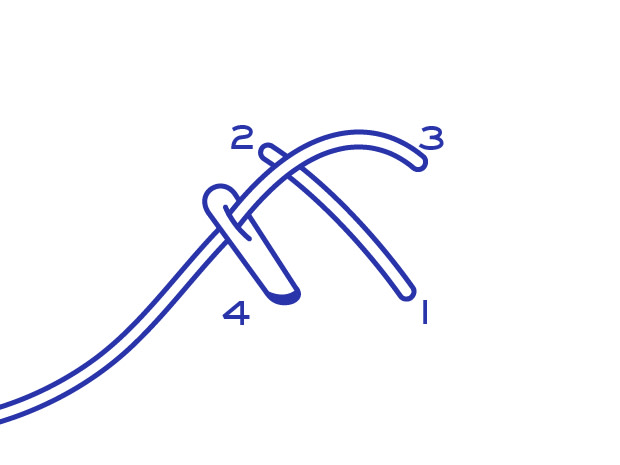
Chevron Stitch
Chevron stitch, also known as double herringbone, can be used to secure a ribbon or braid or as a decorative stitch on its own. It's a lovely choice for borders.
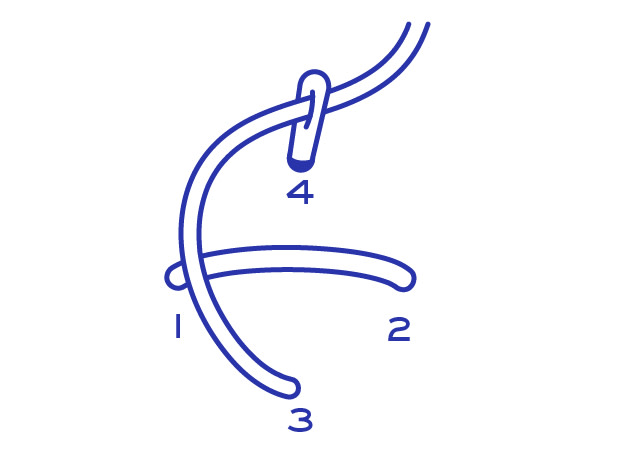
Draw two parallel lines using a water soluble pen. Working left to right, make a straight stitch by bringing the needle up at 1 and down at 2.
Bring the needle up in the midpoint of the first stitch - 3 and down at 4. Then do a back stitch - up at 5 down at 6.
Bring the tip of your needle back through the fabric halfway between 5 and 6, at point 7. Bring your needle down at 8. Repeat until you have created your desired number of chevron stitches.
Cloud Filling Stitch
An open filling stitch that gives a lovely lattice effect. Cloud filling uses small vertical anchoring stitches which then have thread woven between them.
Evenly space short vertical anchor stitches in offset rows, so that the stitches on each row are half way between the stitches in the row above.

Bring the thread up so it appears underneath the top left anchor stitch. Weave a thread from left to right to create a zig zag along the top two rows of vertical anchor stitches.
Then bring your thread up underneath and to the left of the last anchor stitch on the third row. Weave from right to left creating a zig zag between the third and second rows of anchor stitches. Continue weaving in this pattern until all the anchor stitches have been woven.
Evenly space short vertical anchor stitches in offset rows, so that the stitches on each row are half way between the stitches in the row above.
Bring the thread up so it appears underneath the top left anchor stitch. Weave a thread from left to right to create a zig zag along the top two rows of vertical anchor stitches.
Then bring your thread up underneath and to the left of the last anchor stitch on the third row. Weave from right to left creating a zig zag between the third and second rows of anchor stitches. Continue weaving in this pattern until all the anchor stitches have been woven.
Colonial Knot
Colonial knots are larger and rounder than French knots and are part of the USA's 18th Century candlewick tradition of embroidery.
Bring your needle up where you want your colonial knot to sit.
Wrap the thread up, over and behind the needle forming a figure of 8 around the needle close to the surface of the fabric.
Go back down through the fabric very close to, but not in the same hole you came up. Taking care to keep the thread taut until the stitch is completely finished, pull the thread all the way through.
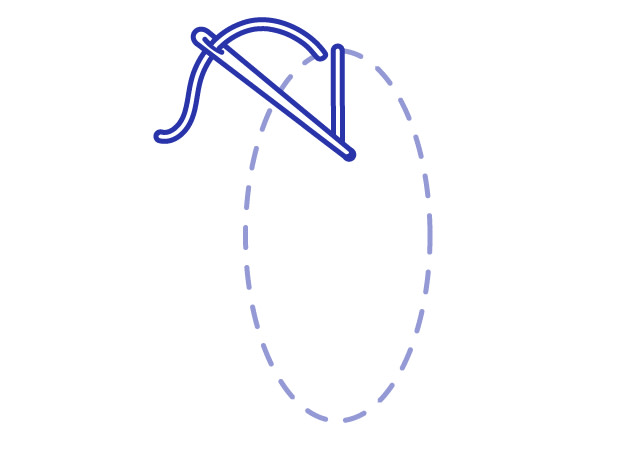
Coral Stitch
A pretty knotted stitch that is a lovely choice for outlines, flower stems and adding texture.
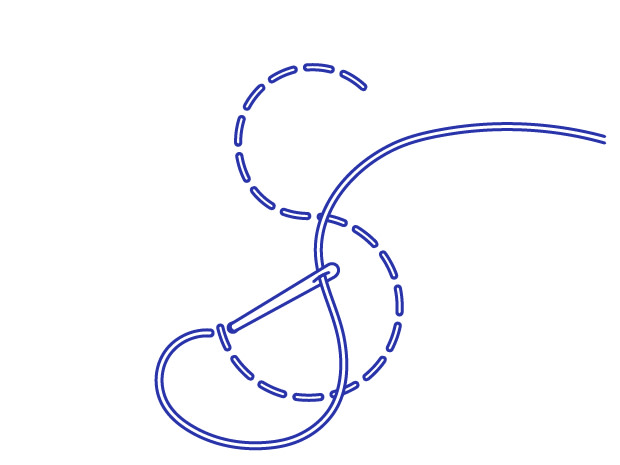
Bring your needle up at one end of the line of coral stitch you want to create. Lay the thread on the surface of the fabric following the line of your design.
Holding the laid thread in place, take the needle down to one side of it a few mm from where you began. This first stitch will set the distance between knots.
Start to draw the thread through leaving a loop on the surface, then bring your needle up on the other side of the laid thread and through the loop you left. Hold the needle in the fabric and pull the loop tight against the needle.

Bring your needle back up to the surface of the fabric and repeat the steps. Space your knots evenly as you work along the lines of your design.
Bring your needle up at one end of the line of coral stitch you want to create. Lay the thread on the surface of the fabric following the line of your design.
Holding the laid thread in place, take the needle down to one side of it a few mm from where you began. This first stitch will set the distance between knots.
Start to draw the thread through leaving a loop on the surface, then bring your needle up on the other side of the laid thread and through the loop you left. Hold the needle in the fabric and pull the loop tight against the needle.
Bring your needle back up to the surface of the fabric and repeat the steps. Space your knots evenly as you work along the lines of your design.
Couching Stitch
Popular in goldwork, couching is a method used to attach thread to the surface of the fabric. It's very useful if a thread is too thick or delicate for the fabric you are stitching on. Couching is an ancient technique that has been found in artifacts from ancient Egypt and nomadic tribes from the first millenium. Couching uses a surface thread which is laid on the top of the fabric and a couching thread that is used to stitch over the surface thread and attach it to the fabric.
Bring the surface thread up onto the surface of the fabric and position it on the surface. Using a 2nd needle, bring the couching thread up onto the surface of the fabric on one side of the surface thread.
Take the needle up and down through the fabric on the other side of the surface thread, forming a small straight stitch that will secure the surface thread.

Continue couching small stitches at regularly spaced intervals along the length of the surface thread. To finish, take both the surface thread and the couching thread to the back and secure.
Bring the surface thread up onto the surface of the fabric and position it on the surface. Using a 2nd needle, bring the couching thread up onto the surface of the fabric on one side of the surface thread.
Take the needle up and down through the fabric on the other side of the surface thread, forming a small straight stitch that will secure the surface thread.
Continue couching small stitches at regularly spaced intervals along the length of the surface thread. To finish, take both the surface thread and the couching thread to the back and secure.
Feather Stitch
Feather stitch is created by working fly stitches in an offset pattern. It is often used in smocking and can be used functionally to gather cloth or purely as a decorative stitch. Not to be confused with long and short stitch, it is also sometimes called feather stitch.
Make a straight stitch but don't pull the thread all the way though, instead leave a small loop on the surface. Bring the needle up half way, between the start and end of this first stitch but a little way below, making sure your needle is inside the loop. Tighten the loop against your needle.
Pull the needle and thread the rest of the way and then put the needle down through the fabric again to the side as shown.
Draw the thread through but not all the way, to create another loop and bring the needle up below and halfway between the holes.
Position your next fly stitch below and slightly to one side of your last stitch. Continue offsetting stitches to create the distinctive feather stitch pattern.
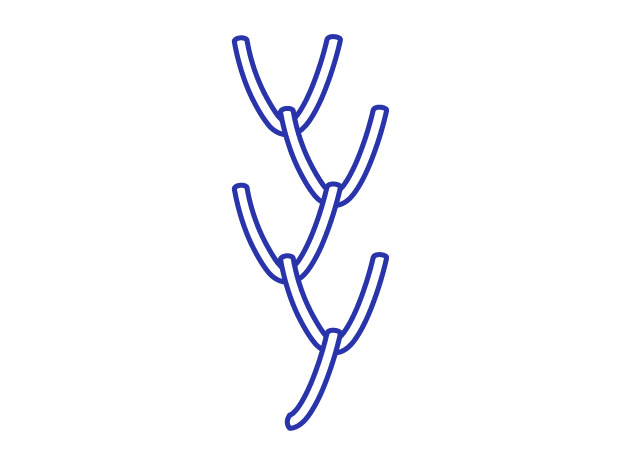
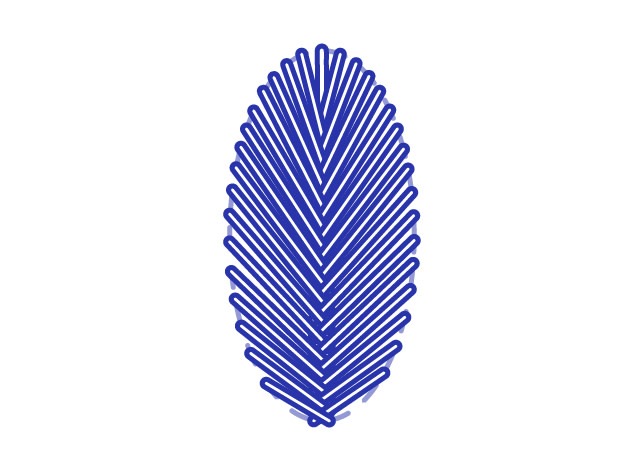
Fern Stitch
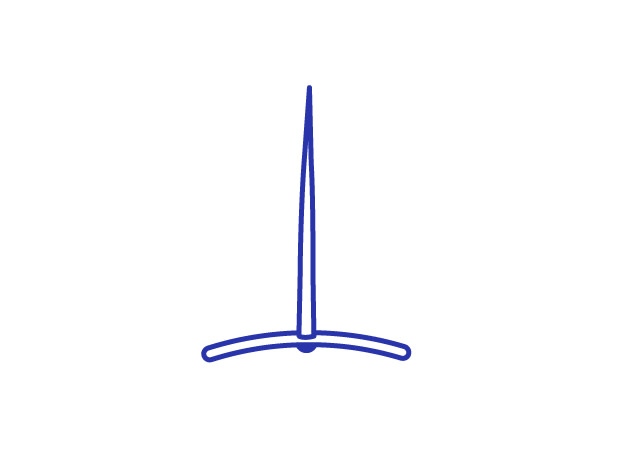
Fern stitch uses three straight stitches fanned out to make a fern shape. It’s a lovely decorative stitch that is ideal for leaves and branches.

Start by making a vertical stitch, this will set the length for all the other stitches.

Now make a second stitch angled out to one side bringing your needle down through the same hole that was created by the bottom of the first stitch.

Make a third stitch on the other side leaning out at the same angle and sharing the same hole at the bottom. Fern stitches look great stacked on top of each other.
Start by making a vertical stitch, this will set the length for all the other stitches.
Now make a second stitch angled out to one side bringing your needle down through the same hole that was created by the bottom of the first stitch.
Make a third stitch on the other side leaning out at the same angle and sharing the same hole at the bottom. Fern stitches look great stacked on top of each other.
Fishbone Stitch
A filling stitch that uses overlapping sharply slanting stitches. A lovely choice for leaves, petals and feather shapes.
Bring the needle up at the center top of the shape you are filling and make a vertical stitch.
Come up again outside the shape close to the top of the vertical stitch you have made and make a slanted stitch that overlaps the end of the vertical stitch.
Working down the shape and placing your stitches so they touch, continue making slanted stitches that overlap the center line.
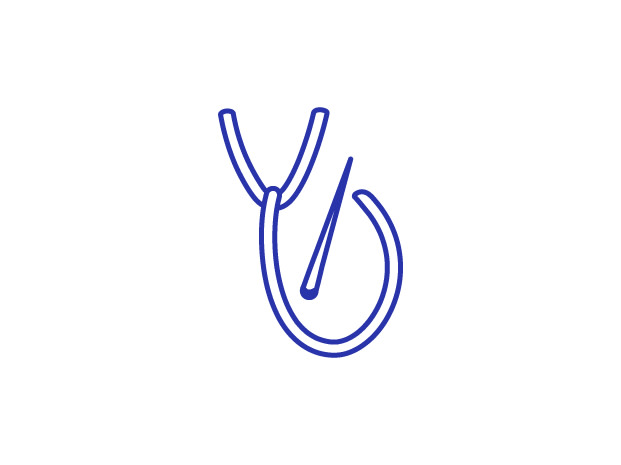
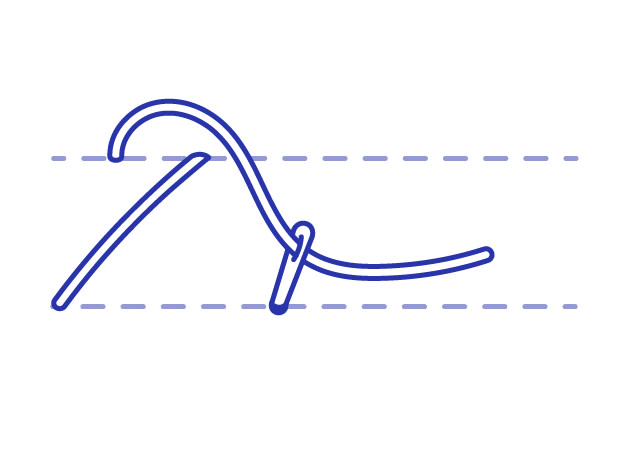
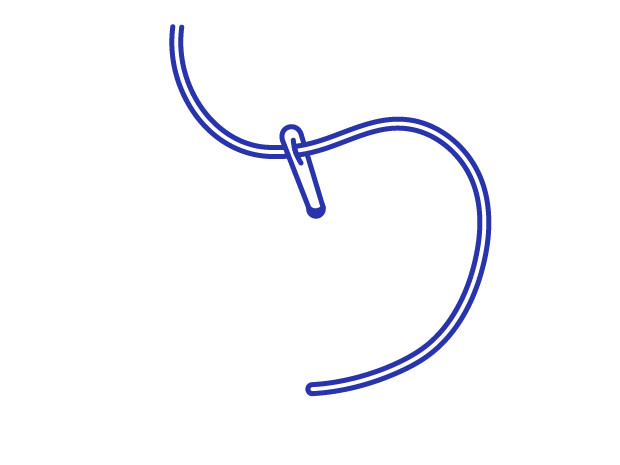
Fly Stitch
The fly stitch uses a small anchoring stitch to pull a longer straight stitch into a V shape. They can be stitched individually or in a row to form closed fly stitches.
Make a straight stitch but don't pull the thread all the way though, instead leave a small loop on the surface.
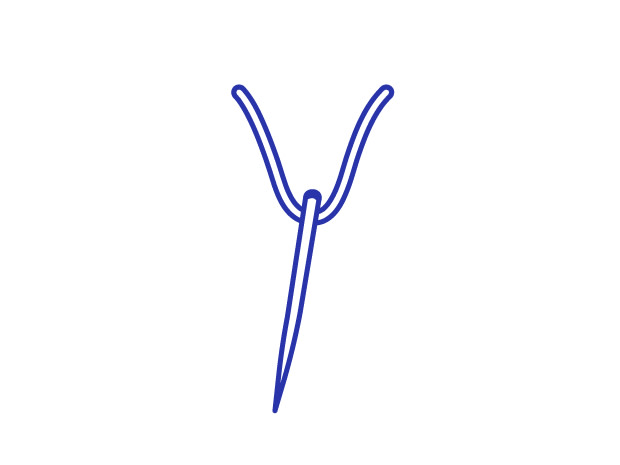
Bring the needle up half way, between the start end end of this first stitch but a little way below, making sure your needle is inside the loop. Tighten the loop against your needle.
Pull the needle and thread the rest of the way and then put the needle down through the fabric again the other side of the loop to secure it with a small stitch.
Make a straight stitch but don't pull the thread all the way though, instead leave a small loop on the surface.
Bring the needle up half way, between the start end end of this first stitch but a little way below, making sure your needle is inside the loop. Tighten the loop against your needle.
Pull the needle and thread the rest of the way and then put the needle down through the fabric again the other side of the loop to secure it with a small stitch.
French Knot
These small knots are great for adding decoration and creating texture. Try scattering them or packing them in close to achieve different effects.

Bring your needle up where you want your french knot to sit.
Wrap the thread around the needle close to the surface of the fabric once or twice (depending on how big you want your knot to be).
Go back down through the fabric very close to but not in the same hole you came up. Taking care to keep the thread taut until the stitch is completely finished, pull the thread all the way through.
Half Cross Stitch
Half cross stitch is worked in vertical or horizontal rows. It creates short perpendicular stitches on the back of the work which means it uses less thread. It's ideal for projects that don't need to be particularly hard wearing such as framed pictures or decorative items.
Start in the bottom right hand corner of the section you want to fill. Make you first stitch by bringing the needle up top right (1) and down bottom left (2).
Make a vertical stitch on the back of your canvas then complete the second stitch by bringing it down bottom left (4).
To work the next row the order and direction is reversed. You will be working from left to right bringing your needle up bottom left and down top right as shown.
Herringbone Stitch
Herringbone stitch uses rows of slanted stitches that cross at the ends to create an elegant effect. Popular in Jacobean Crewelwork embroidery where it is often used for leafy stems.
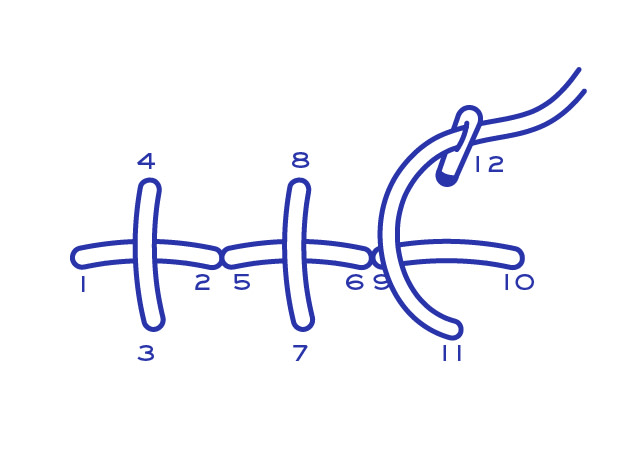
Draw two parallel lines using a water soluble pen. Working left to right, make a straight stitch by bringing the needle up at the far left of the bottom line and down on the opposite line to create a diagonal slanting stitch as shown.
Bring the needle up a small way behind the end of this first stitch on the same line. Take the needle down on the lower line to create a diagonal stitch that slants in the opposite direction.

Making sure your stitches are spaced as shown continue until you have completed the herringbone section of your design.
Draw two parallel lines using a water soluble pen. Working left to right, make a straight stitch by bringing the needle up at the far left of the bottom line and down on the opposite line to create a diagonal slanting stitch as shown.
Bring the needle up a small way behind the end of this first stitch on the same line. Take the needle down on the lower line to create a diagonal stitch that slants in the opposite direction.
Making sure your stitches are spaced as shown continue until you have completed the herringbone section of your design.
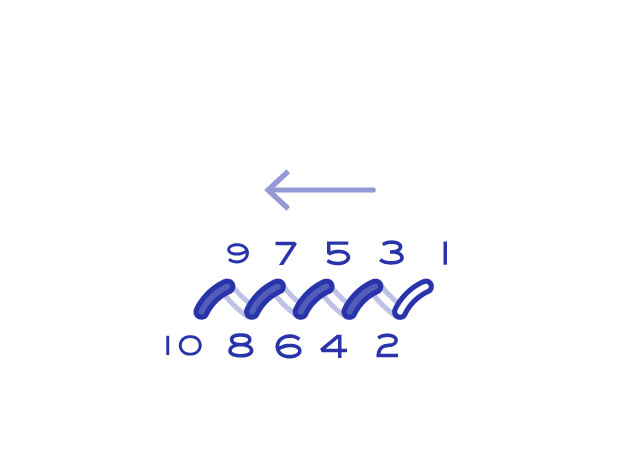
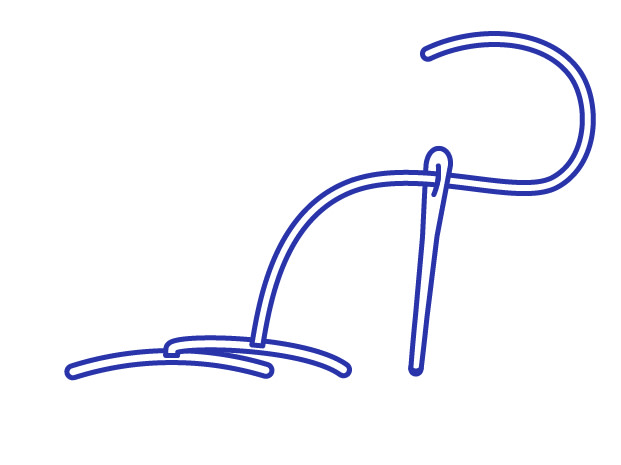
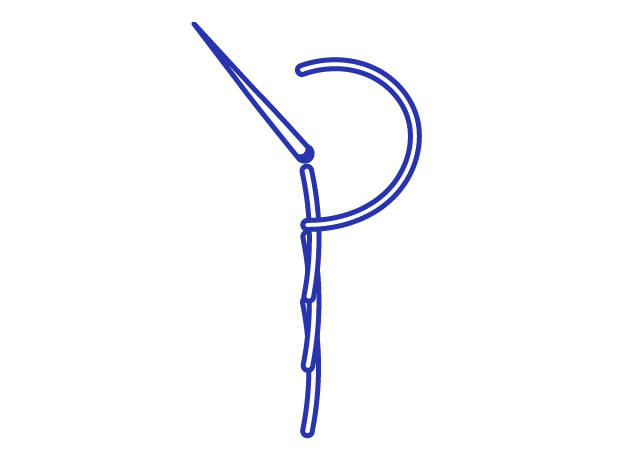
Laced Back Stitch
Laced back stitch is a variation of back stitch that gives a wavy effect. It’s a decorative choice for outlines, flower stems or lettering.

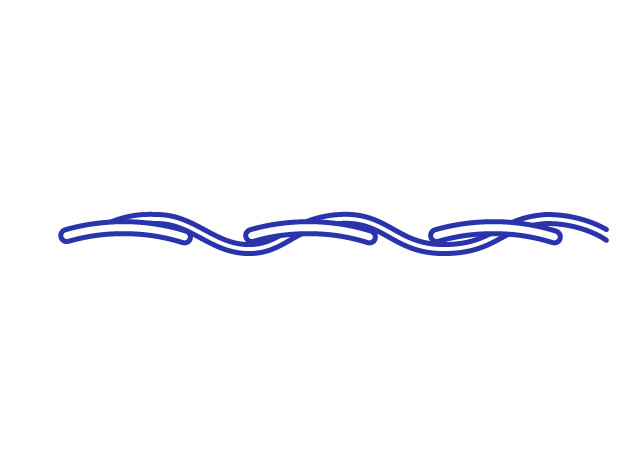
Start by making a row of back stitch using the embroidery needle. You can draw a dotted line on your fabric to help you make even stitches of the same length.
Using a blunt tapestry needle (to avoid piercing the back stitch) bring the needle up at the end of your row of back stitch then slide it under the first back stitch keeping the thread on the surface of the fabric.

Slide the needle under the next back stitch weaving under the back stitches in a zigzag pattern. Take the needle down at the end of the last back stitch.
Start by making a row of back stitch using the embroidery needle. You can draw a dotted line on your fabric to help you make even stitches of the same length.
Using a blunt tapestry needle (to avoid piercing the back stitch) bring the needle up at the end of your row of back stitch then slide it under the first back stitch keeping the thread on the surface of the fabric.
Slide the needle under the next back stitch weaving under the back stitches in a zigzag pattern. Take the needle down at the end of the last back stitch.
Laced Running Stitch
Laced running stitch can be used for borders and decorative outlines. Try experimenting with different colors of thread for the running stitch and lacing.
Create a line of running stitches by bringing the needle up and down through the fabric to make even straight stitches that are evenly spaced.
Thread your needle with the thread you want to use for the lacing. Bring the needle up through the same hole you used to make your first running stitch.
Weave the lacing stitch between the running stitch as shown. Complete the row by taking your thread down through the last hole of the last stitch.
Ladder or Slip Stitch
Ladder stitch can be used to attach appliqué (a patch of fabric or needlework that is applied to the top of a base fabric) or bind seems together. This variation is also known as invisible ladder stitch or slip stitch. It is an ancient stitch, there is evidence of its use as far back as 8th century BCE.
Create a crease along the folded edge of your appliqué. Using a curved needle, thread up and tie a knot in the end of the thread. Secure with two small holding stitches in the base fabric in an area that will be hidden. Ensure you finish by bringing the needle up in line with the folded edge of the applique.
Pull the thread through onto the surface. Now lay it on the base fabric at 90 degrees to the crease and make a stitch in the base fabric in line with the edge of your appliqué. Repeat working around the entire edge of your appliqué.
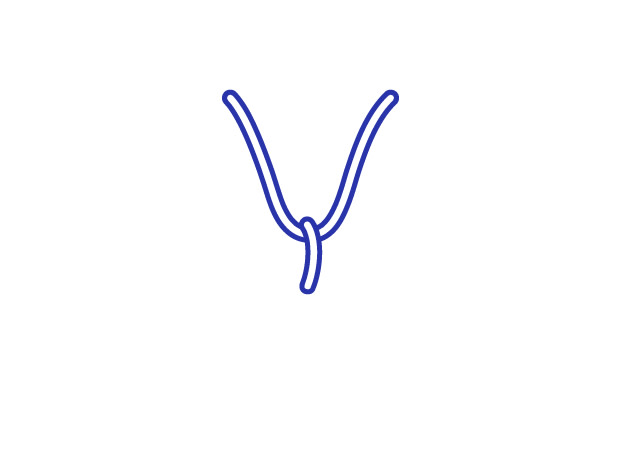
Lazy Daisy
Also known as detached chain stitch or single chain stitch. Lazy daisy stitches can be made in a circle to create simple flower shapes.
Bring the needle up where you want the point of this petal shaped stitch to be.
Take the needle back down through the same hole leaving a small loop of thread on the surface.
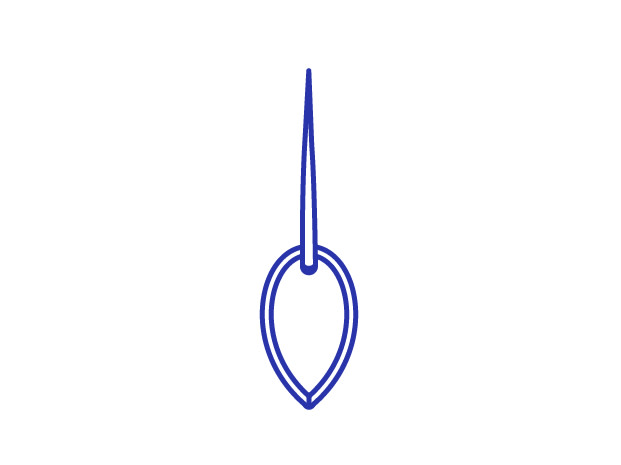
Decide on the length of the petal and bring the needle up inside the loop at this distance. Holding the needle in the fabric, gently tighten the loop against your needle.
Bring the needle up where you want the point of this petal shaped stitch to be.
Take the needle back down through the same hole leaving a small loop of thread on the surface.
Decide on the length of the petal and bring the needle up inside the loop at this distance. Holding the needle in the fabric, gently tighten the loop against your needle.
Long and Short Filling Stitch
Long and short filling stitch is also known by quite a few different names including long and short satin stitch, silk shading and embroidery stitch. It is a series of closely packed straight stitches of different lengths which are used to fill a shape.
Prepare by working an outline of split stitch. Think about the direction of your stitches as this will impact the effect this stitch creates. You might want to draw guidelines to help you angle your stitches in the right direction.
Bring the needle up in the center of your shape and, following your guidelines, make a straight stitch by bringing the needle down outside your split stitch outline.
Continue working straight stitches of different lengths, placing each so it runs alongside the previous stitch until you have filled the shape.
Overcast Stitch
Overcast stitch creates a smooth, slightly raised narrow line. Try it to add a more pronounced outline or raised details like flower stems or the veins in leaves.
Create a line of running stitch.
Bring the needle up at one end of your running stitch line, very close to the stitch. Work small stitches over the running stitch covering it completely.
Make sure each overcast stitch is laid touching the previous stitch so none of the running stitch can be seen.
Create a line of running stitch.
Bring the needle up at one end of your running stitch line, very close to the stitch. Work small stitches over the running stitch covering it completely.
Make sure each overcast stitch is laid touching the previous stitch so none of the running stitch can be seen.
Padded Satin Stitch
This padded version of satin stitch is used to fill shapes with straight parallel stitches and it really shows off the beautiful sheen of DMC threads like Six-Strand Embroidery Floss. The padding adds a fabulous 3D quality. It's great for rounded berries and the eyes of animals.
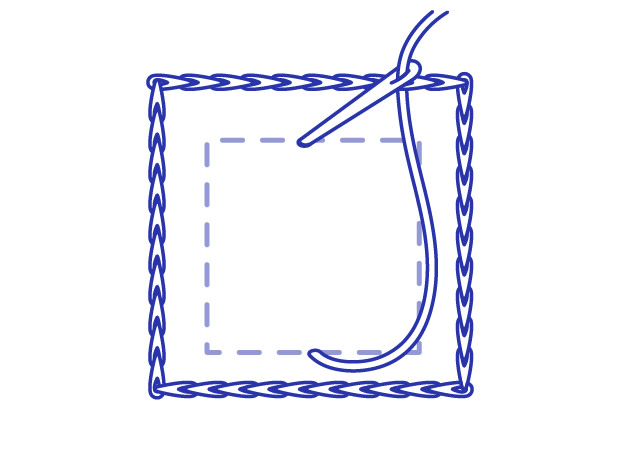
To create a crisp neat edge, create a split stitch outline of your shape. Then add padding stitches. Depending on how thick you want your padding, fill your shape with seed stitches or by overlapping straight stitches in one direction then the other. You will work the satin stitches from the middle of the shape to one edge and then from the middle to the other edge.

Once you have added your padding stitches, you will work the satin stitches from the middle of the shape to one edge and then from the middle to the other edge. Bring your needle up outside the split stitch outline, half way along one side of the shape. Hold the thread over the surface of the shape to set the angle of the stitches. Take your needle down outside your split stitch outline.
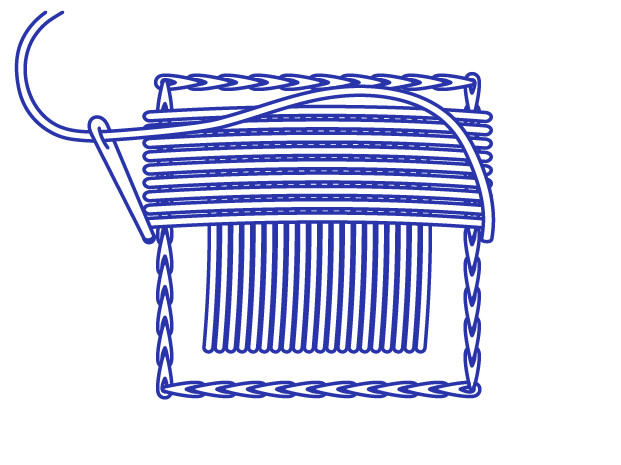
Bring the needle back up very close to the start of the first stitch and back down, so your second stitch lays perfectly next to the first. Continue making satin stitches, each butted up against the last, until you have reached the edge of your shape. Then start again in the middle of your shape and working outwards, fill the other half of the shape.
To create a crisp neat edge, create a split stitch outline of your shape. Then add padding stitches. Depending on how thick you want your padding, fill your shape with seed stitches or by overlapping straight stitches in one direction then the other. You will work the satin stitches from the middle of the shape to one edge and then from the middle to the other edge.
Once you have added your padding stitches, you will work the satin stitches from the middle of the shape to one edge and then from the middle to the other edge. Bring your needle up outside the split stitch outline, half way along one side of the shape. Hold the thread over the surface of the shape to set the angle of the stitches. Take your needle down outside your split stitch outline.
Bring the needle back up very close to the start of the first stitch and back down, so your second stitch lays perfectly next to the first. Continue making satin stitches, each butted up against the last, until you have reached the edge of your shape. Then start again in the middle of your shape and working outwards, fill the other half of the shape.
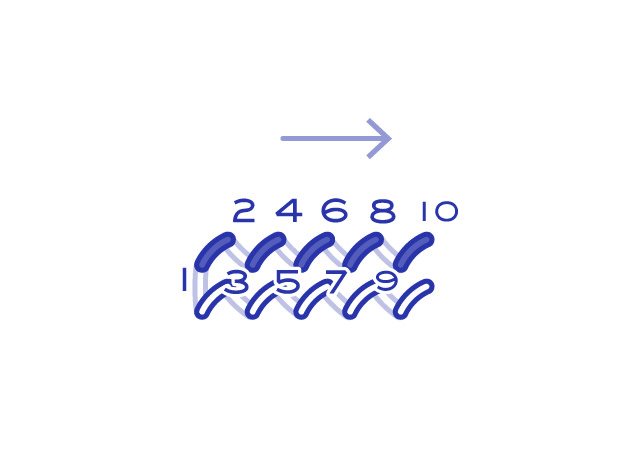
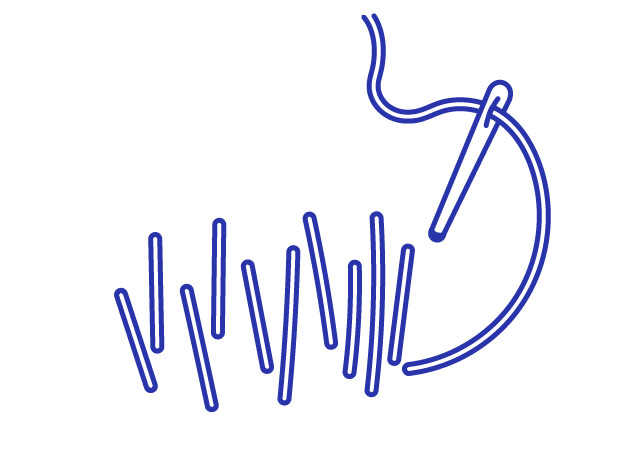
Running Stitch
The first stitch many people learn, the humble running stitch is a line of stitches that are all the same length. A very versatile stitch which can be used to gather fabric, to quilt layers and add decoration. A popular stitch used in a wide range of techniques including Sashiko, Cross Stitch and Kantha.
Satin Stitch
Satin stitch is used to fill shapes with straight parallel stitches and it really shows off the beautiful sheen of DMC threads like Six-Strand Embroidery Floss. It's great for monograms, petals and leaves.
To create a crisp neat edge, create a split stitch outline of your shape. You will work the satin stitches from the middle of the shape to one edge and then from the middle to the other edge.
Bring your needle up outside the split stitch outline, half way along one side of the shape. Hold the thread over the surface of the shape to set the angle of the stitches. Take your needle down outside your split stitch outline.
Bring the needle back up very close to the start of the first stitch and back down so your second stitch lays perfectly next to the first. Continue making satin stitches, each butted up against the last, until you have reached the edge of your shape. Then start again in the middle of your shape and working outwards, fill the other half of the shape.
Seed Stitch
Seed or seeding stitch is a collection of randomly placed small straight stitches. This can be used to add shading by varying the density of stitches.
Working in lots of different directions make lots of small straight 1-2mm stitches.
You can pack them closely for dense coverage.
Spread them apart for lighter shading effects.
Working in lots of different directions make lots of small straight 1-2mm stitches.
You can pack them closely for dense coverage.
Spread them apart for lighter shading effects.
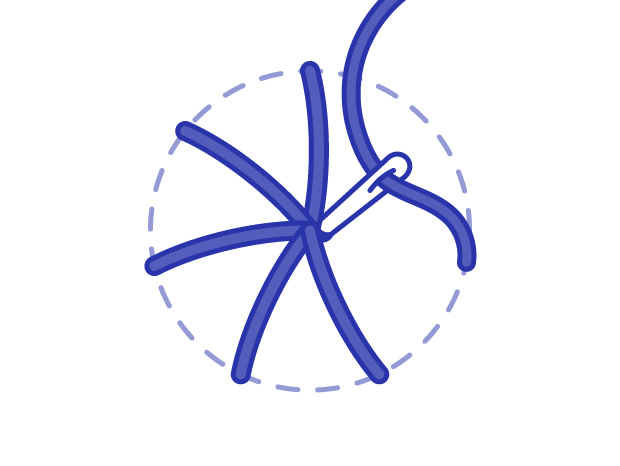
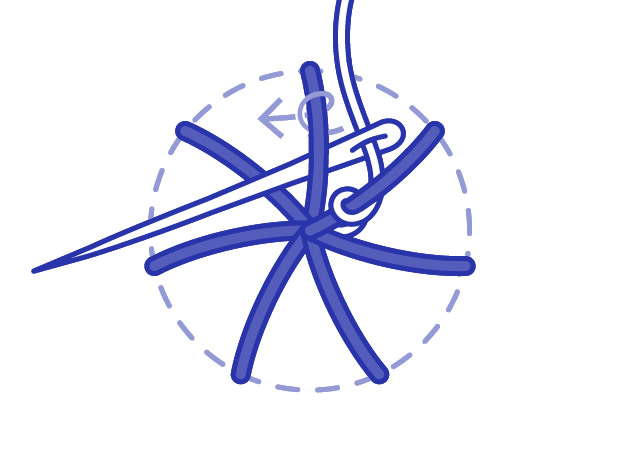
Spider Stitch / Woven Wheel
Spider stitch is worked by weaving thread through a circle of stitches that are like spokes in a wheel. It creates a raised circle which is ideal for flowers and spots. You will create these foundation stitches by taking your needle down in the center of the circle.
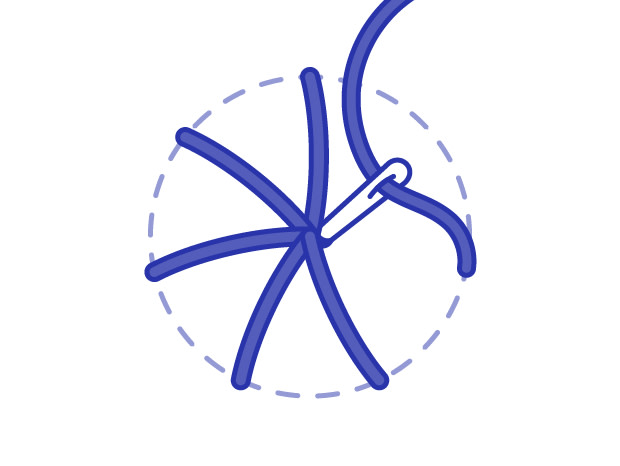
Start by drawing a circle and marking the center with a dot. Then, bring the needle up on the edge of the circle and down through the center dot. Repeat until you have the desired number of spokes evenly spaced around the circle.
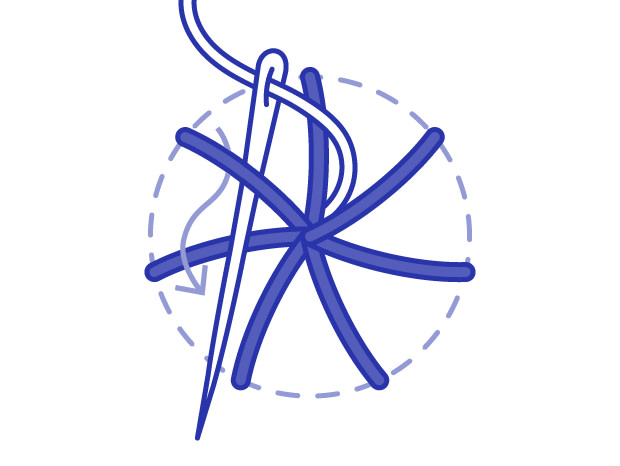
Now bring your needle up between two of the stitches you have worked as close to the center of the stitch as you can. Now weave this thread over and under the spokes around the circle. As you work you may need to gently nudge the thread into place so the rounds of weaving sit neatly.
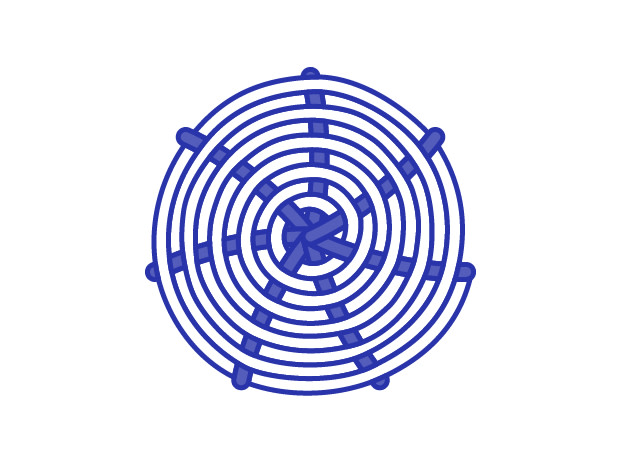
Continue weaving in rounds until you have covered all the spokes. Make each round slightly looser to help them lie flat against the fabric. To finish, push the needle down under the previous round and fasten off your thread at the back of your work.
Start by drawing a circle and marking the center with a dot. Then, bring the needle up on the edge of the circle and down through the center dot. Repeat until you have the desired number of spokes evenly spaced around the circle.
Now bring your needle up between two of the stitches you have worked as close to the center of the stitch as you can. Now weave this thread over and under the spokes around the circle. As you work you may need to gently nudge the thread into place so the rounds of weaving sit neatly.
Continue weaving in rounds until you have covered all the spokes. Make each round slightly looser to help them lie flat against the fabric. To finish, push the needle down under the previous round and fasten off your thread at the back of your work.
Overlocked Spider Stitch / Whipped Wheel
An Overlocked Spider Stitch starts in the same way as a woven spider stitch but instead of weaving under and over the spokes you wrap the thread around them. This creates a raised stitch that highlights the spokes it is formed on. It is ideal for flowers and spots. If you have an odd number of spokes you will create these foundation stitches by taking your needle down in the center of the circle. (As described below) If you create an even number of spokes you can create them by stitching across the circle.
To make an overlocked spider stitch with an odd number of spokes start by drawing a circle and marking the center with a dot. Then, bring the needle up on the edge of the circle and down through the center dot. Repeat until you have the desired number of spokes evenly spaced around the circle.
Now bring your needle up between two of the stitches you have worked as close to the center of the stitch as you can. Take your needle under the first spoke and wrap or "whip" your thread all the way around this spoke on the surface of the fabric. (You may find it easier to use a tapestry needle with a blunt point to help you avoid catching the fabric). As you work you may need to gently nudge the thread into place so the rounds of wrapping sit neatly.
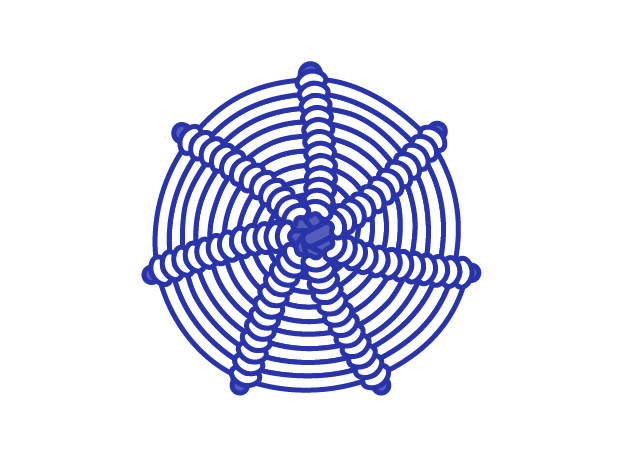
Continue wrapping each spoke in rounds until you have covered all the spokes. To finish, push the needle down under the previous round and fasten off your thread at the back of your work.
To make an overlocked spider stitch with an odd number of spokes start by drawing a circle and marking the center with a dot. Then, bring the needle up on the edge of the circle and down through the center dot. Repeat until you have the desired number of spokes evenly spaced around the circle.
Now bring your needle up between two of the stitches you have worked as close to the center of the stitch as you can. Take your needle under the first spoke and wrap or "whip" your thread all the way around this spoke on the surface of the fabric. (You may find it easier to use a tapestry needle with a blunt point to help you avoid catching the fabric). As you work you may need to gently nudge the thread into place so the rounds of wrapping sit neatly.
Continue wrapping each spoke in rounds until you have covered all the spokes. To finish, push the needle down under the previous round and fasten off your thread at the back of your work.
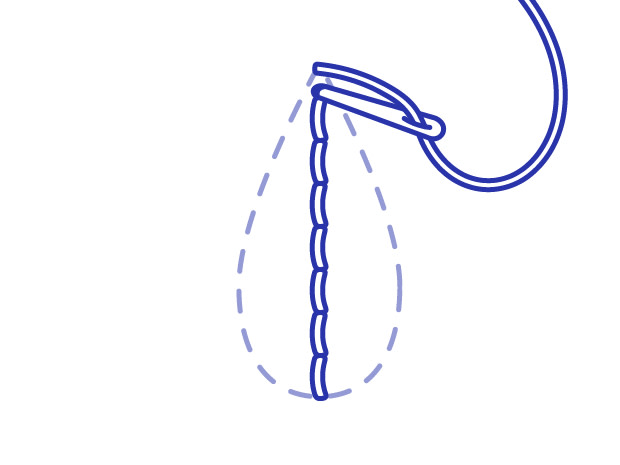
Split Stitch
Split stitch is used for outlines and padding some stitches (e.g. satin stitch and long and short stitch). It is a form of back stitch and looks a little like a mini chain stitch.
Bring the needle up where you want your line of split stitches to begin. Set your desired stitch length by making a straight stitch. Make sure all your other stitches match this length.
Bring your needle back up in the middle of your first stitch. Your needle should split the thread.
Take the needle back down through the fabric, creating a new stitch of the same length then bring your needle back up in the center of this stitch. Keep splitting the previous stitch as you bring your needle up until your line of split stitches is complete.
Star Stitch (Algerian Eye)
Sometimes known as Algerian eye stitch or star eyelet stitch, this decorative stitch consists of several straight stitches radiating from a small central hole. Vary the length and number of stitches for different effects.

Starting at the top, bring the needle up at 1 and down to the center at 2.
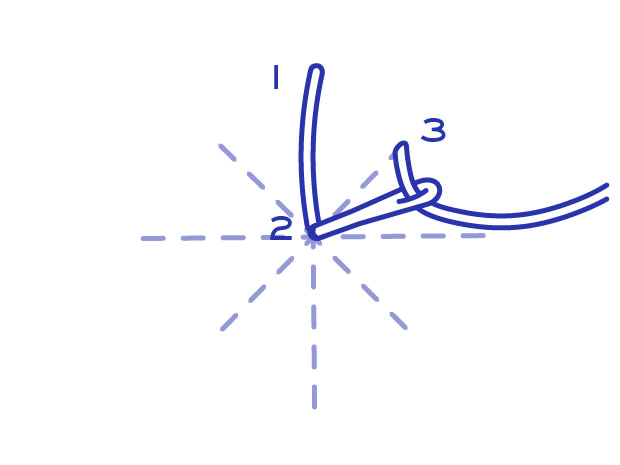
Bring the needle up at 3 and down to center at 2.
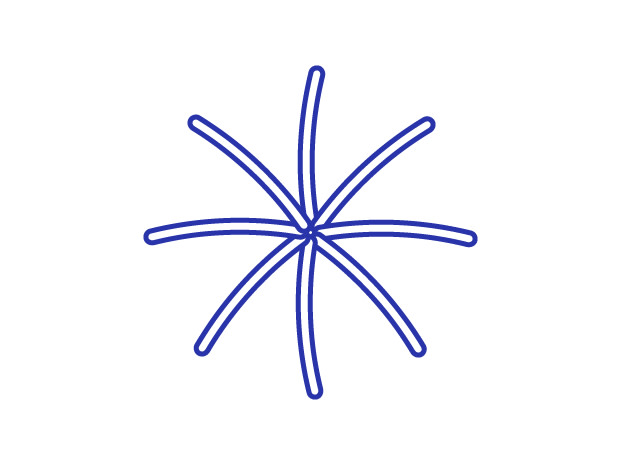
Continue stitching in a clockwise direction until you have 8 evenly placed stitches to create a star.
Starting at the top, bring the needle up at 1 and down to the center at 2.
Bring the needle up at 3 and down to center at 2.
Continue stitching in a clockwise direction until you have 8 evenly placed stitches to create a star.
Star Stitch (Double Cross Stitch)
This Star Stitch or Double Cross Stitch, as it is also known, is made up of a diagonal cross stitch with an upright cross stitch worked over the top.
First work a diagonal cross stitch by bringing the needle up at 1, down at 2, up at three and down at 4.

Then make a vertical stitch from bottom center to the top center.
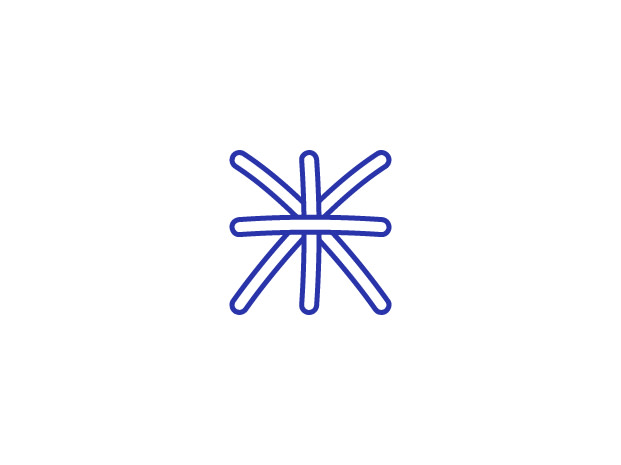
Complete the star by making a horizontal stitch across all the stitches from left centre to right center.
First work a diagonal cross stitch by bringing the needle up at 1, down at 2, up at three and down at 4.
Then make a vertical stitch from bottom center to the top center.
Complete the star by making a horizontal stitch across all the stitches from left centre to right center.
Stem & Double Stem Stitch
A very popular stitch for lettering and outlines, stem stitch consists of straight stitches which are staggered beside one another. To create double stem stitch, work two lines of stem stitch next to each other.
Set your stitch length by making a single straight stitch where you want your stem stitch to begin. Leave this stitch a little loose.
Hold this loose stitch out of the way to the right and bring your needle up half way along its length and tighten the stitch against it.
Make your next stitch in the same way, always holding the loose stitch to the same side, tightening it against the needle before making the next stitch.
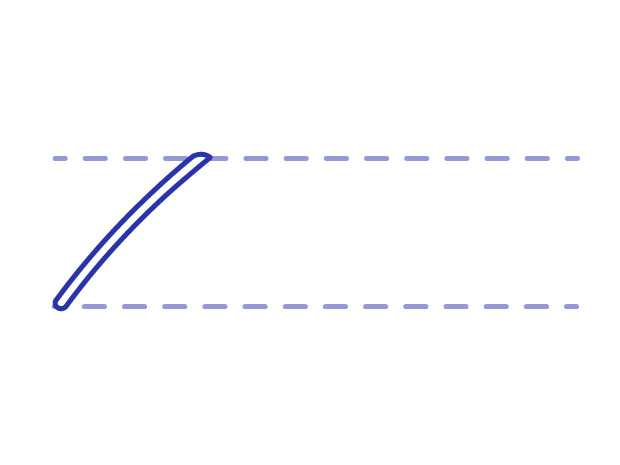
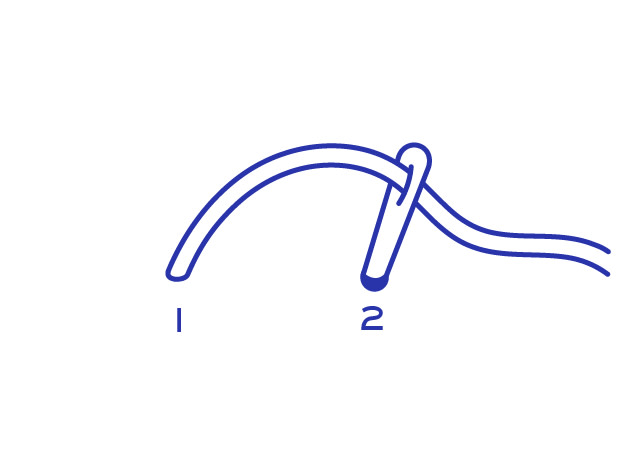
Straight Stitch
A straight stitch is just that. They can be worked in any thread or even ribbon and are a component part of many other stitches. Choose the length, direction and spacing to suit the aesthetic and purpose for your project.
Bring your needle up onto the surface of the fabric and go back down a short distance away.

To help place straight stitches accurately you can hold the thread on the surface of your work where you want it to sit and stitch through your thread or ribbon.
Bring your needle up onto the surface of the fabric and go back down a short distance away.
To help place straight stitches accurately you can hold the thread on the surface of your work where you want it to sit and stitch through your thread or ribbon.
Upright Cross Stitch
Use this upright cross stitch to add decoration or as a border.
Working left to right, create a horizontal stitch by bringing your needle up at 1 and down at 2.
Create a vertical stitch by bringing your needle up at 3 and down at 4.
Continue the next stitch coming up at 5 down at 6 etc. Continue in this pattern until you have created all the upright cross stitches you wish.
Whip Stitch
Used for seaming fabrics, either right or wrong sides together. The stitches should be about 2mm-2.5mm apart, and only as deep as necessary to create a firm seam.
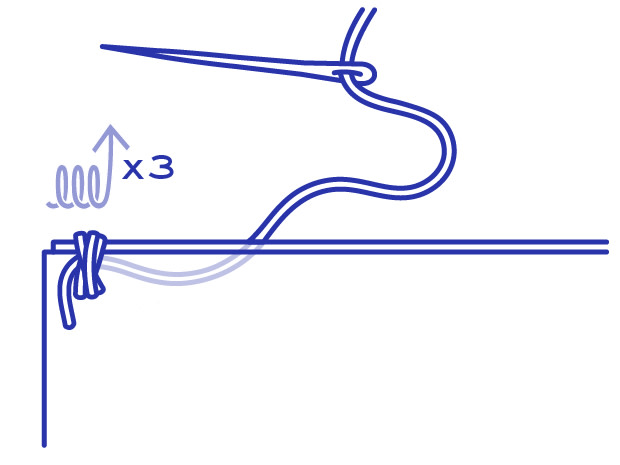
Secure your thread by working a few stitches on top of each other that trap the tail of the thread.
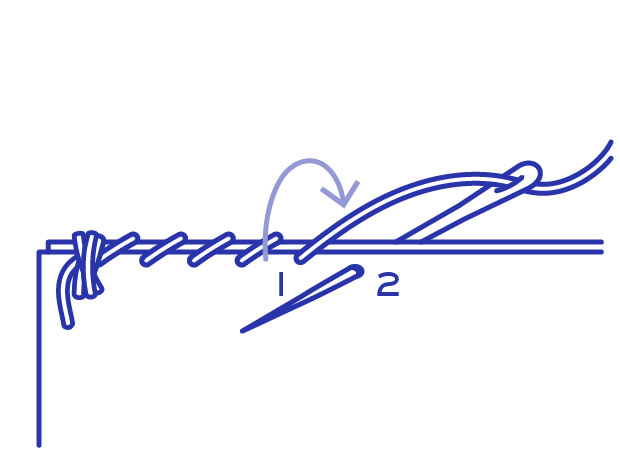
Bring needle up at 1, pull the thread over the edges of the fabric and up again at 2 making sure to pierce both pieces of fabric and bind them together.
Secure your thread by working a few stitches on top of each other that trap the tail of the thread.
Bring needle up at 1, pull the thread over the edges of the fabric and up again at 2 making sure to pierce both pieces of fabric and bind them together.