Learn how to crochet with DMC. This guide provides step by step diagrams for popular crochet stitches. It's designed to be a companion to our video tutorials which can be viewed here. Use the links below to jump to specific stitches or scroll through them all for inspiration.
Use these links to jump to the steps and diagrams for key stitches.
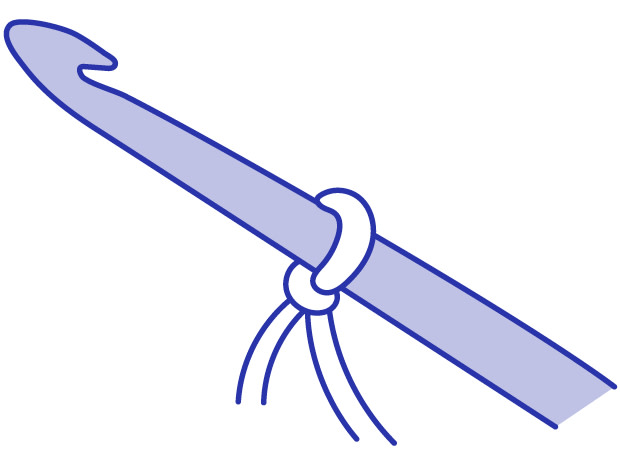
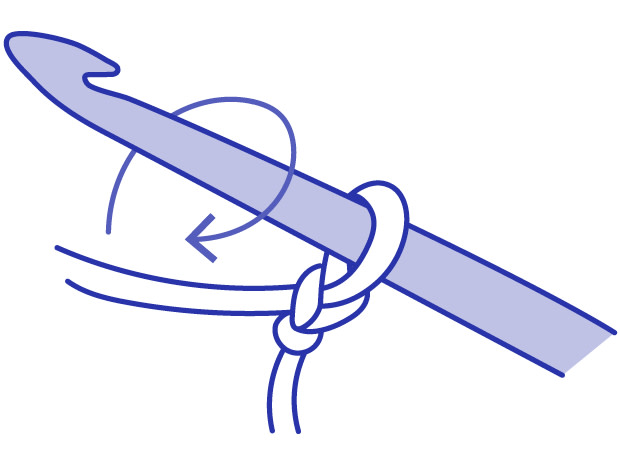
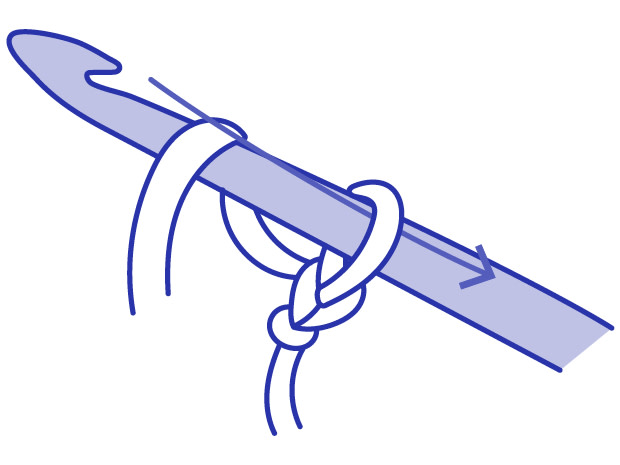
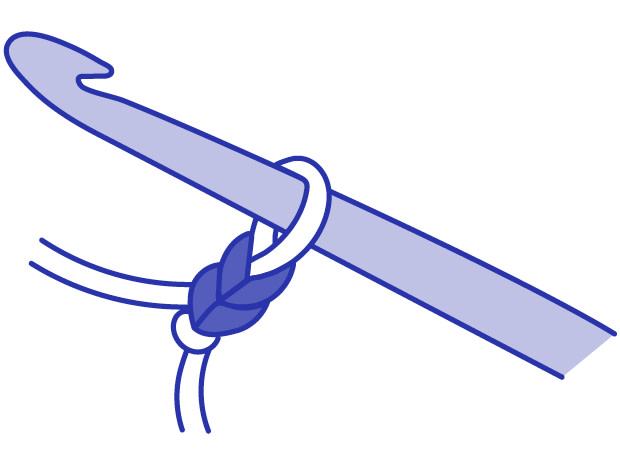
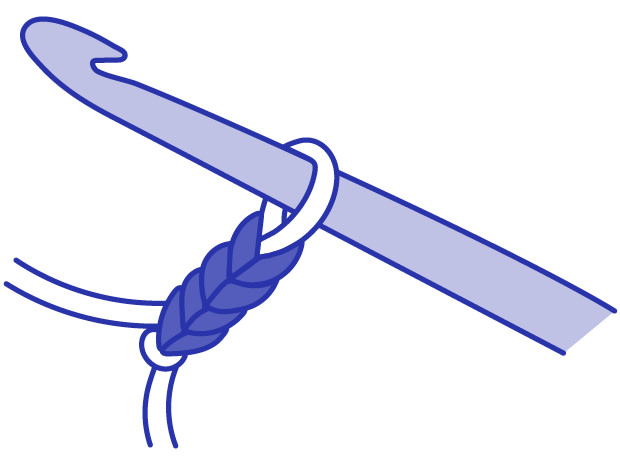
Slip Knot
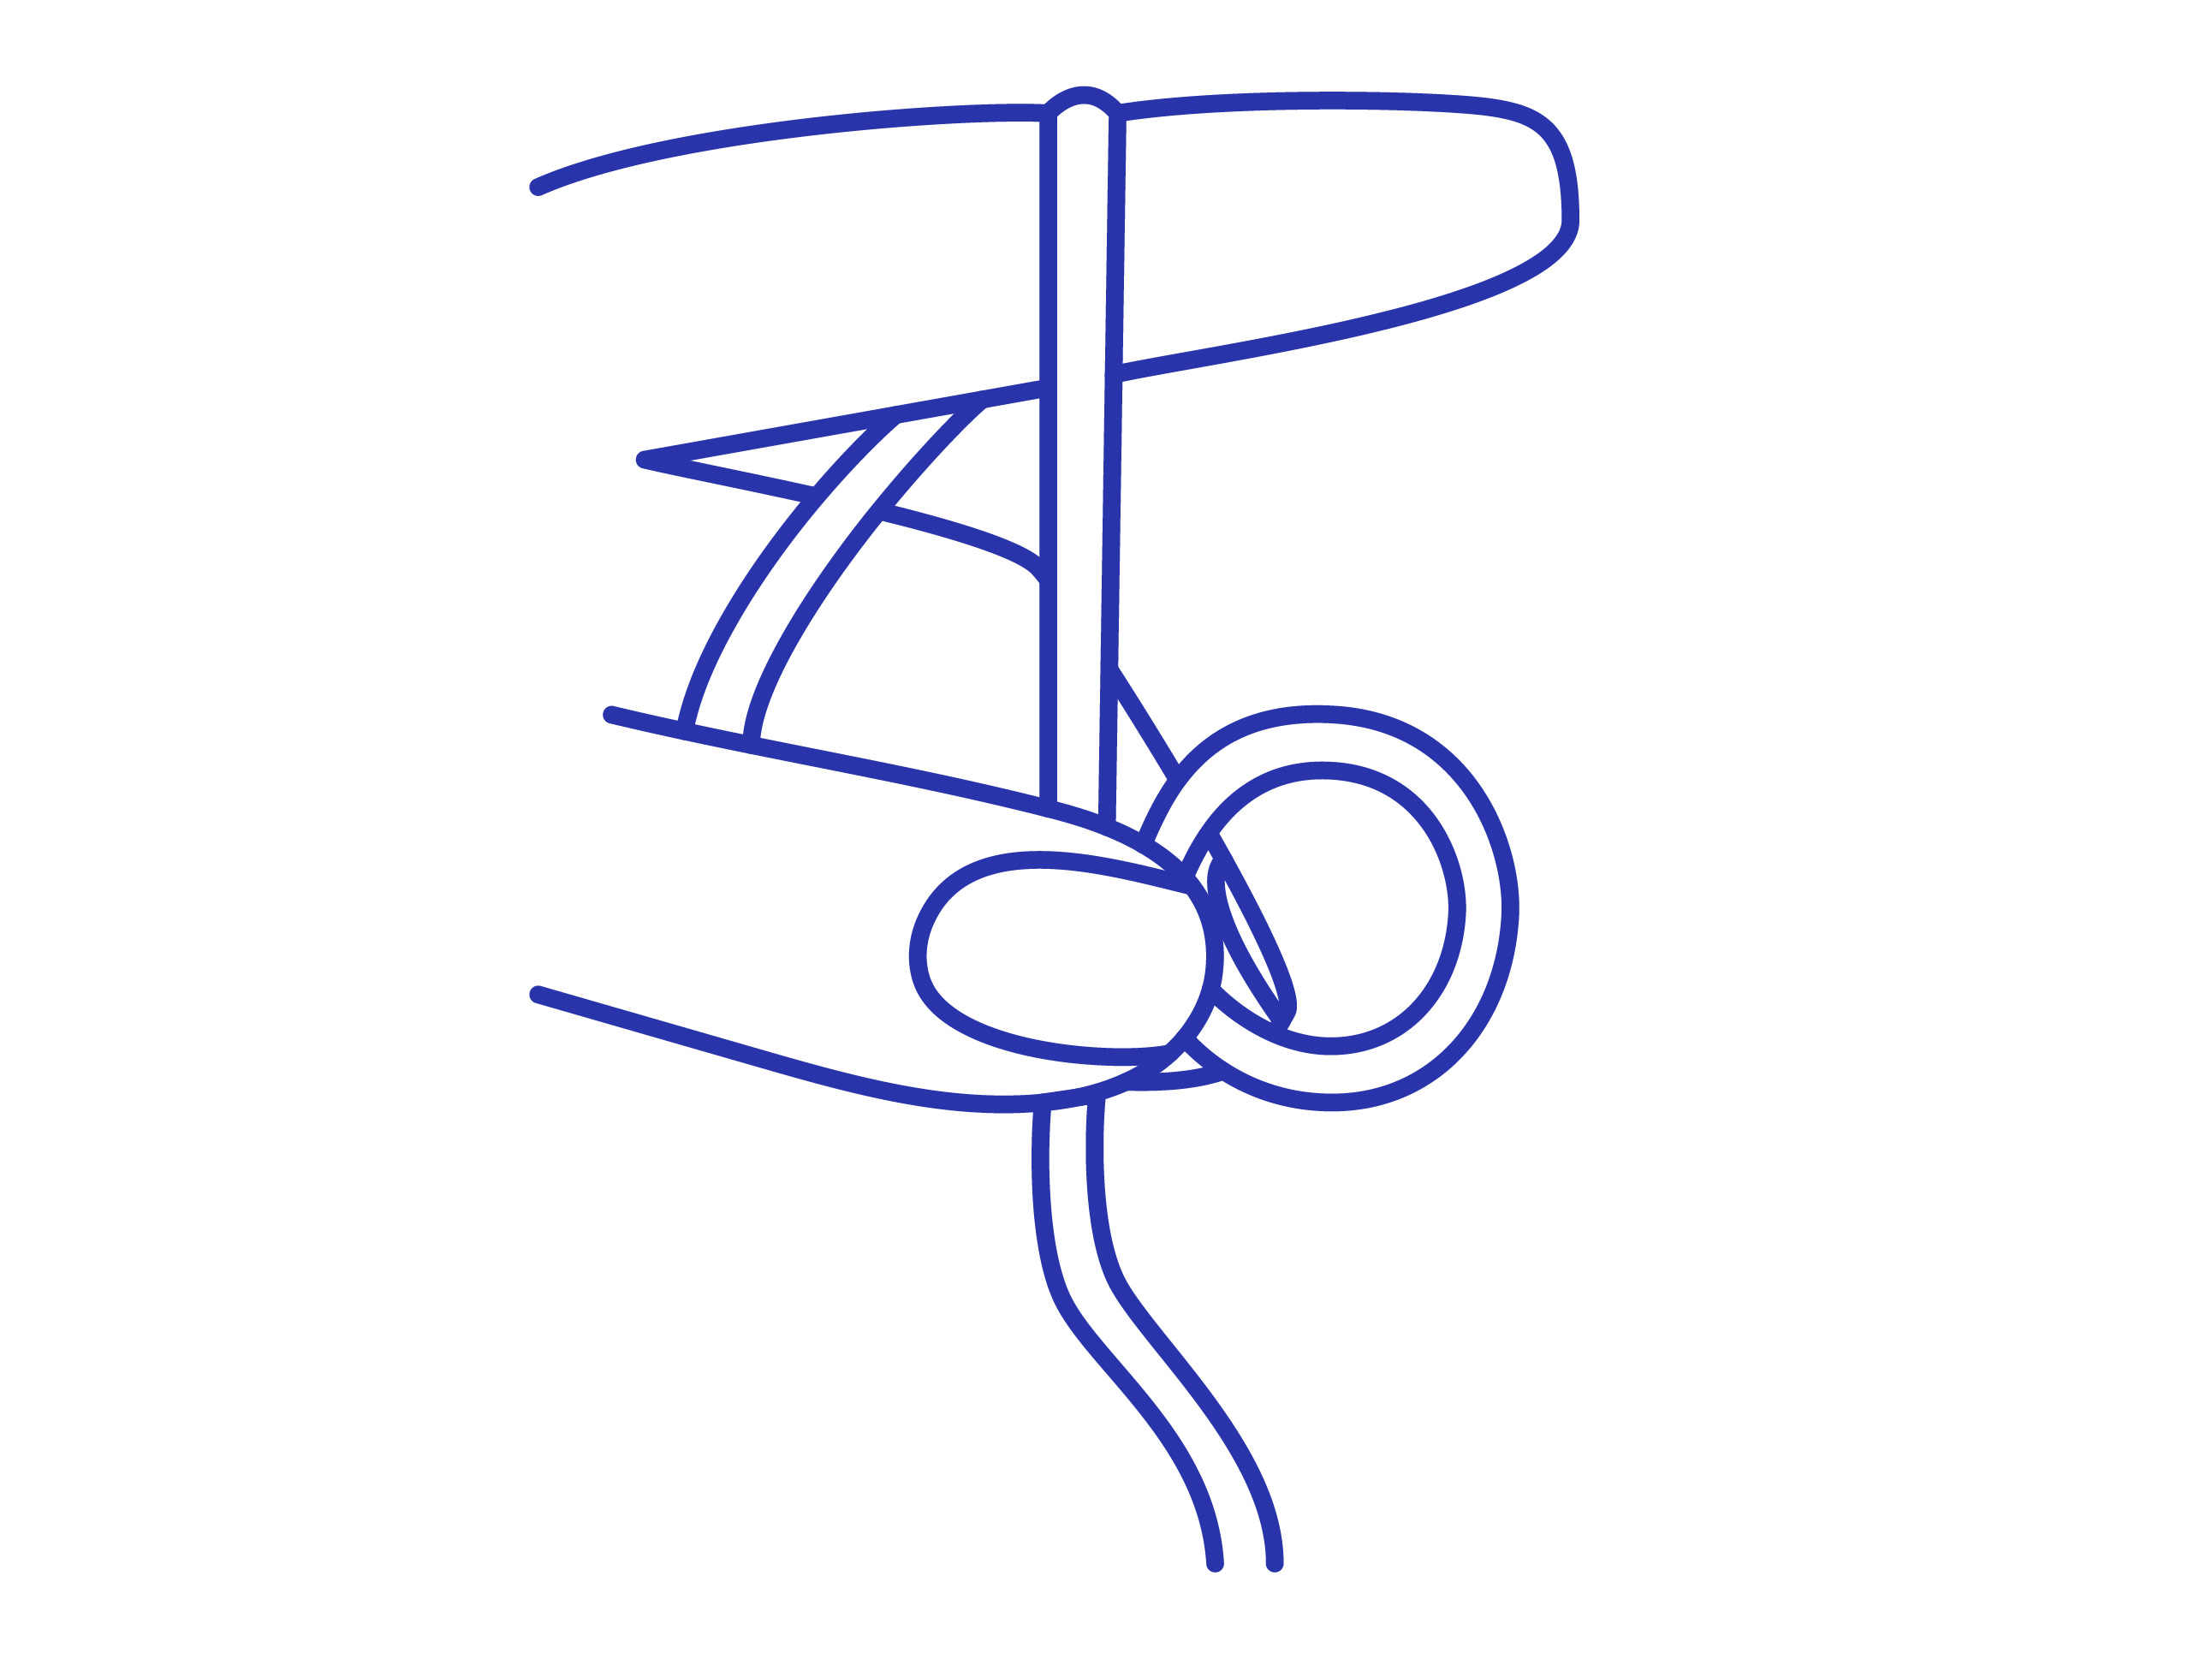
Before you begin to crochet you need to create a slip knot and place it onto your hook.
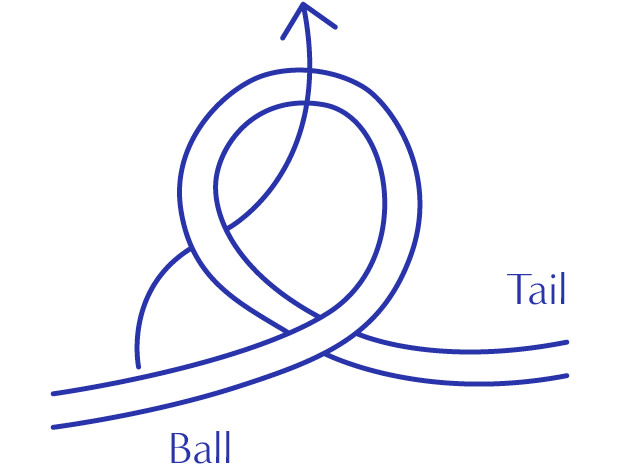
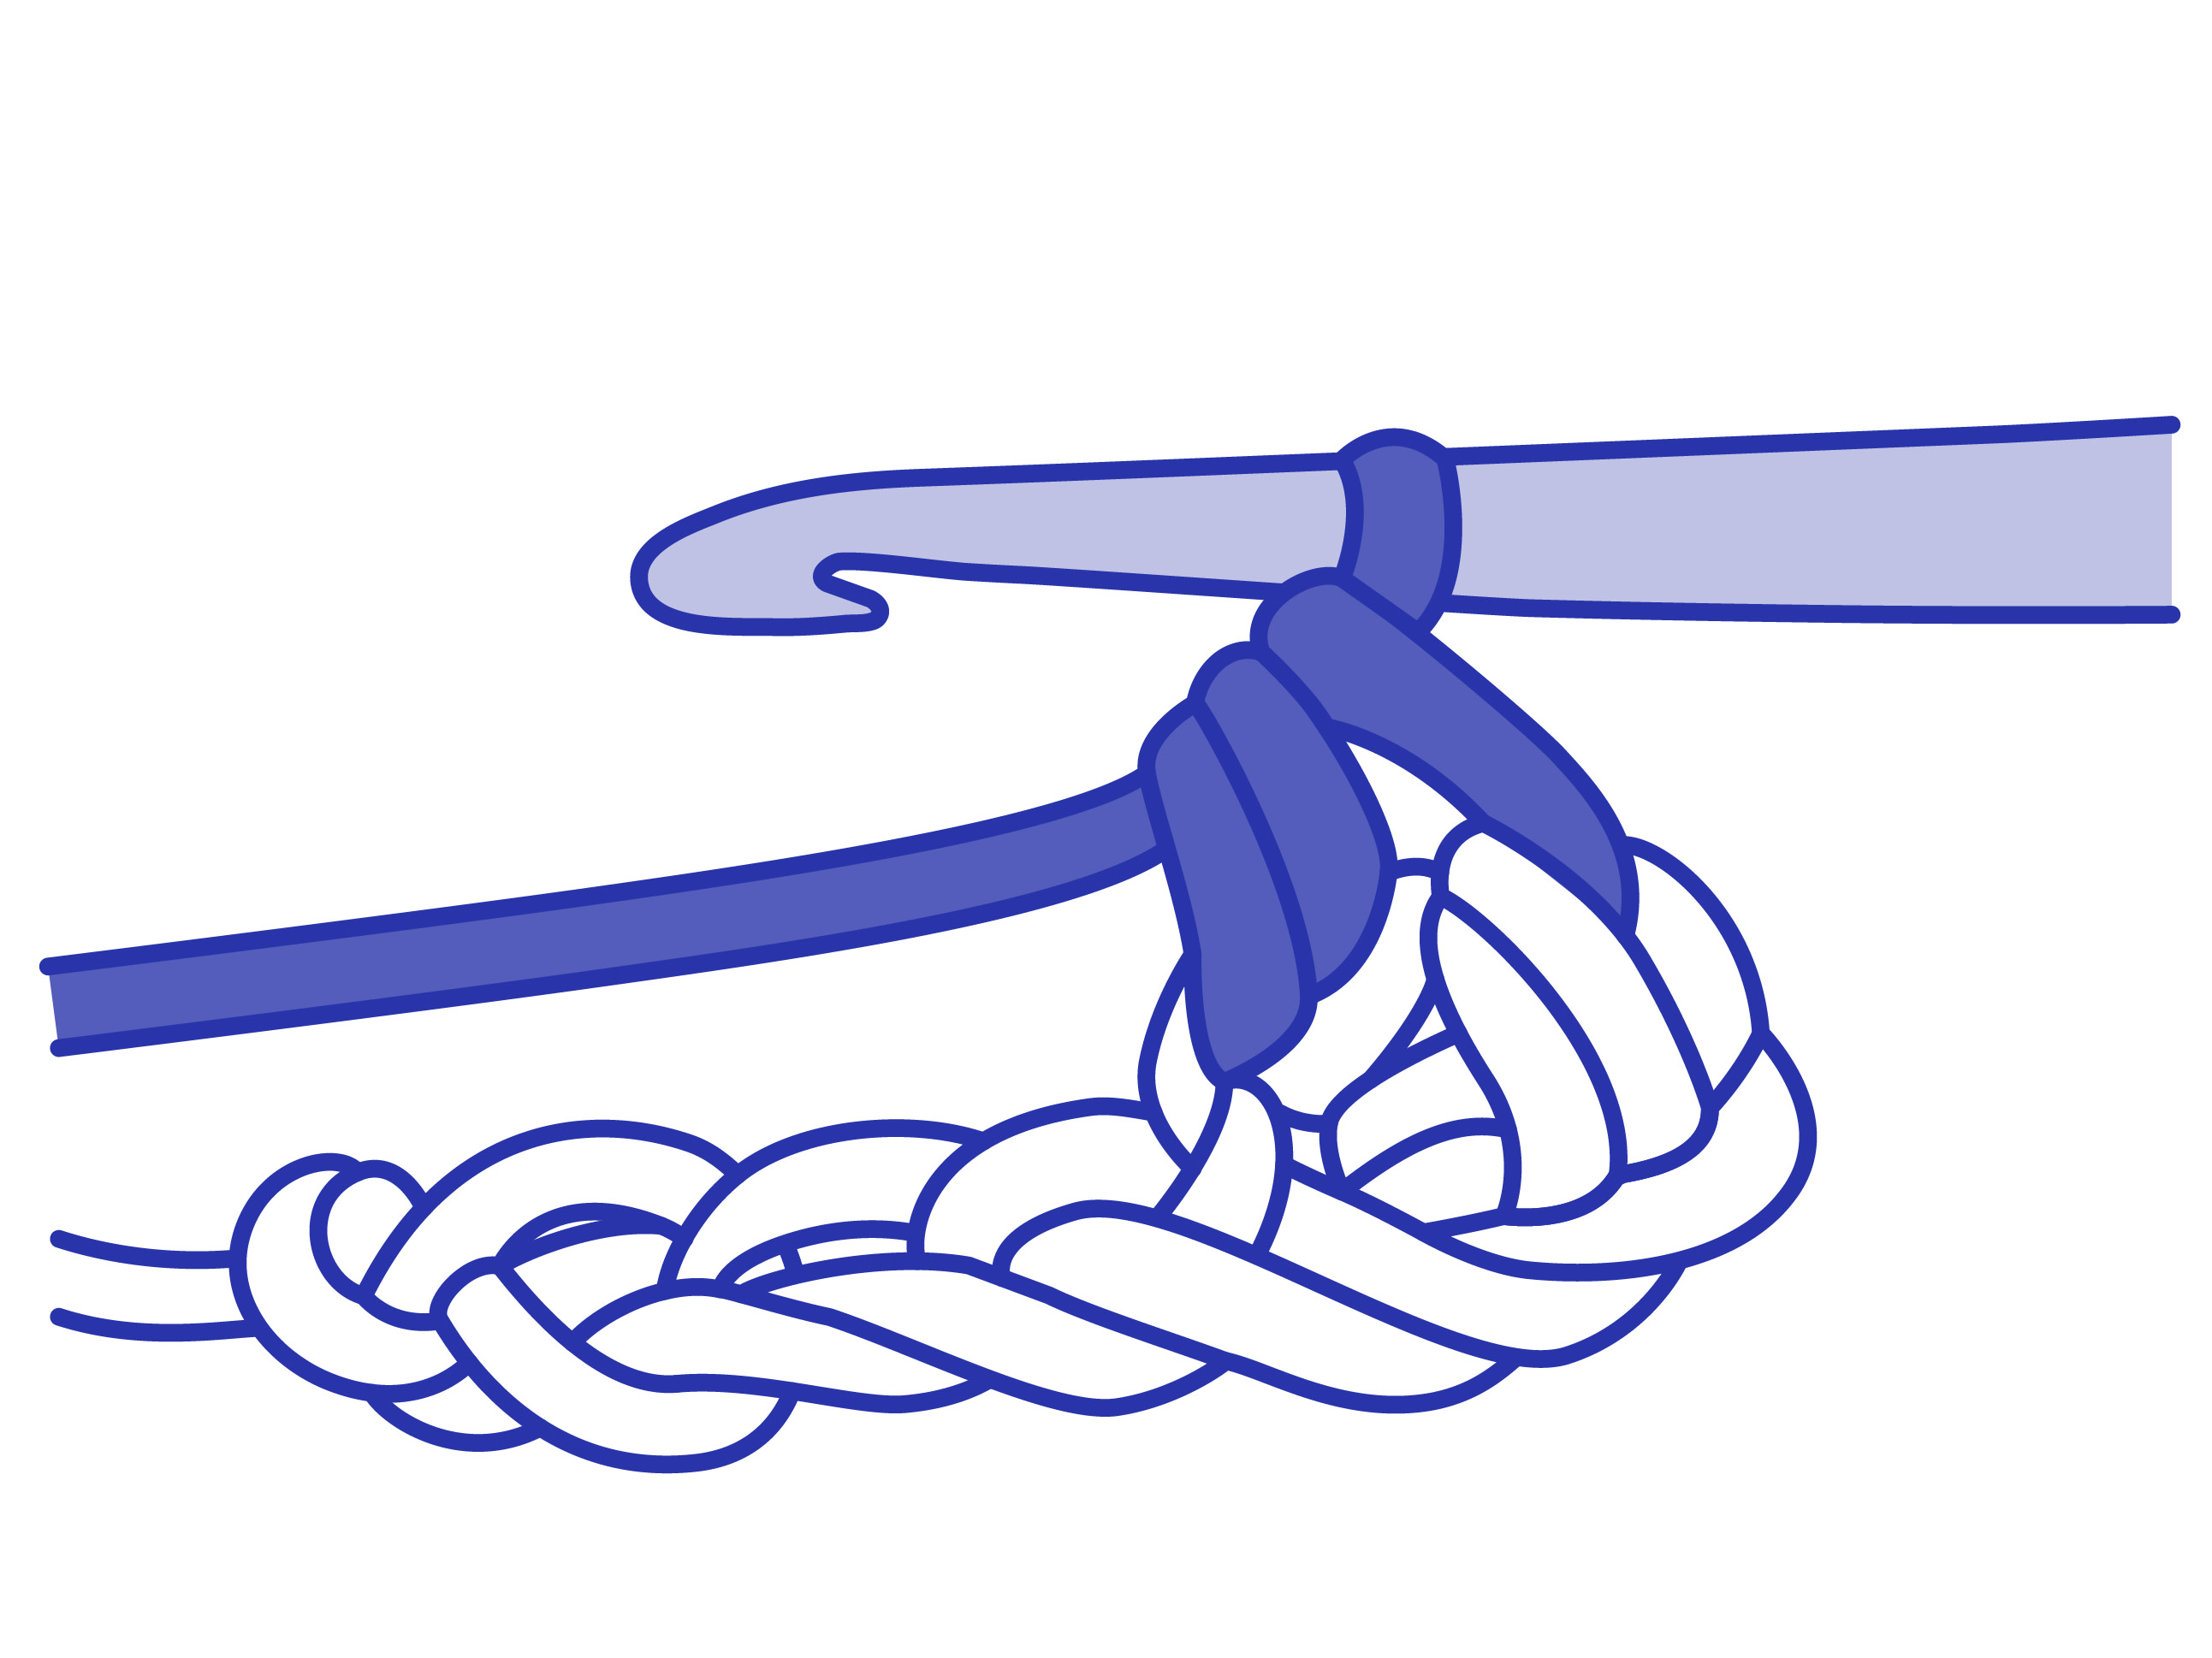
Make a loop at the end of the yarn. Cross the tail end behind the ball end.
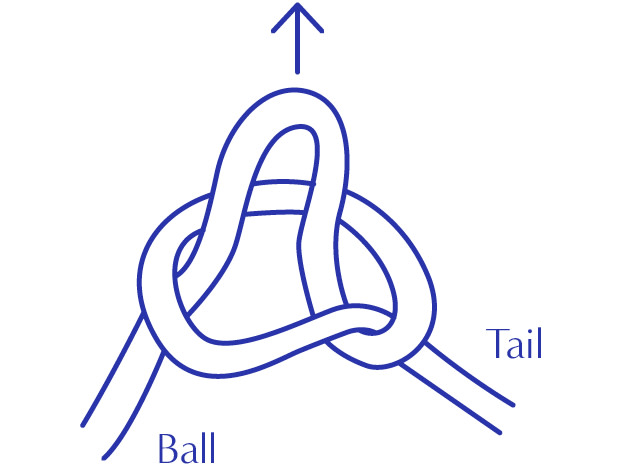
Pull the ball end up through the loop.
Place the loop on to your hook.
Pull the tail end of the yarn to tighten the loop.
Make a loop at the end of the yarn. Cross the tail end behind the ball end.
Pull the ball end up through the loop.
Place the loop on to your hook.
Pull the tail end of the yarn to tighten the loop.
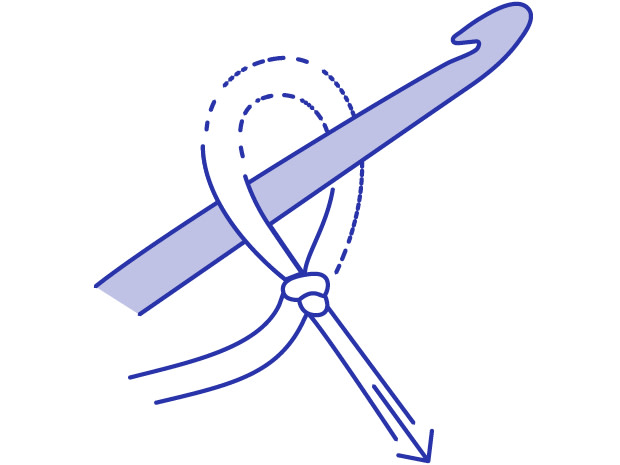
Chain Stitch
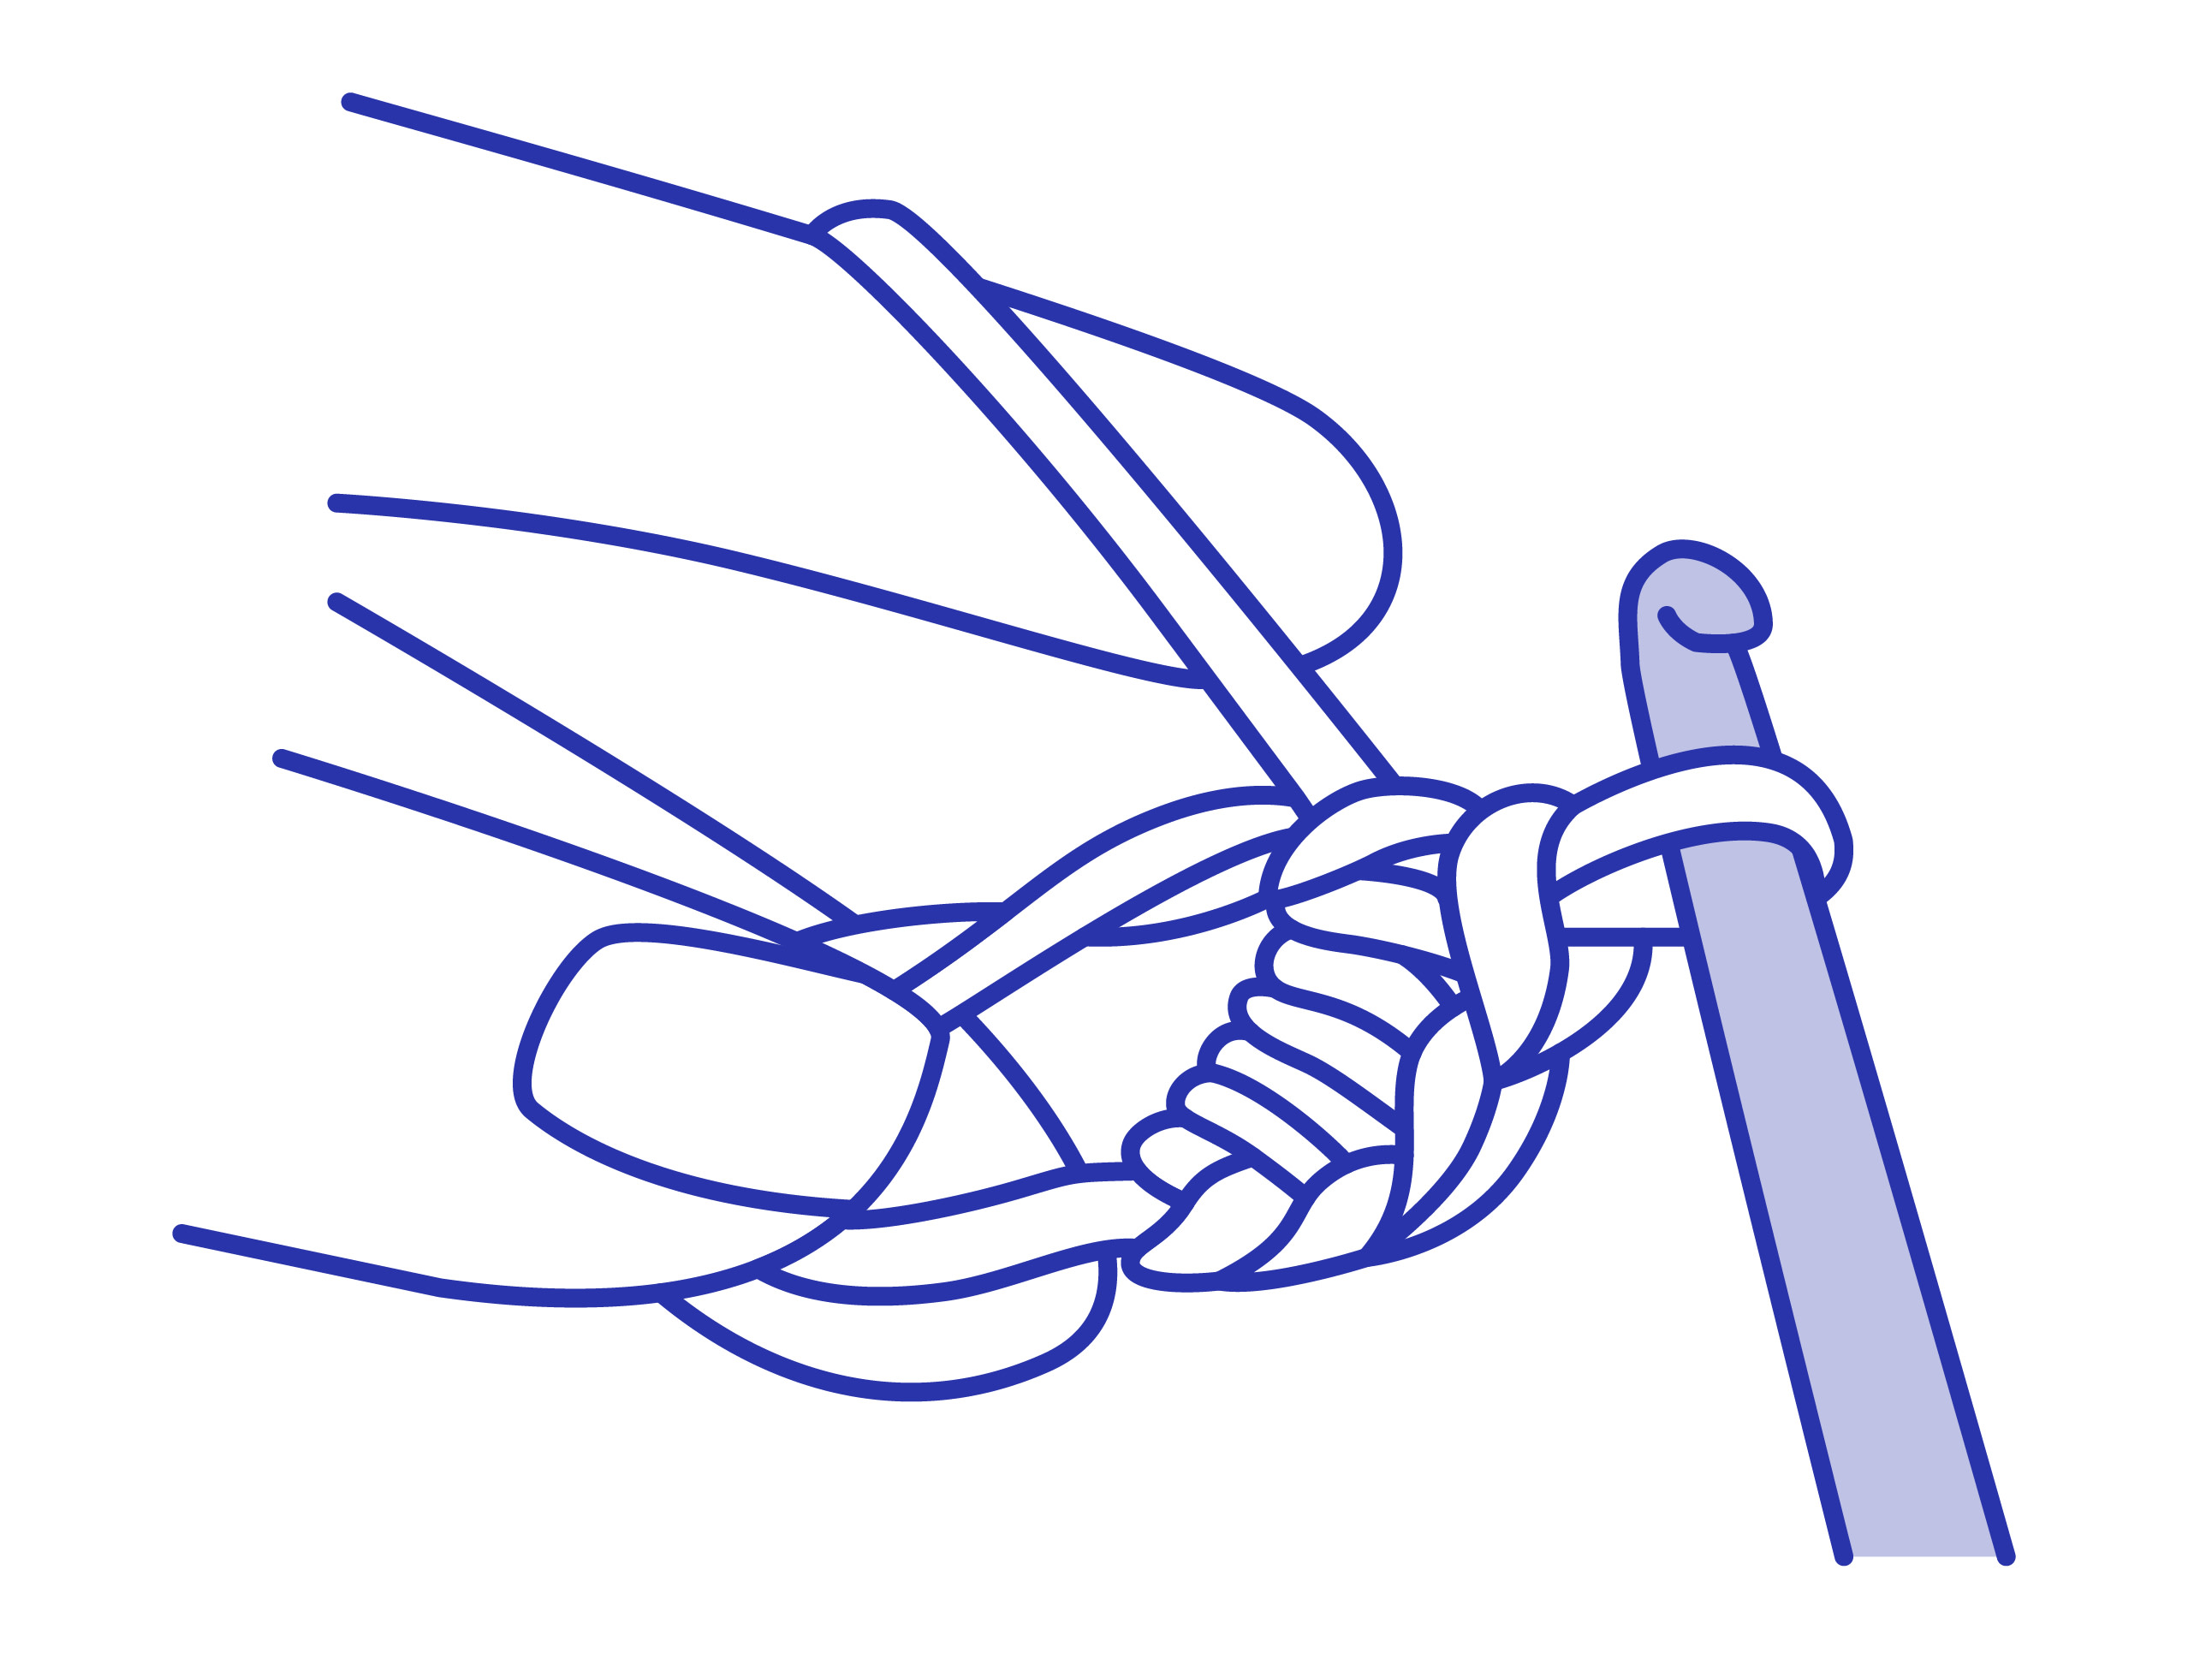
Hold the hook with the slip knot in your right hand and the yarn attached to the ball on your left.
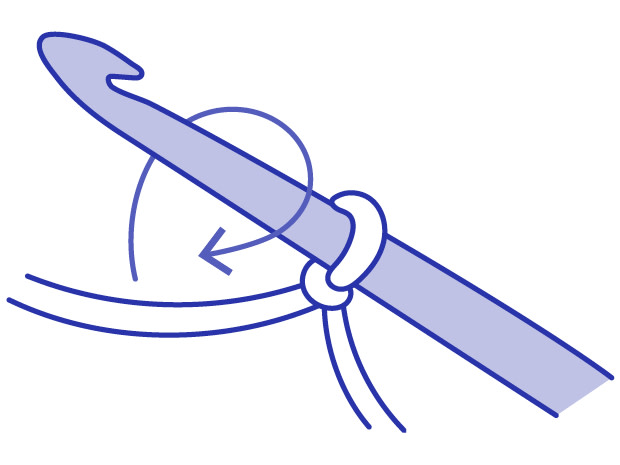
Wrap the yarn over the hook in a clockwise direction.
With the yarn now wrapped around the hook, slowly pull the hook out of the slip knot, catching the wrapped yarn in the groove as you go.
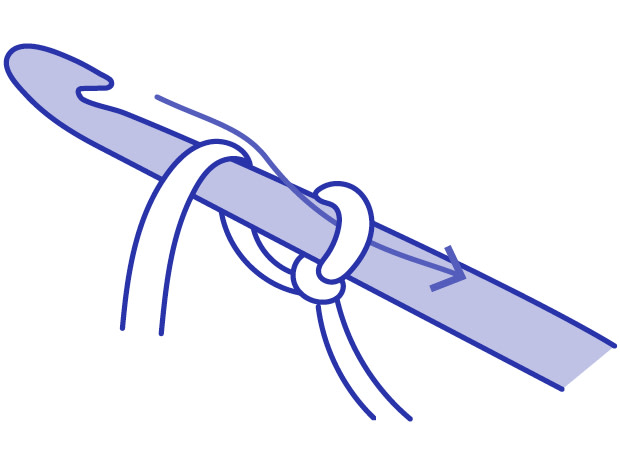
Pull the wrapped yarn through the slip knot and then slide it onto the shaft of your hook. You have made one chain stitch.
Hold the hook with the slip knot in your right hand and the yarn attached to the ball on your left.
Wrap the yarn over the hook in a clockwise direction.
With the yarn now wrapped around the hook, slowly pull the hook out of the slip knot, catching the wrapped yarn in the groove as you go.
Pull the wrapped yarn through the slip knot and then slide it onto the shaft of your hook. You have made one chain stitch.
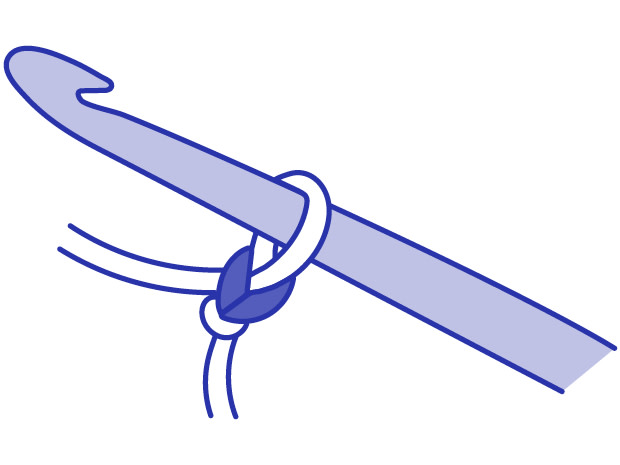
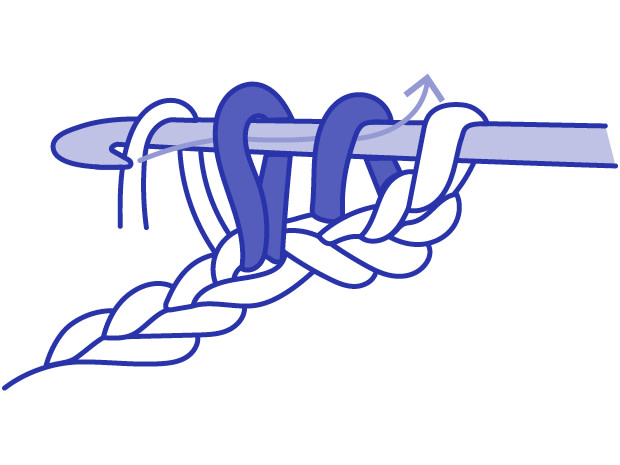
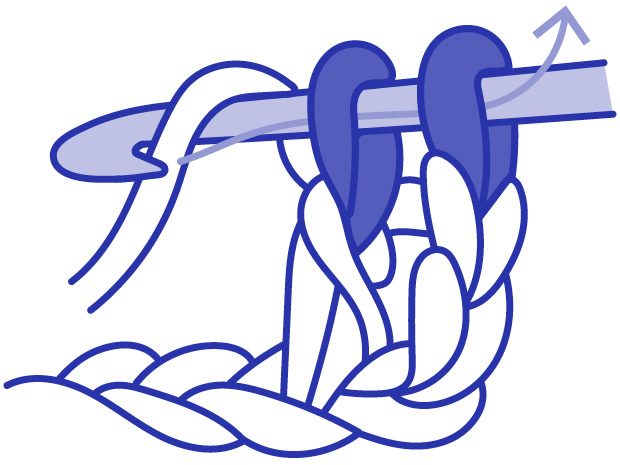
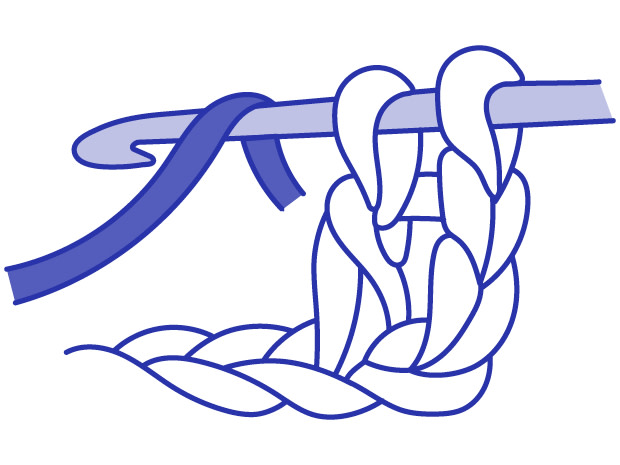
Wrap the yarn as you did before.
Pull the hook out of the stitch, catching the wrapped yarn in the process.
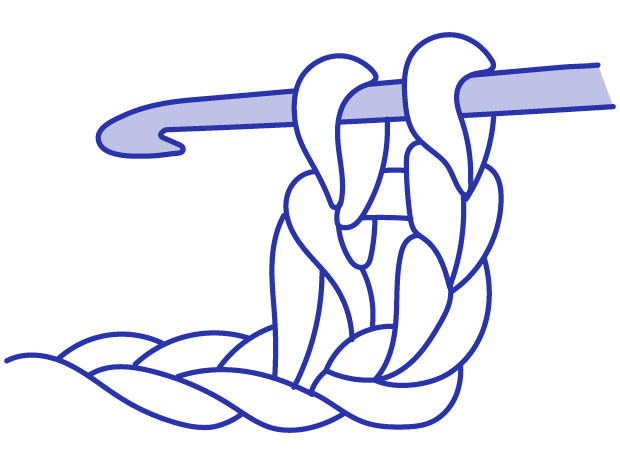
You now have 2 chain stitches.
Continue in this way until you have the correct number of stitches. The stitch on your hook does not count as a chain stitch.
Wrap the yarn as you did before.
Pull the hook out of the stitch, catching the wrapped yarn in the process.
You now have 2 chain stitches.
Continue in this way until you have the correct number of stitches. The stitch on your hook does not count as a chain stitch.
Slip Stitch
Insert your crochet hook into the next stitch. Starting with the hook in front of the yarn, move the hook under and then over the yarn, so the yarn ends up looped around the shaft of the hook. Scoop up the yarn with the groove of your hook and pull it through both the stitch and the loop on your hook. You now have a single loop on your hook. You have worked one slip stitch.
Insert your crochet hook into the next stitch. Starting with the hook in front of the yarn, move the hook under and then over the yarn, so the yarn ends up looped around the shaft of the hook. Scoop up the yarn with the groove of your hook and pull it through both the stitch and the loop on your hook. You now have a single loop on your hook. You have worked one slip stitch.
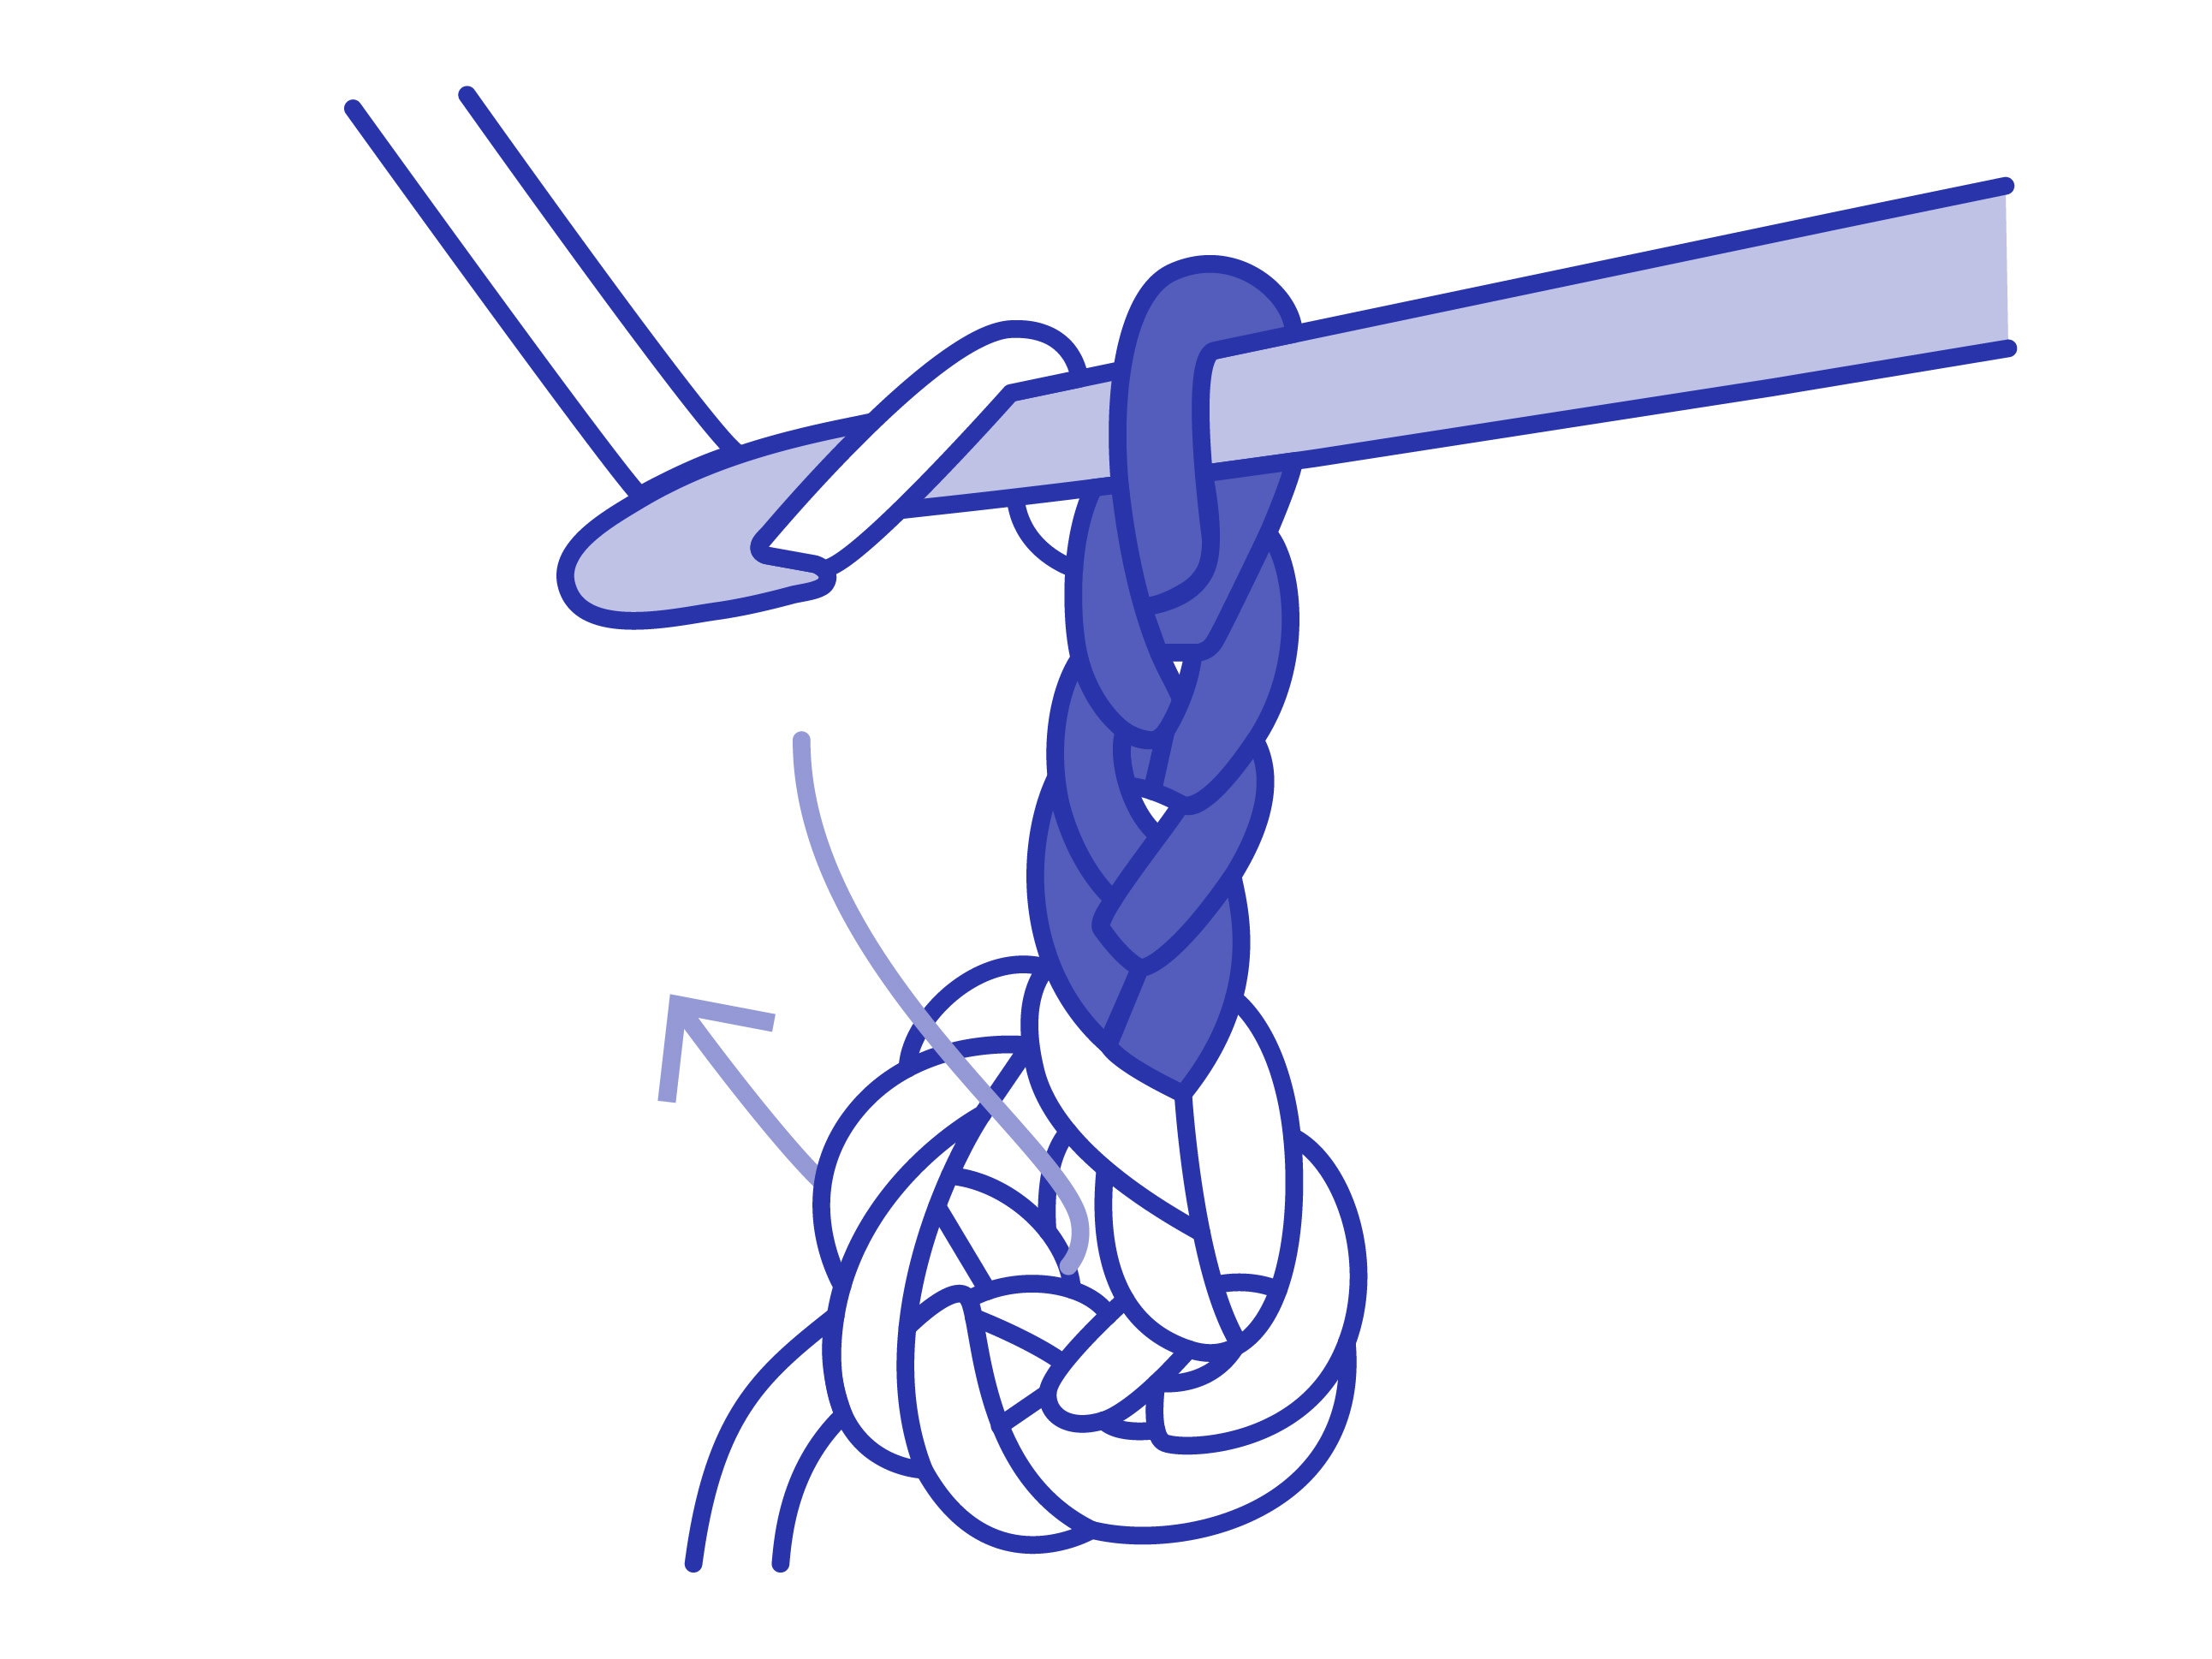
Joining With a Slip Stitch to Make a Ring
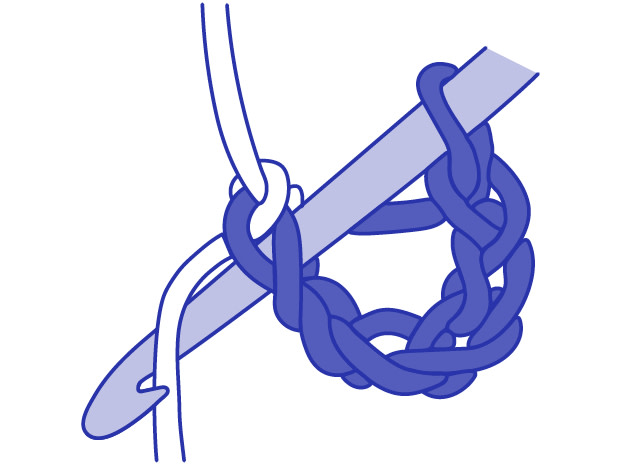
Make a chain of the number of stitches as required by the pattern. Join the chains into a ring with a slip stitch by inserting the hook into the first chain stitch worked and catch the yarn with the hook.
Draw the yarn through the stitch and loop on hook, to make a ring.
Make a chain of the number of stitches as required by the pattern. Join the chains into a ring with a slip stitch by inserting the hook into the first chain stitch worked and catch the yarn with the hook.
Draw the yarn through the stitch and loop on hook, to make a ring.
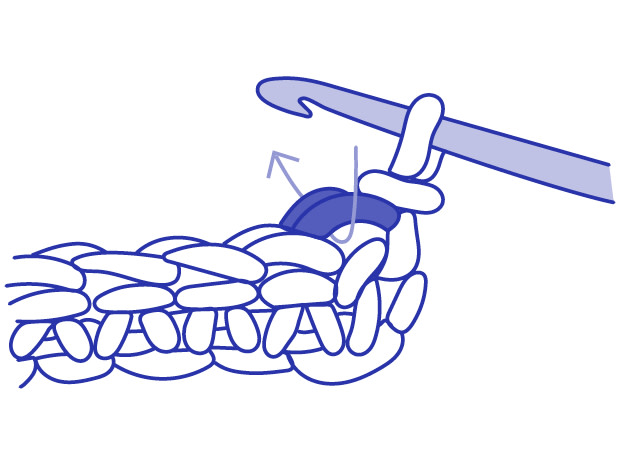
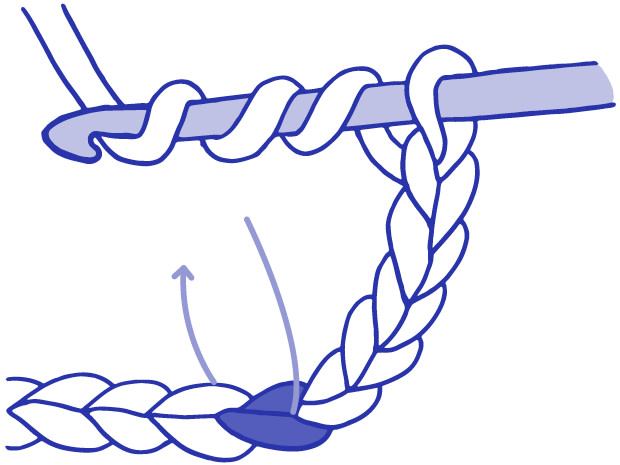
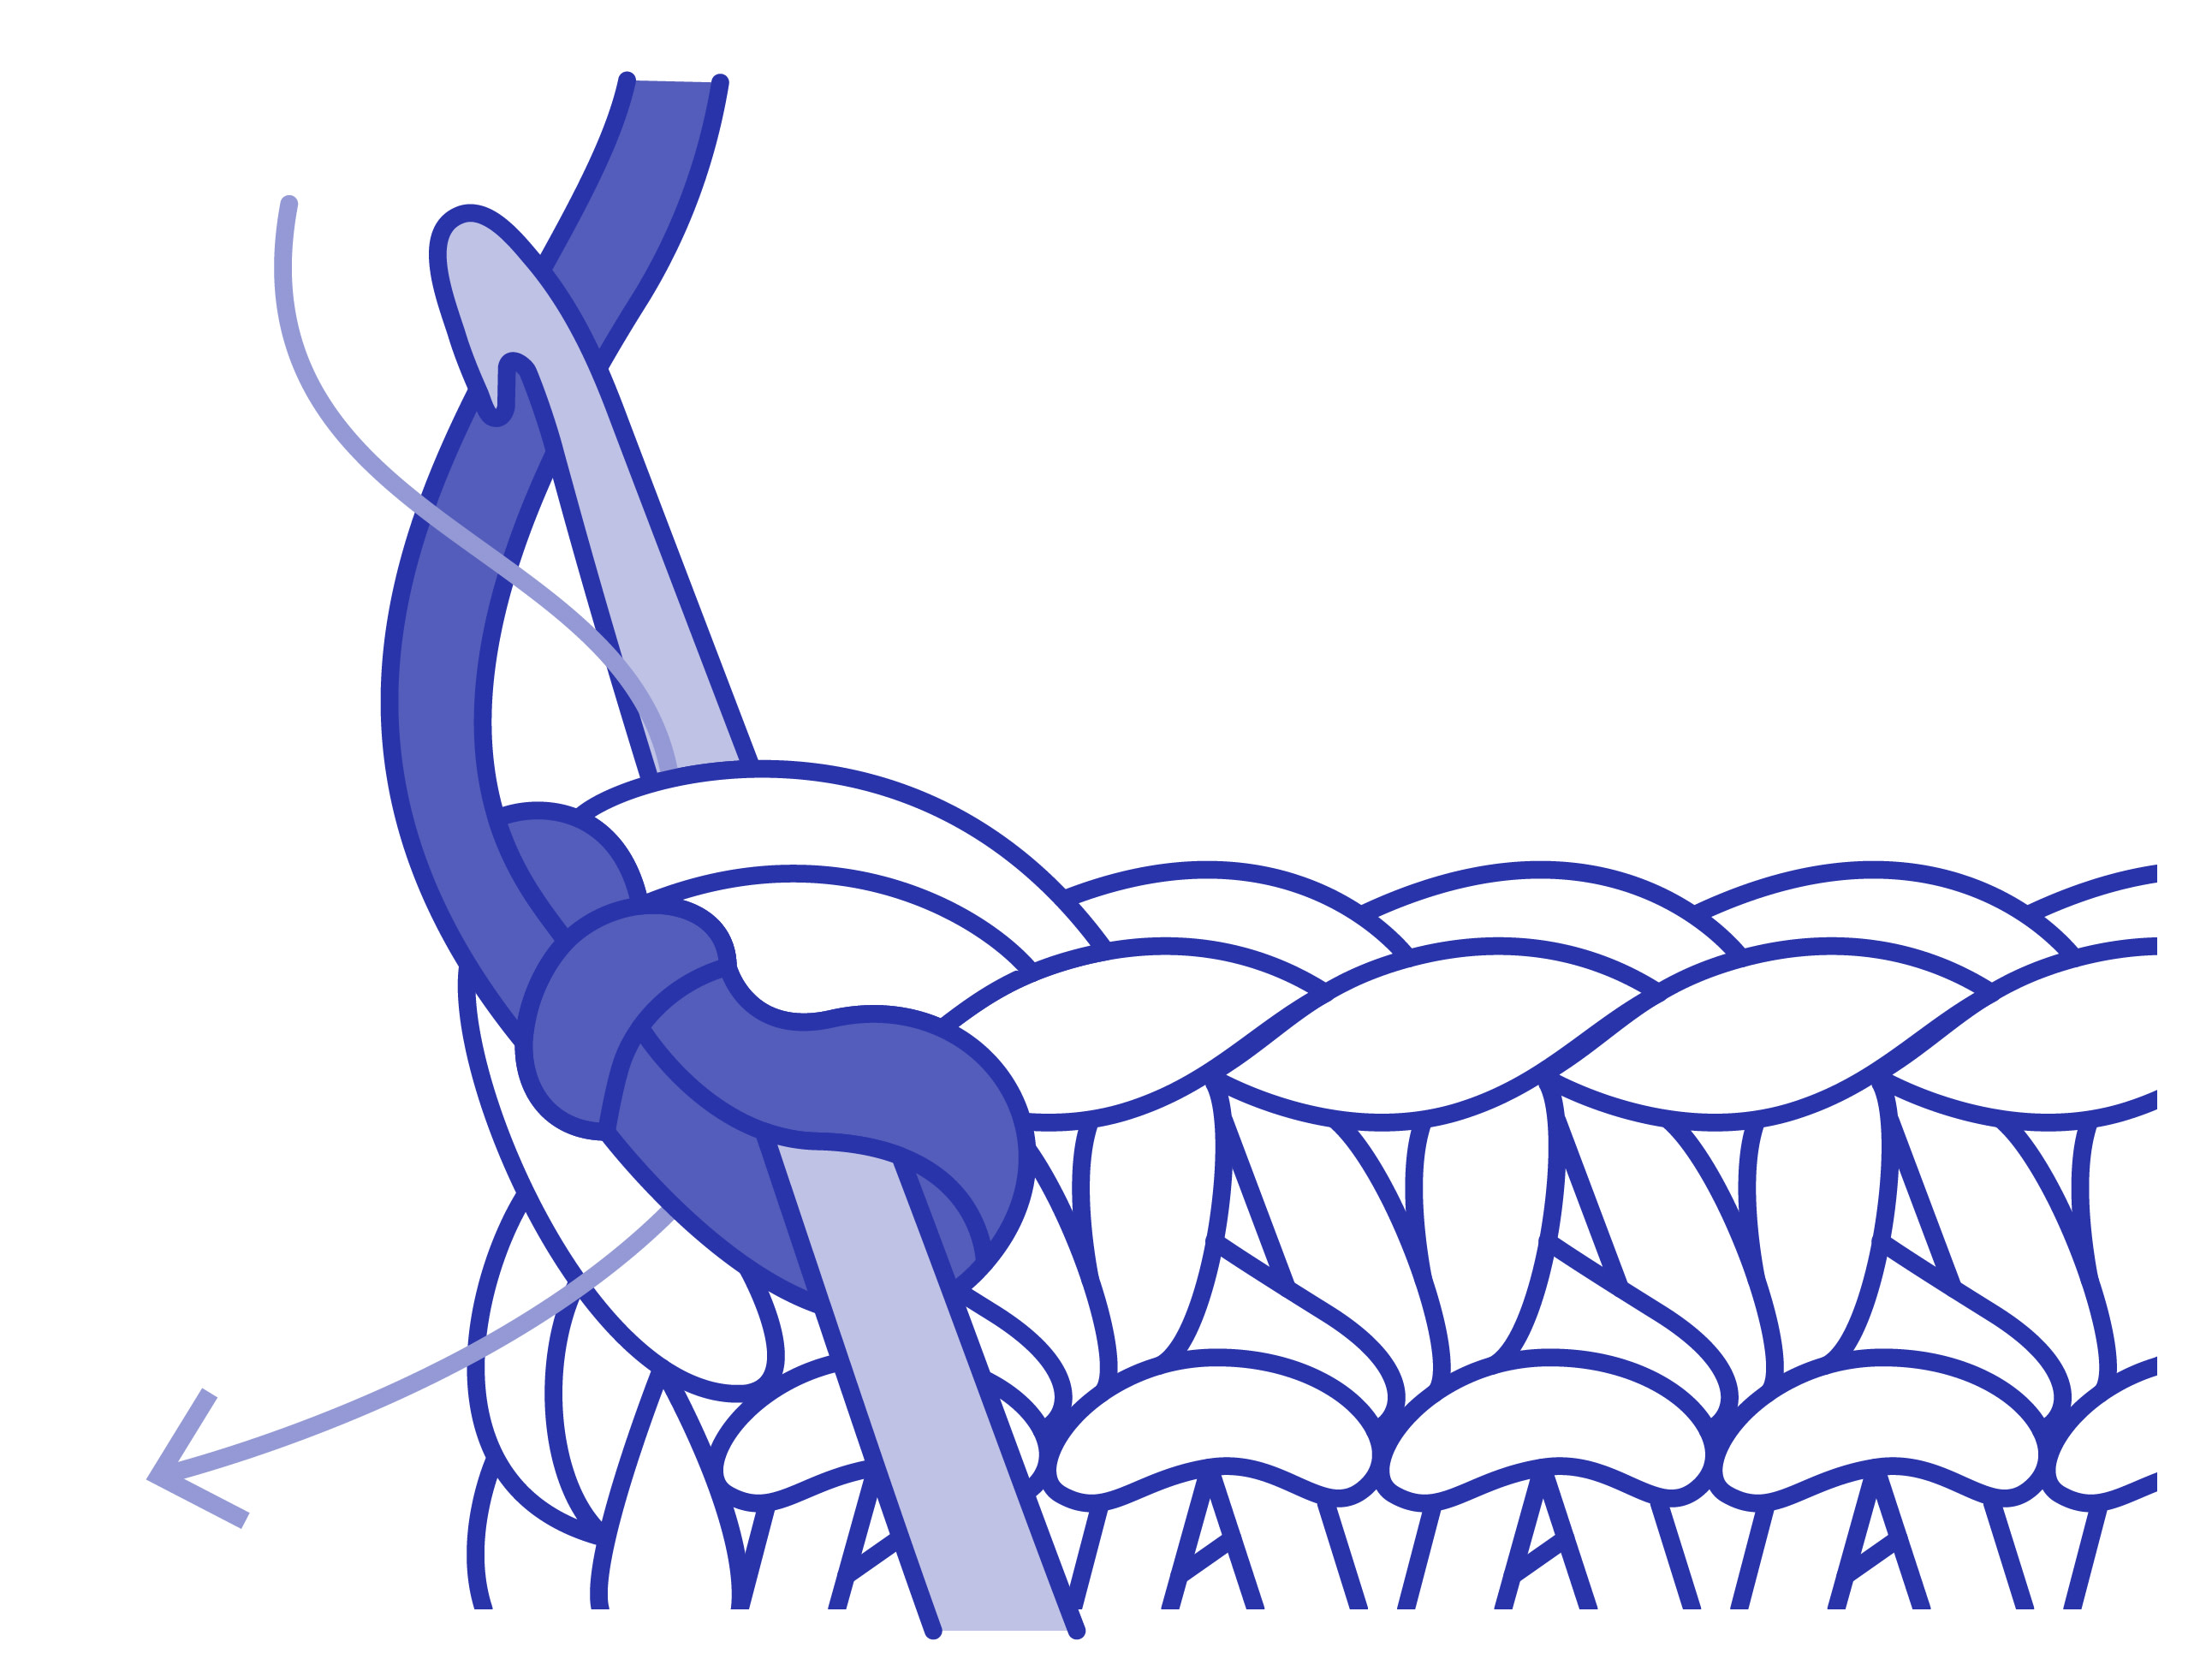
Double Crochet (US Term: Single Crochet)
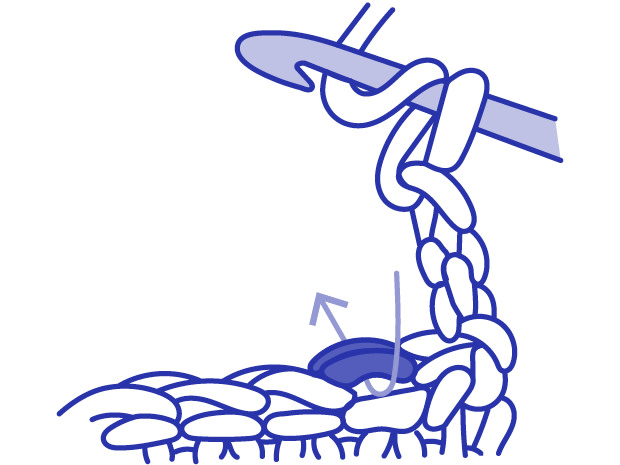
With the hook in your right hand and the work in your left, insert the hook into the stitch closest to the hook underneath the two legs of the ‘v’.
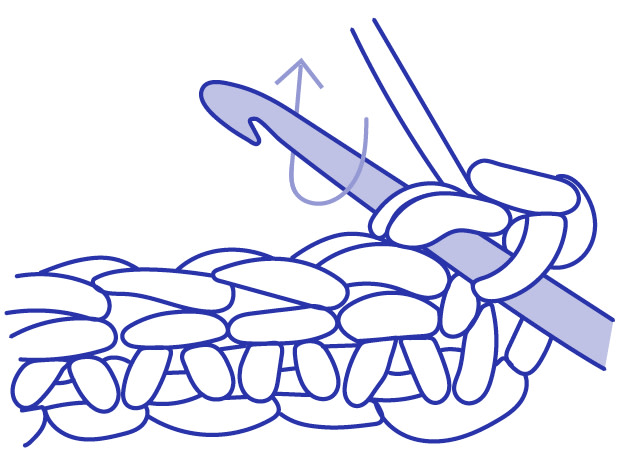
Wrap the yarn over the hook in a clockwise direction.
With the yarn now wrapped around the hook, pull the hook out of the stitch, catching the wrapped yarn in the groove as you go.
With the hook in your right hand and the work in your left, insert the hook into the stitch closest to the hook underneath the two legs of the ‘v’.
Wrap the yarn over the hook in a clockwise direction.
With the yarn now wrapped around the hook, pull the hook out of the stitch, catching the wrapped yarn in the groove as you go.
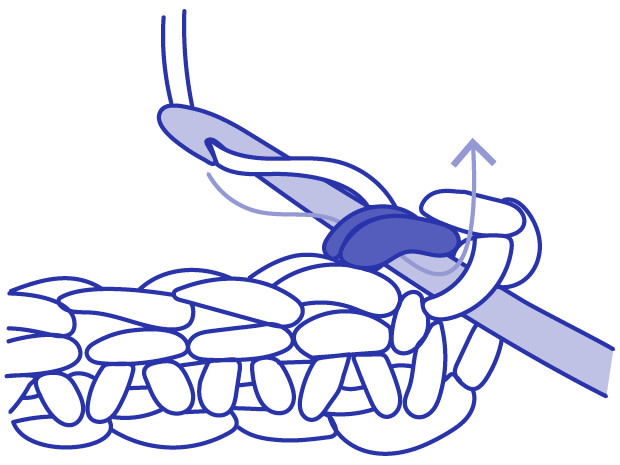
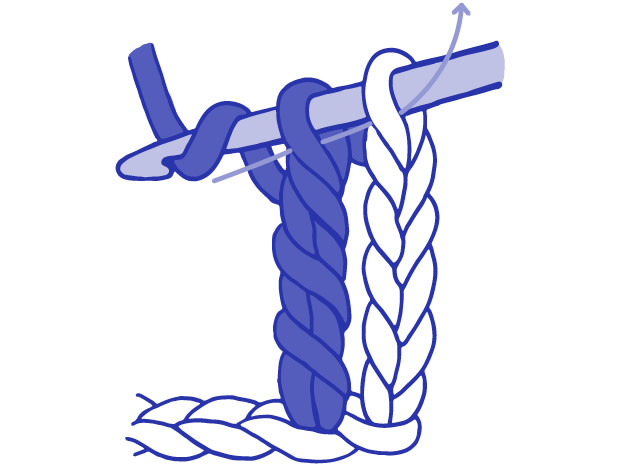
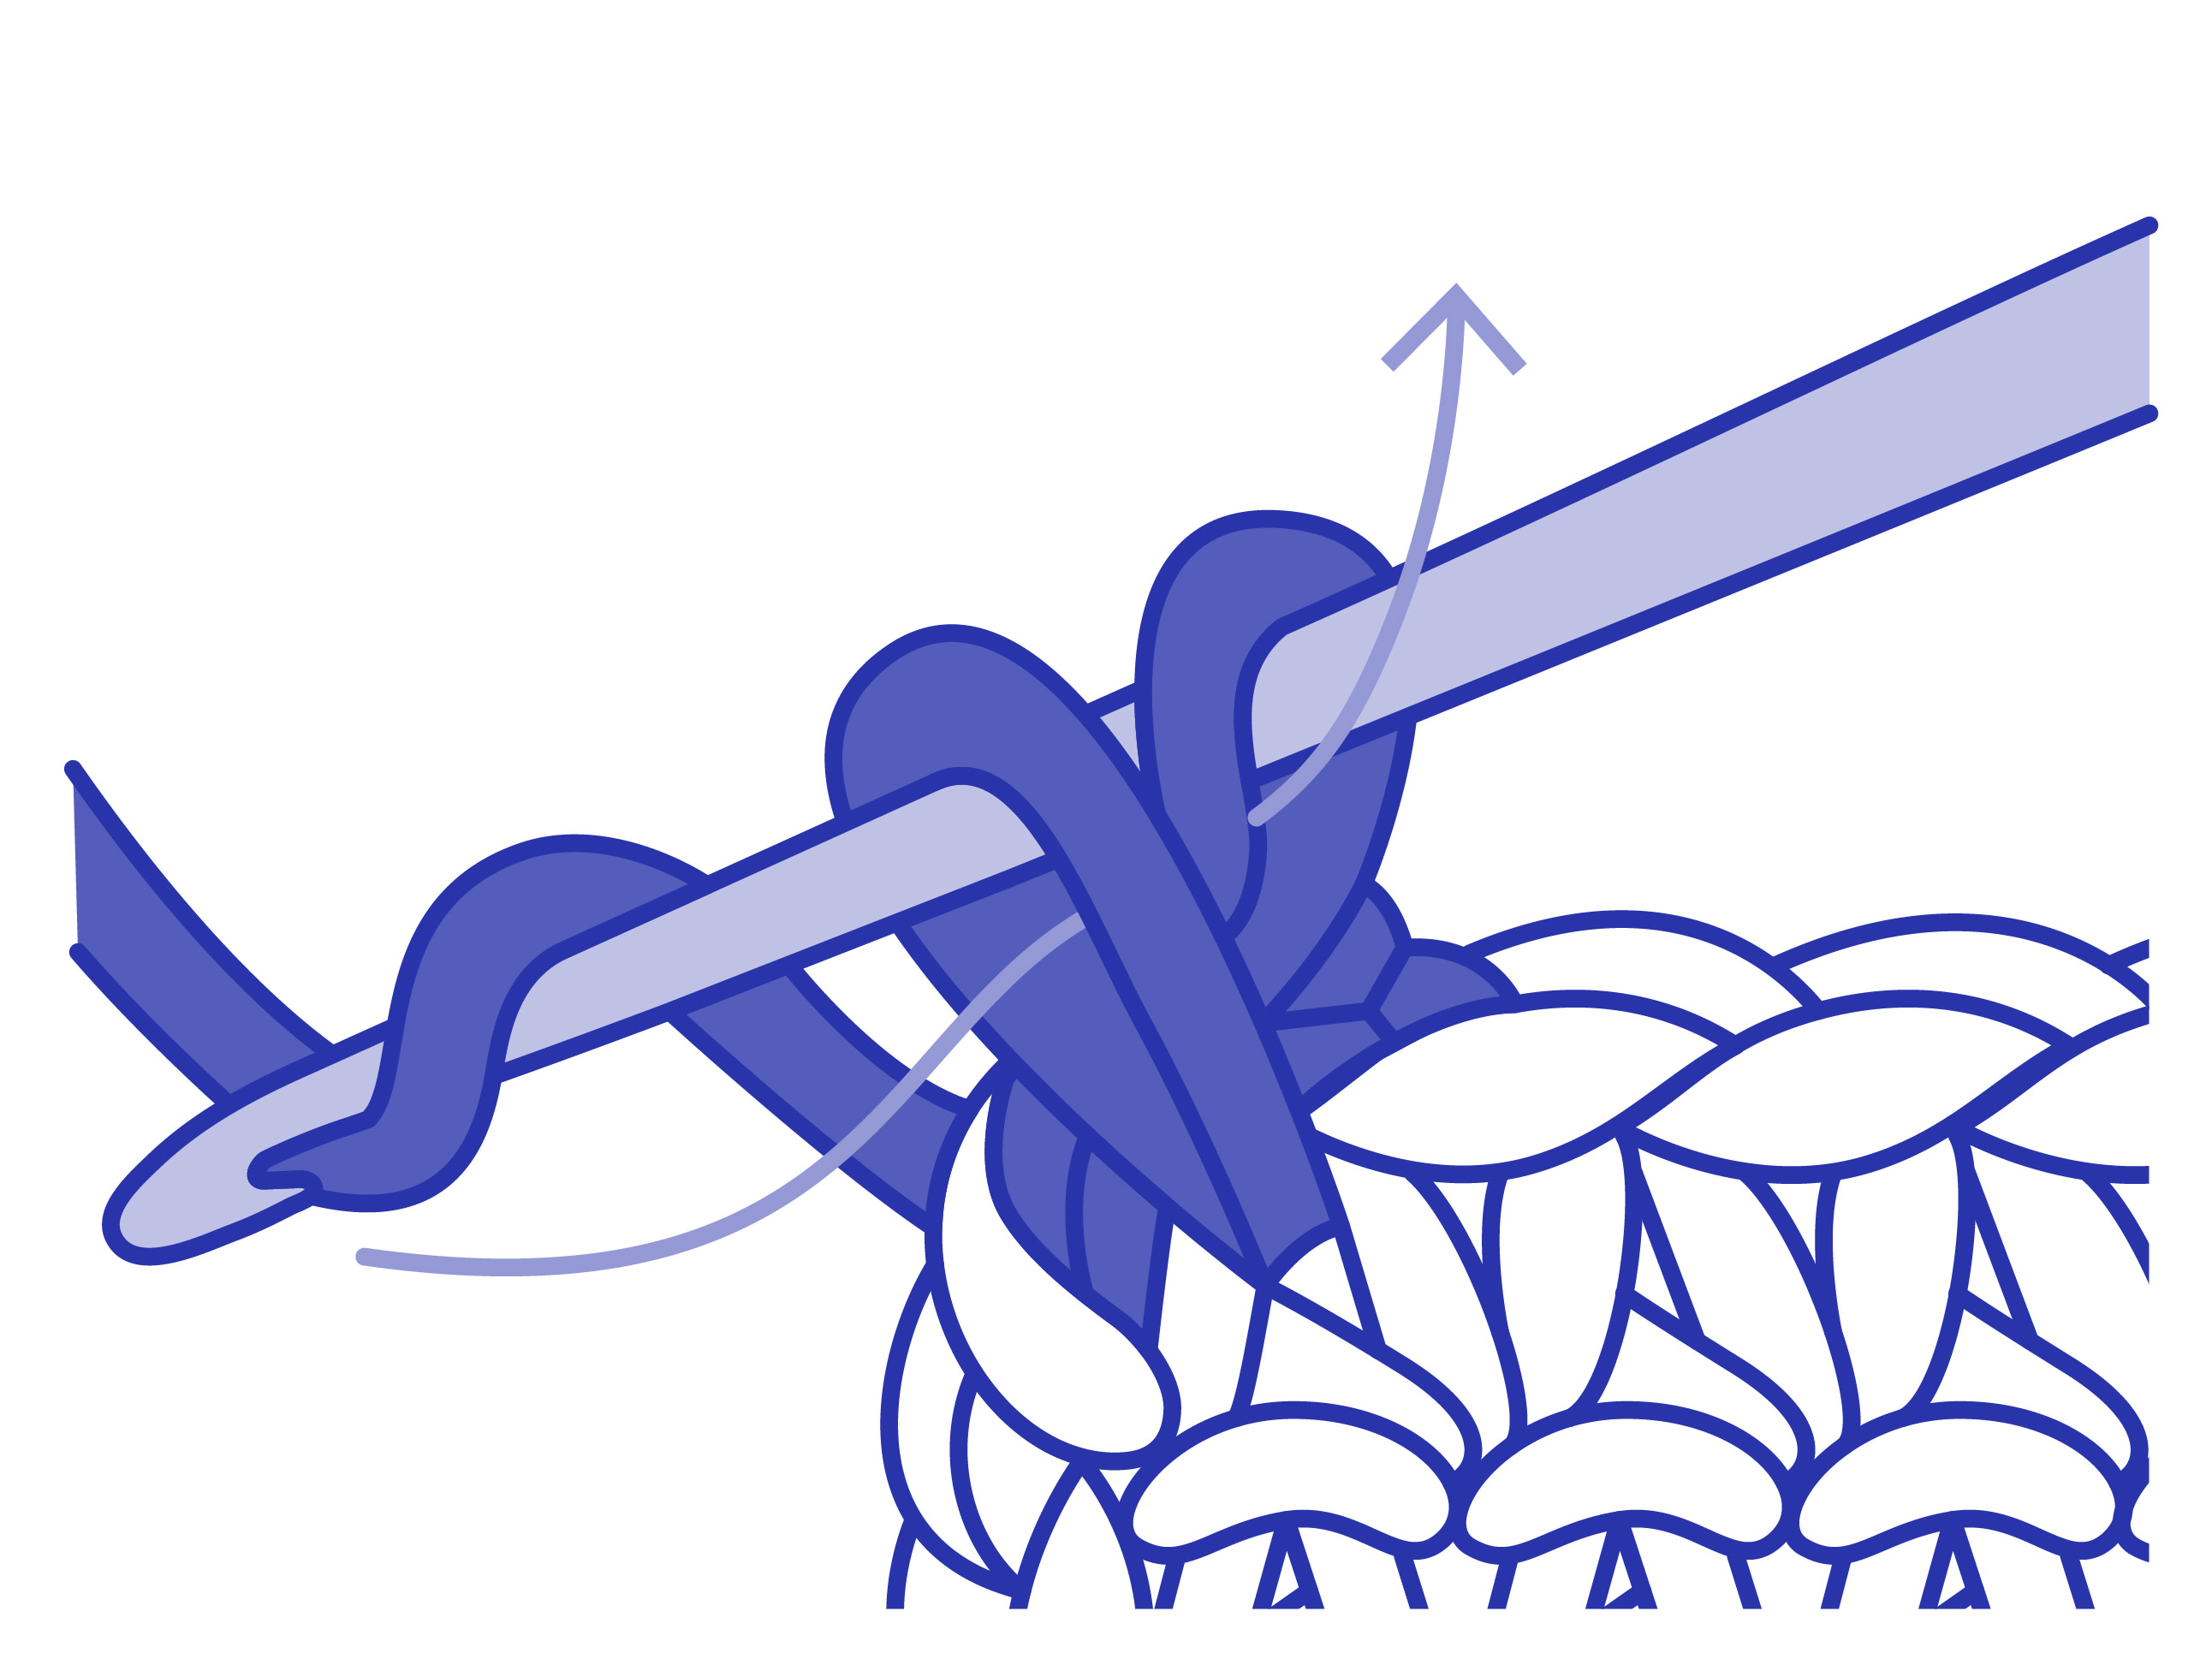
You now have two stitches on your hook. Wrap the yarn around the hook once more.
Pull the hook and the wrapped yarn through the two stitches on the hook. This is one double crochet.
To continue, go into the next stitch, underneath the two legs of the ‘v’ and then repeat steps 2 to 5.
You now have two stitches on your hook. Wrap the yarn around the hook once more.
Pull the hook and the wrapped yarn through the two stitches on the hook. This is one double crochet.
To continue, go into the next stitch, underneath the two legs of the ‘v’ and then repeat steps 2 to 5.
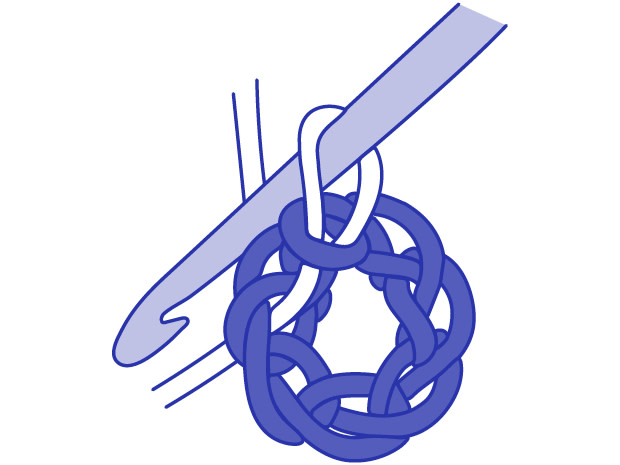
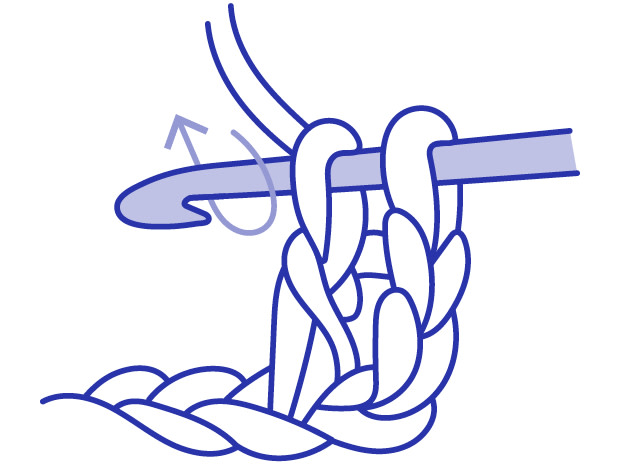
Double Crochet (US Term: Single Crochet) Into Ring
Insert hook into the ring. Catch the yarn with the hook and draw through. You have 2 loops on your hook. Wrap the yarn over the hook in a clockwise direction and draw through the 2 loops on hook. 1 loop remains on your hook.
Insert hook into the ring. Catch the yarn with the hook and draw through. You have 2 loops on your hook. Wrap the yarn over the hook in a clockwise direction and draw through the 2 loops on hook. 1 loop remains on your hook.
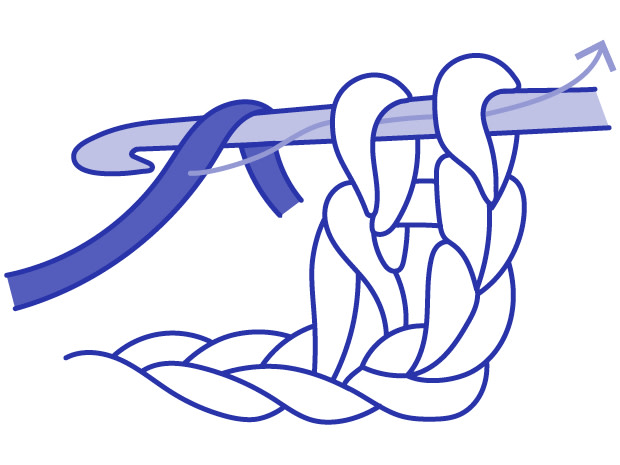
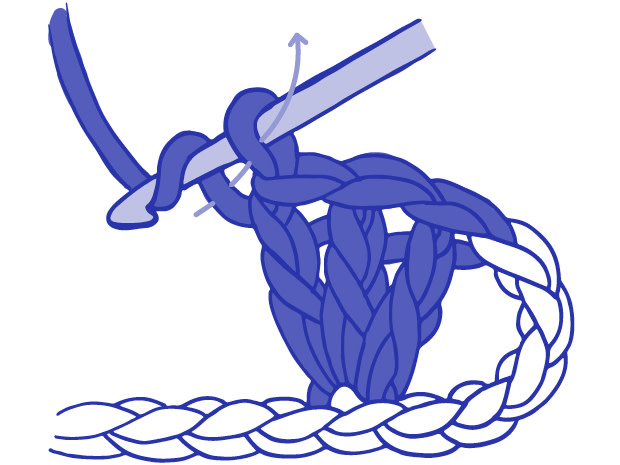
Treble Crochet (US Term: Double Crochet)
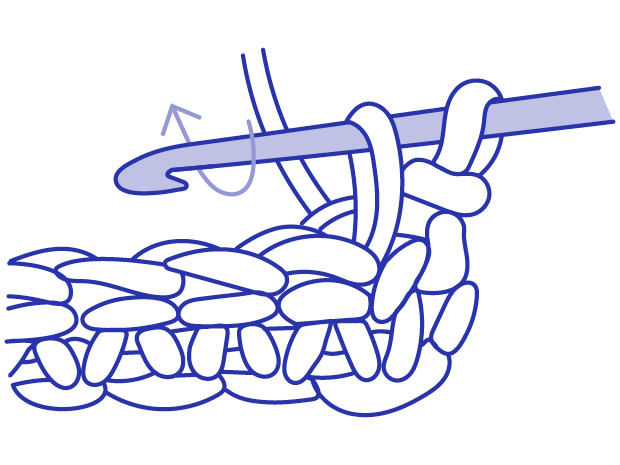
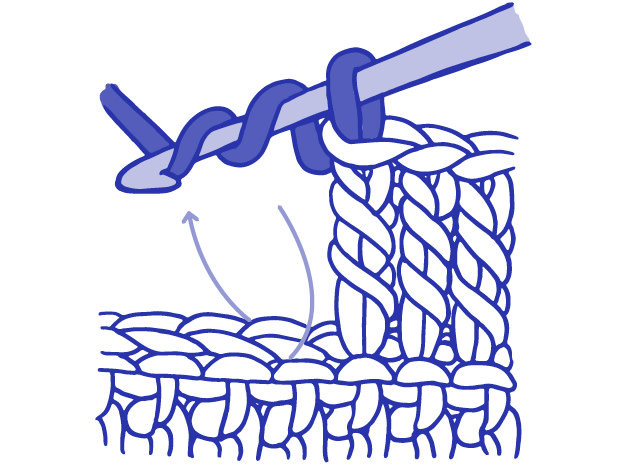
With the hook in your right hand the work in your left, wrap the yarn over the hook in a clockwise direction. You may find it easier to move the hook rather than move the yarn.

Now insert the hook into the second stitch along your work, under the two legs of the ‘v’.
Wrap the yarn around the hook again and slowly pull the hook back through the ‘v’, catching the wrapped yarn as you go. You should now have 3 loops on your hook.
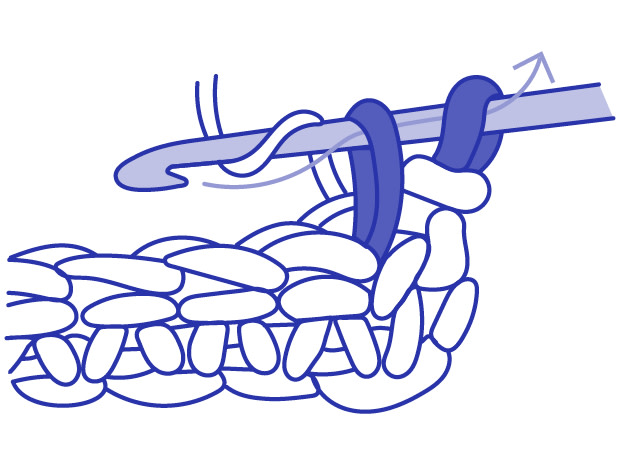
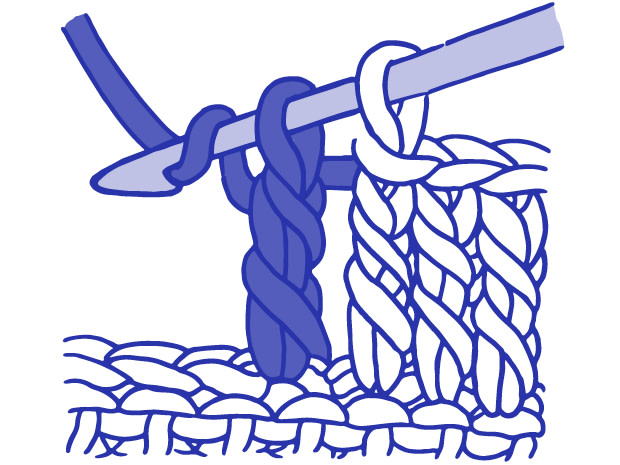
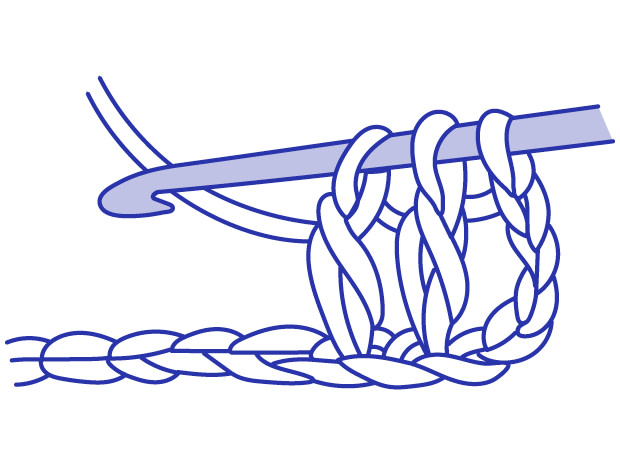
Wrap the yarn around the hook once more. Pull the hook and wrapped yarn through the first 2 loops.
With the hook in your right hand the work in your left, wrap the yarn over the hook in a clockwise direction. You may find it easier to move the hook rather than move the yarn.
Now insert the hook into the second stitch along your work, under the two legs of the ‘v’.
Wrap the yarn around the hook again and slowly pull the hook back through the ‘v’, catching the wrapped yarn as you go. You should now have 3 loops on your hook.
Wrap the yarn around the hook once more. Pull the hook and wrapped yarn through the first 2 loops.

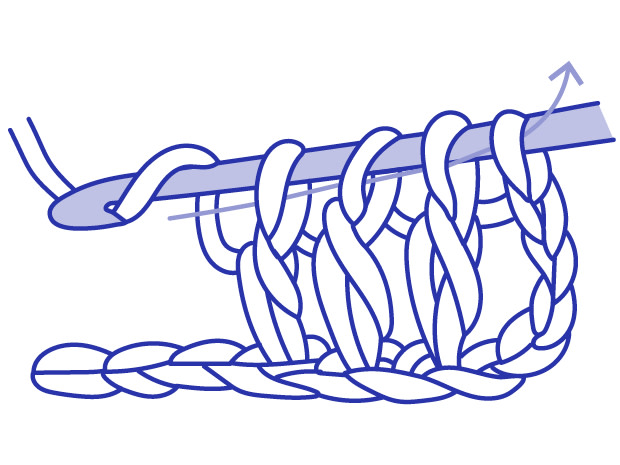
You should now have 2 loops left on your hook. Wrap the yarn again.
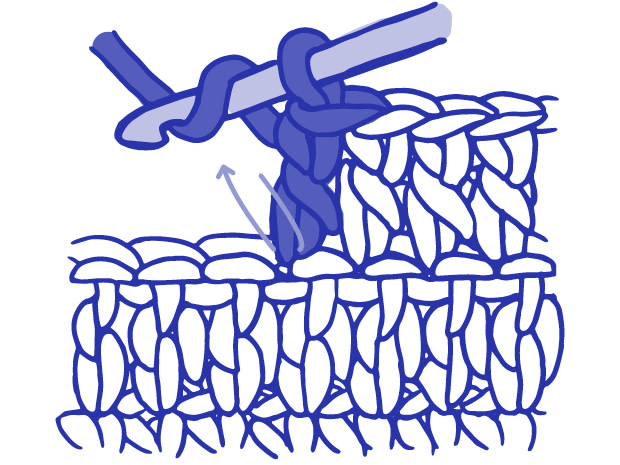
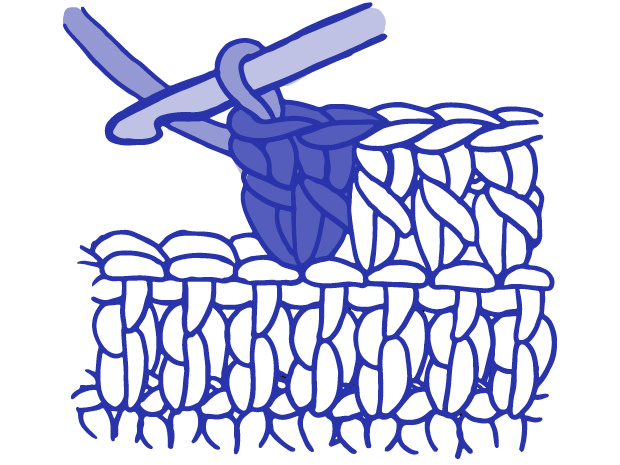
Pull the hook and the wrapped yarn through the two remaining loops on the hook. You will be left with 1 loop on the hook. This is one treble stitch.

To continue, wrap the yarn around the hook and insert the hook into the next stitch of your row. Follow steps 3 to 5 to create your treble crochet stitches.
You should now have 2 loops left on your hook. Wrap the yarn again.
Pull the hook and the wrapped yarn through the two remaining loops on the hook. You will be left with 1 loop on the hook. This is one treble stitch.
To continue, wrap the yarn around the hook and insert the hook into the next stitch of your row. Follow steps 3 to 5 to create your treble crochet stitches.
Adding a New Ball / Changing Color
Start your stitch in the usual way with your current yarn work until you have 2 loops left on your hook.
Lay the new yarn across your hook, as if wrapping the yarn in the usual way.
Pull the new yarn through your loops to finish the stitch and then continue working with the new yarn.
Start your stitch in the usual way with your current yarn work until you have 2 loops left on your hook.
Lay the new yarn across your hook, as if wrapping the yarn in the usual way.
Pull the new yarn through your loops to finish the stitch and then continue working with the new yarn.
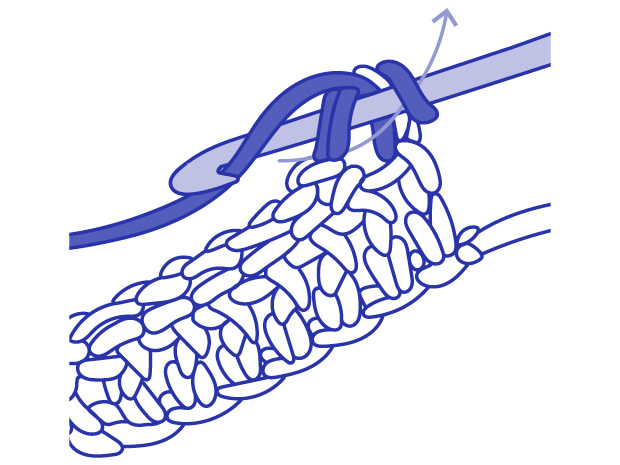
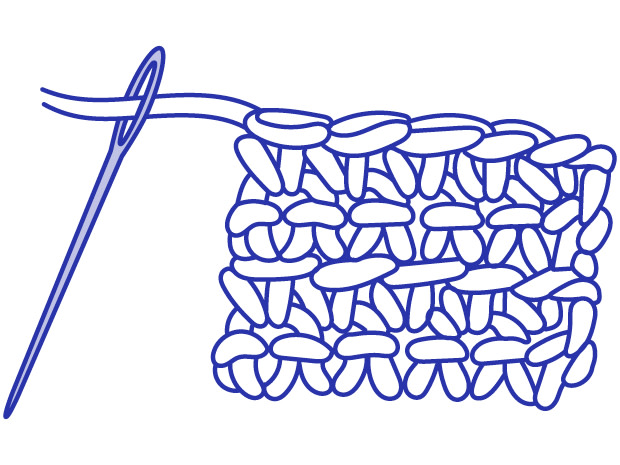
Fasten Off
To prevent the work from unravelling when you have finished, complete the final stitch then cut the working yarn and pull it through the last loop on the hook. Pull to close the loop and thread the working end of the yarn into a sewing needle and weave into the back of the work.
Weaving in Ends
Position your work so that the wrong side is facing you. Thread your sewing needle with the tail end of yarn.

With your sewing needle travel across your work horizontally, going under the vertical ‘v’s.
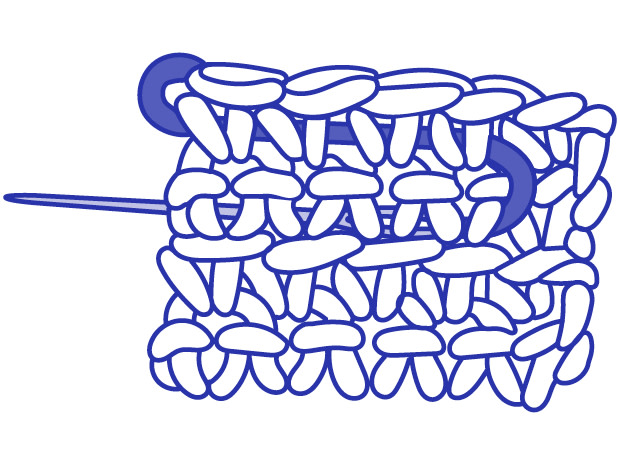
Once you have worked through a few stitches, drop down a row, turn around and travel back across your work in the same way.
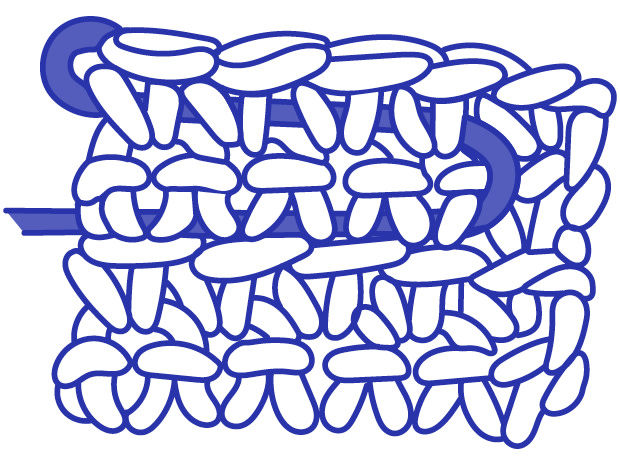
Do this until you feel the end is secure then remove your needle and cut off any remaining loose yarn.
Position your work so that the wrong side is facing you. Thread your sewing needle with the tail end of yarn.
With your sewing needle travel across your work horizontally, going under the vertical ‘v’s.
Once you have worked through a few stitches, drop down a row, turn around and travel back across your work in the same way.
Do this until you feel the end is secure then remove your needle and cut off any remaining loose yarn.
Double Treble Crochet (US Term: Treble Crochet)
Yarn over hook two times, then insert hook into next stitch. Yarn over hook and draw yarn through the stitch — you have 4 loops on the hook.
Loop yarn over hook and draw through 2 loops, (there are now three loops remaining on the hook), *yarn over hook and draw through two loops**, repeat from * to ** once more. This completes one double treble crochet.
2 Treble (US Term: Double) Into the Same Stitch (increase)
Work 1 treble crochet.
Work another treble crochet into the same stitch. The two stitches together are shaped like a “V”.
Work 1 treble crochet.
Work another treble crochet into the same stitch. The two stitches together are shaped like a “V”.
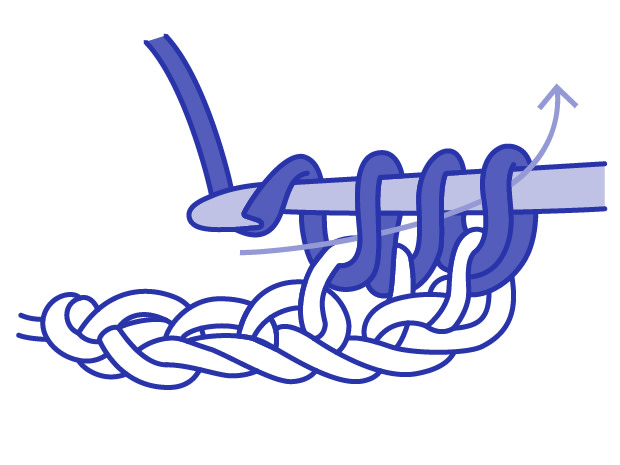
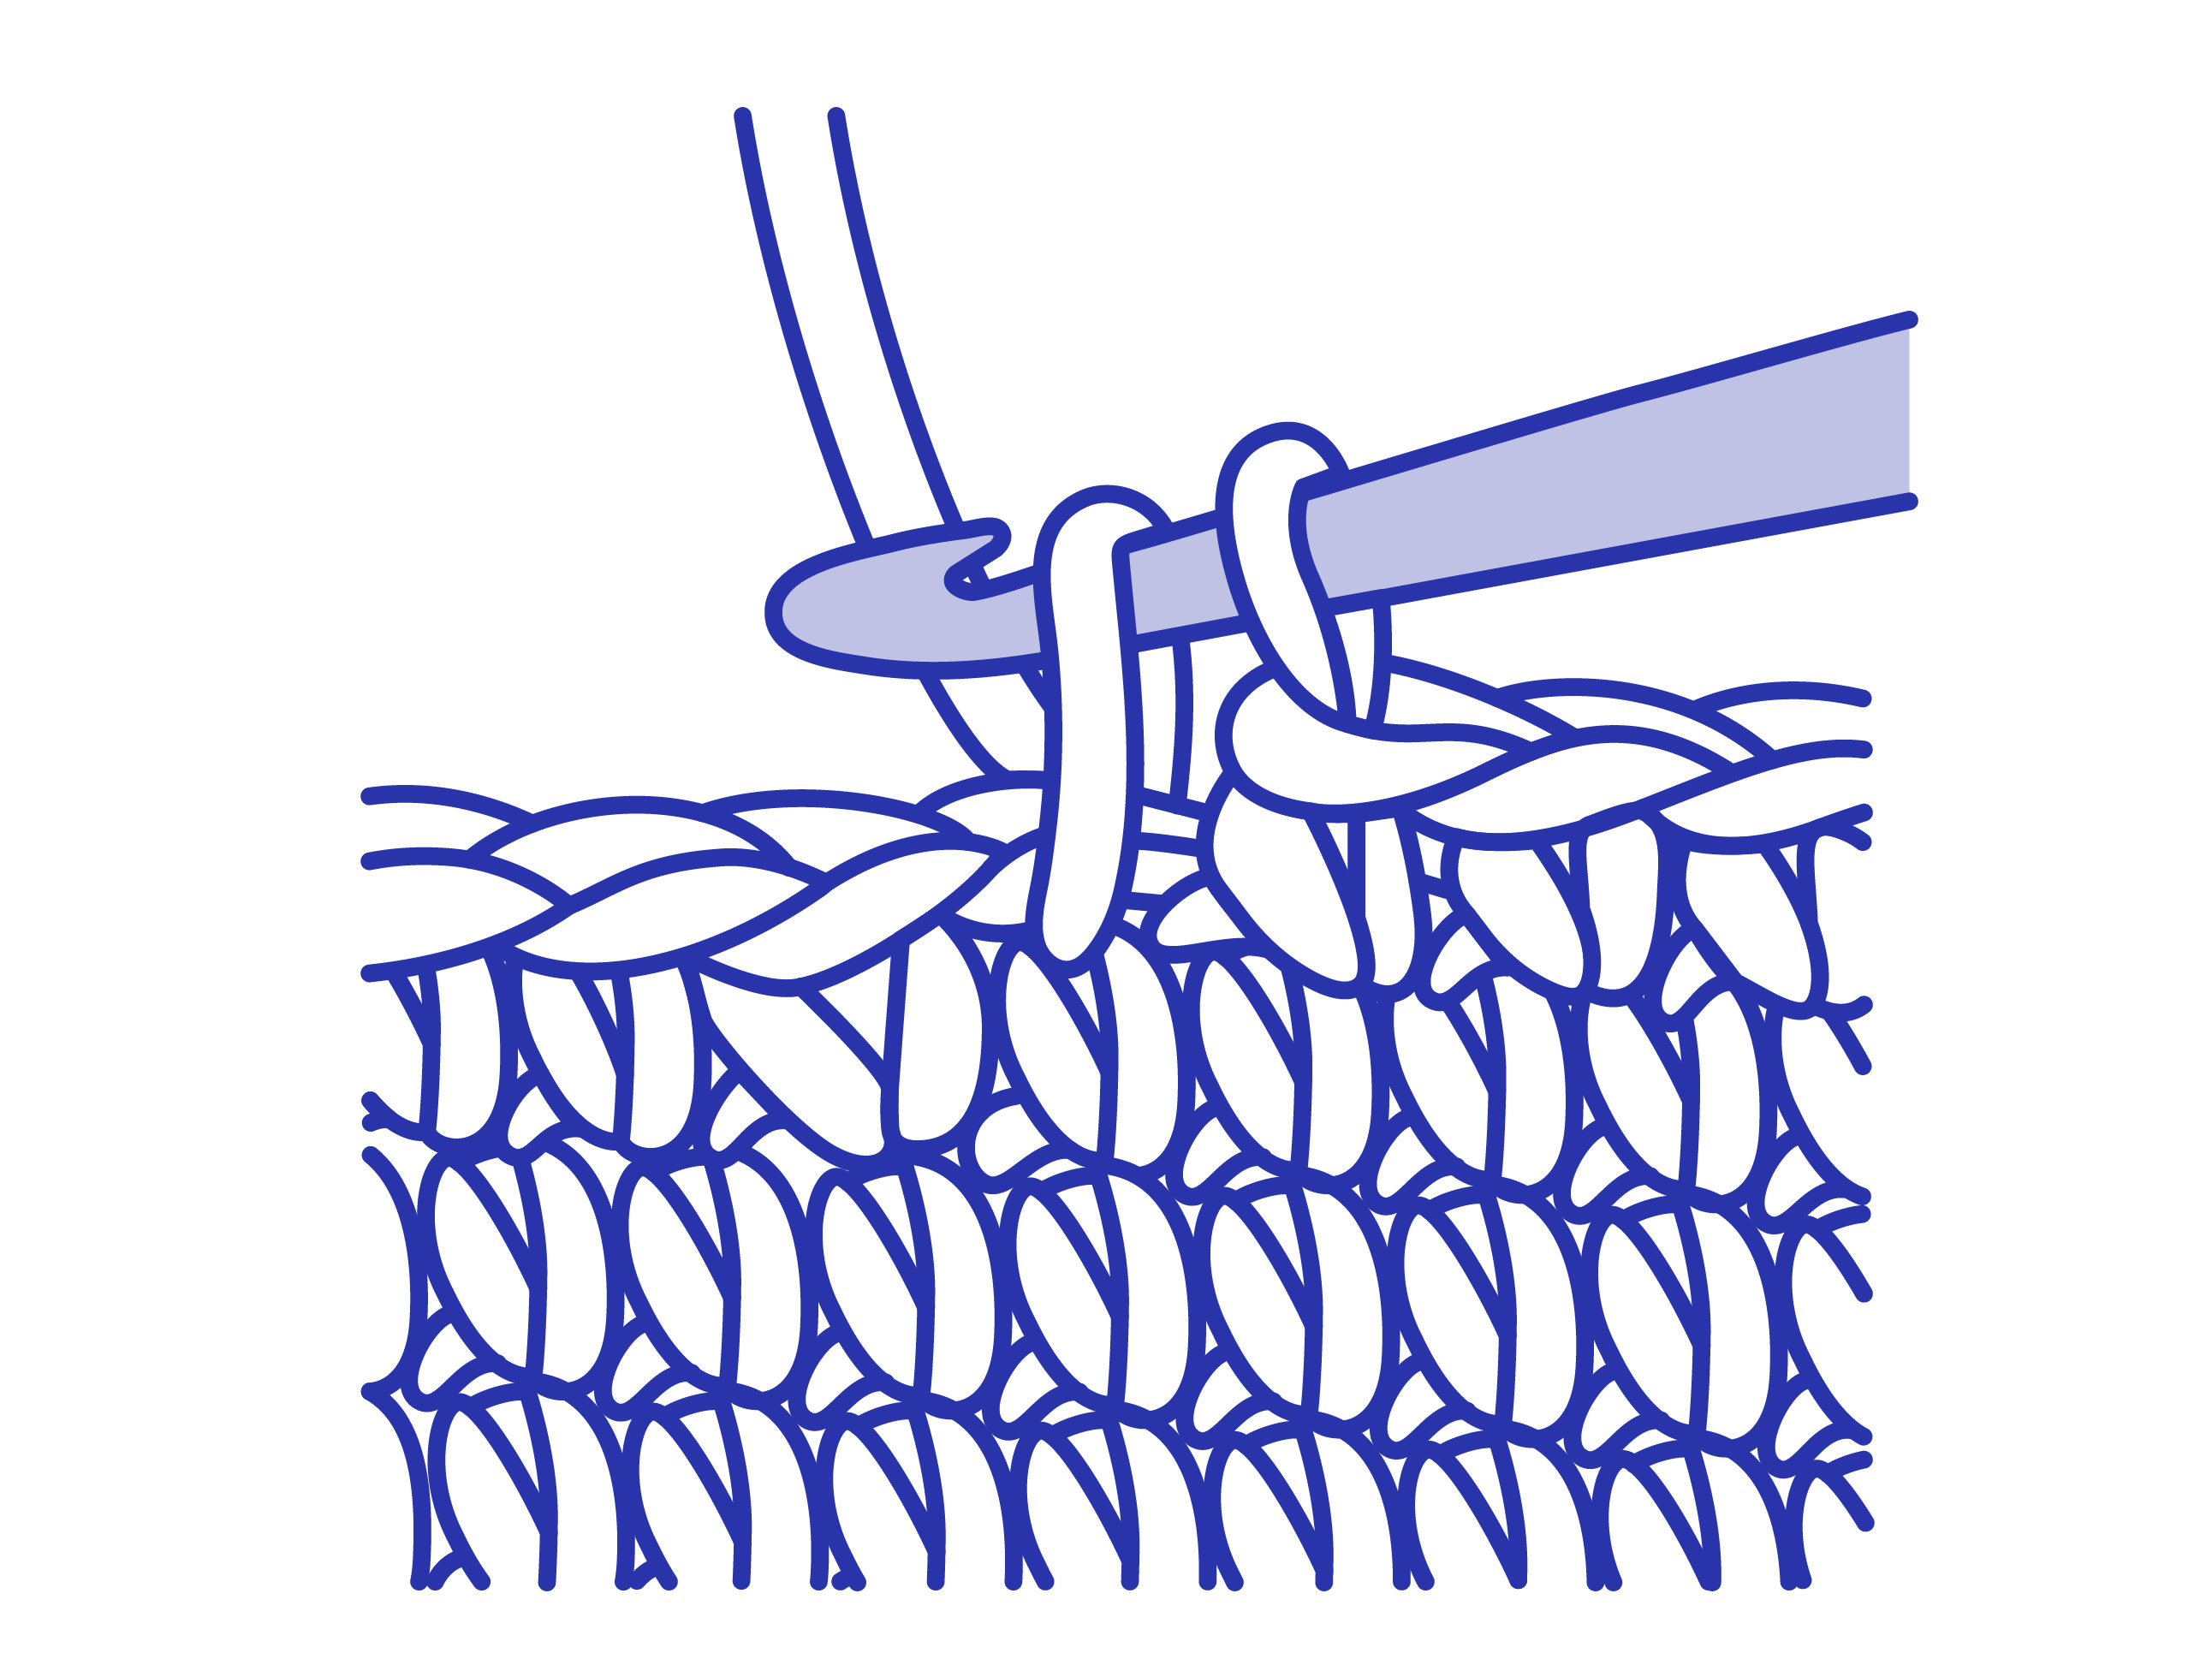
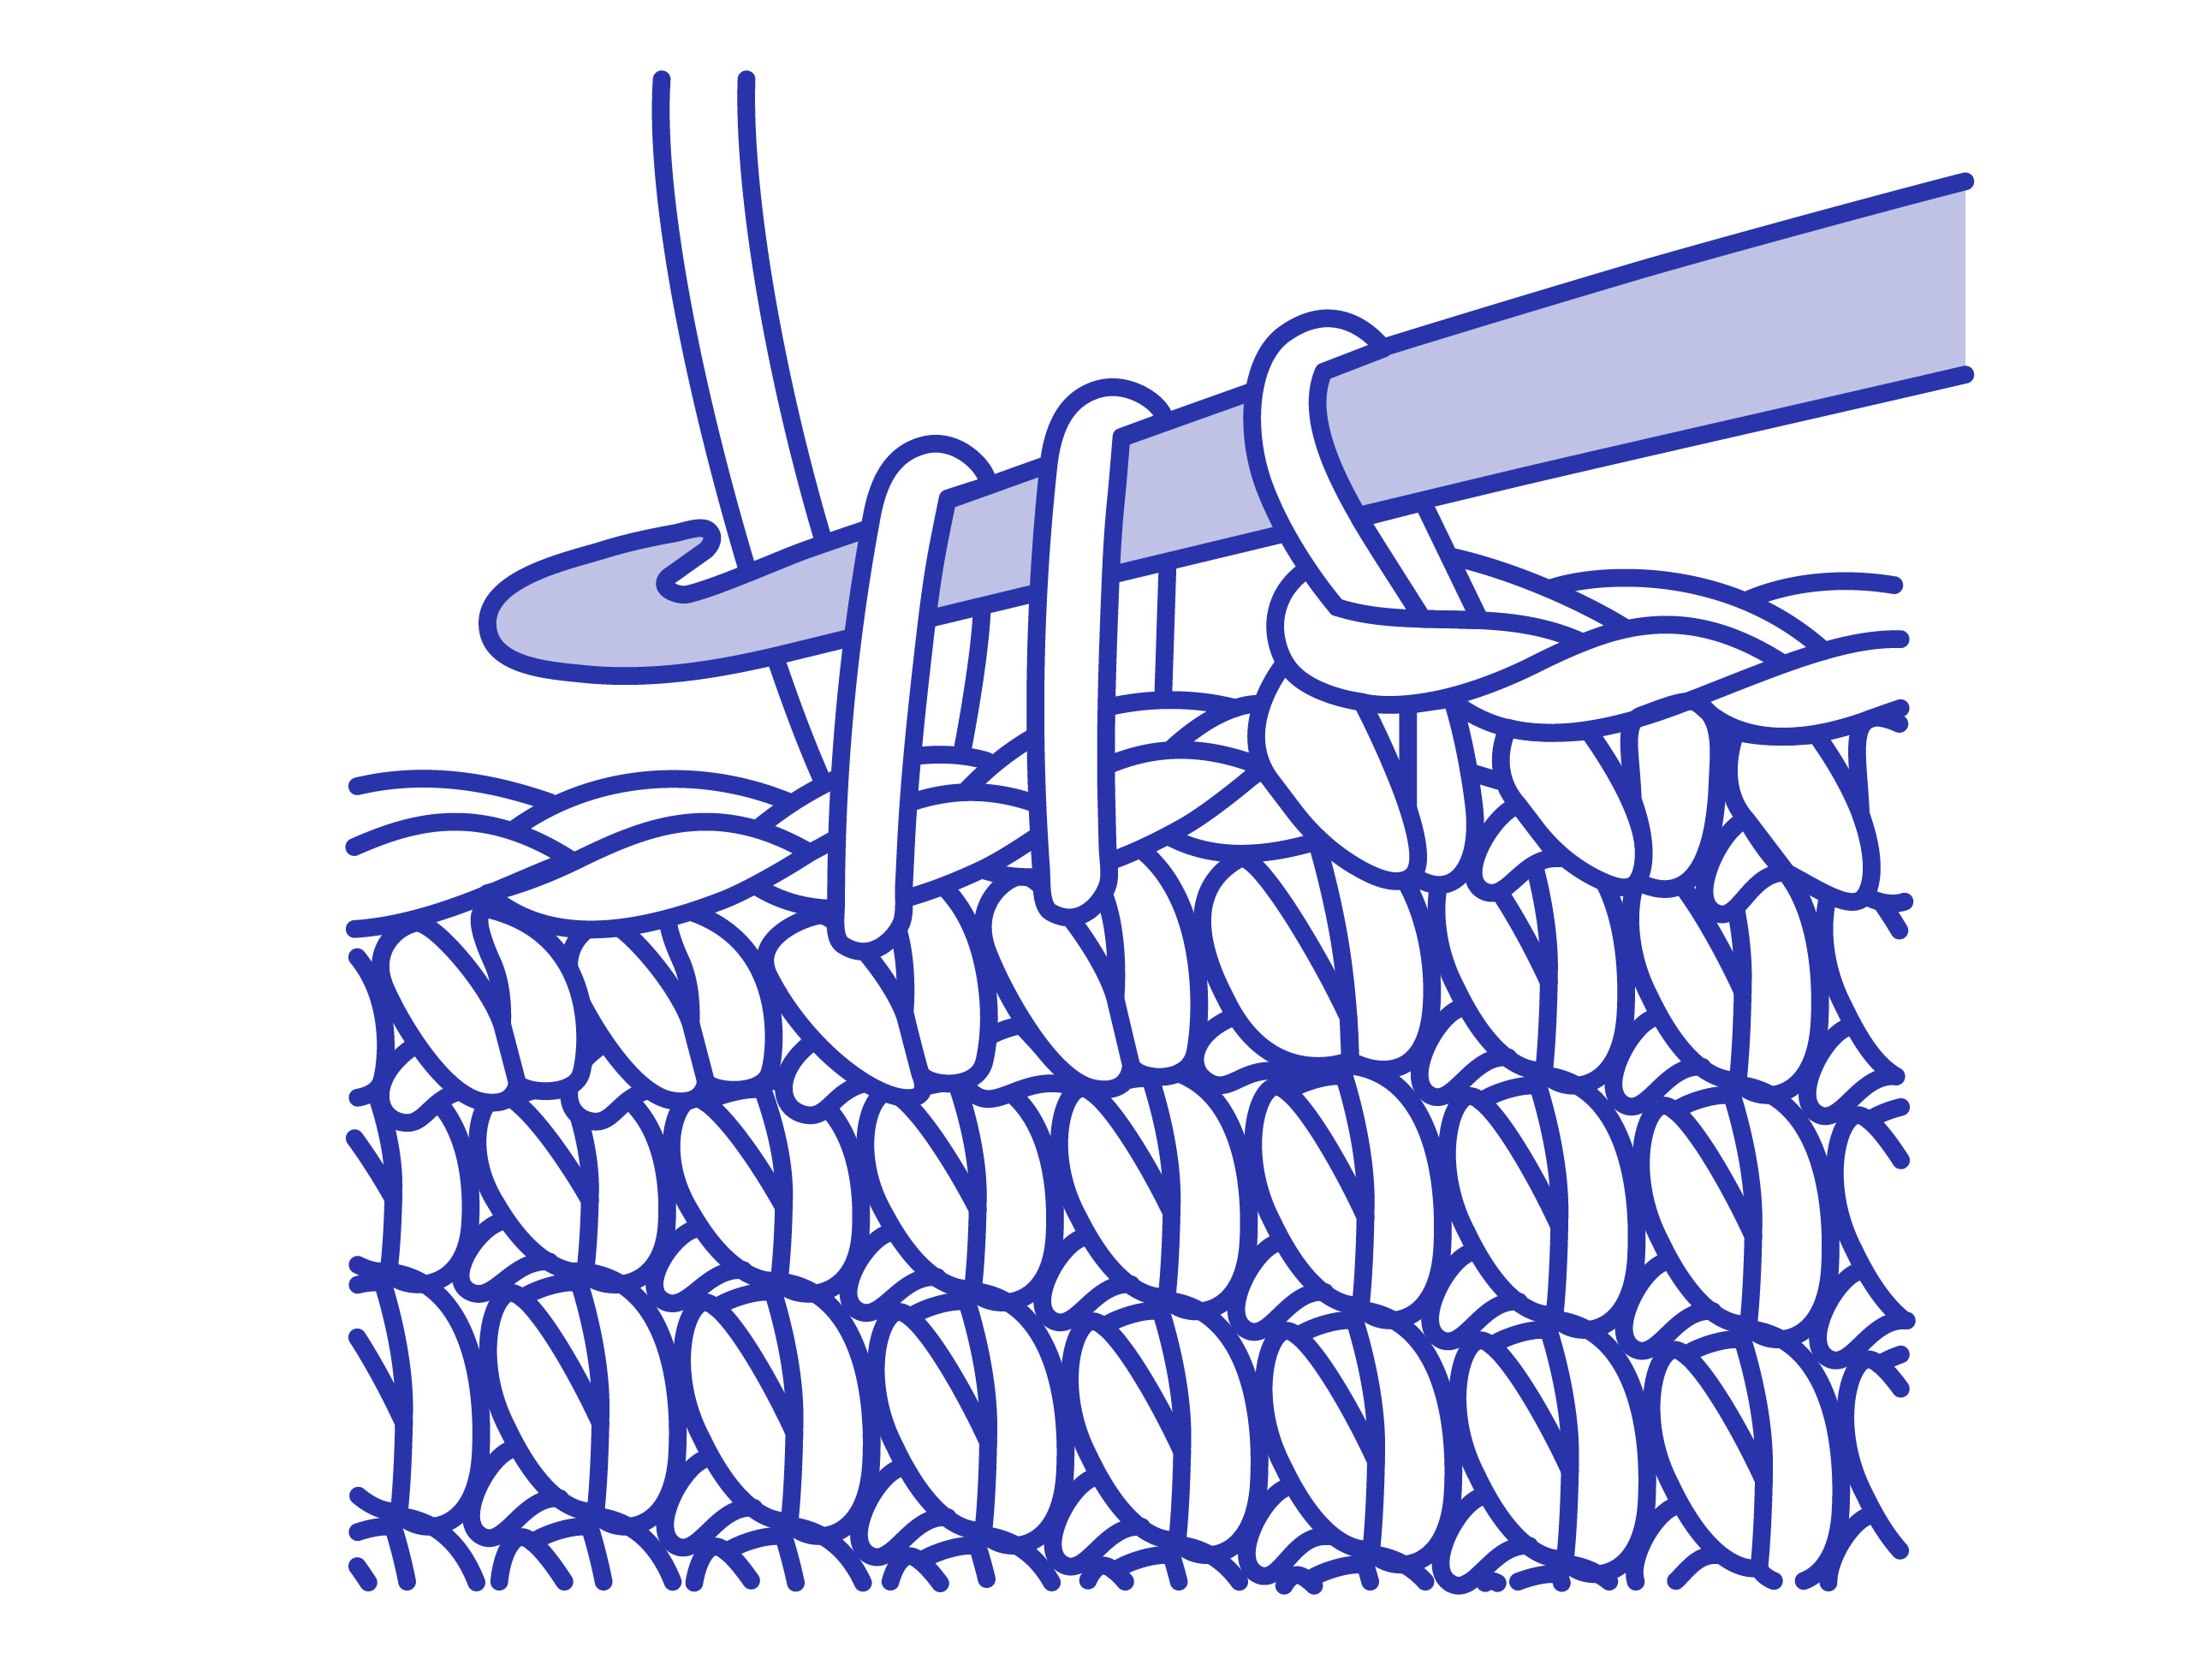
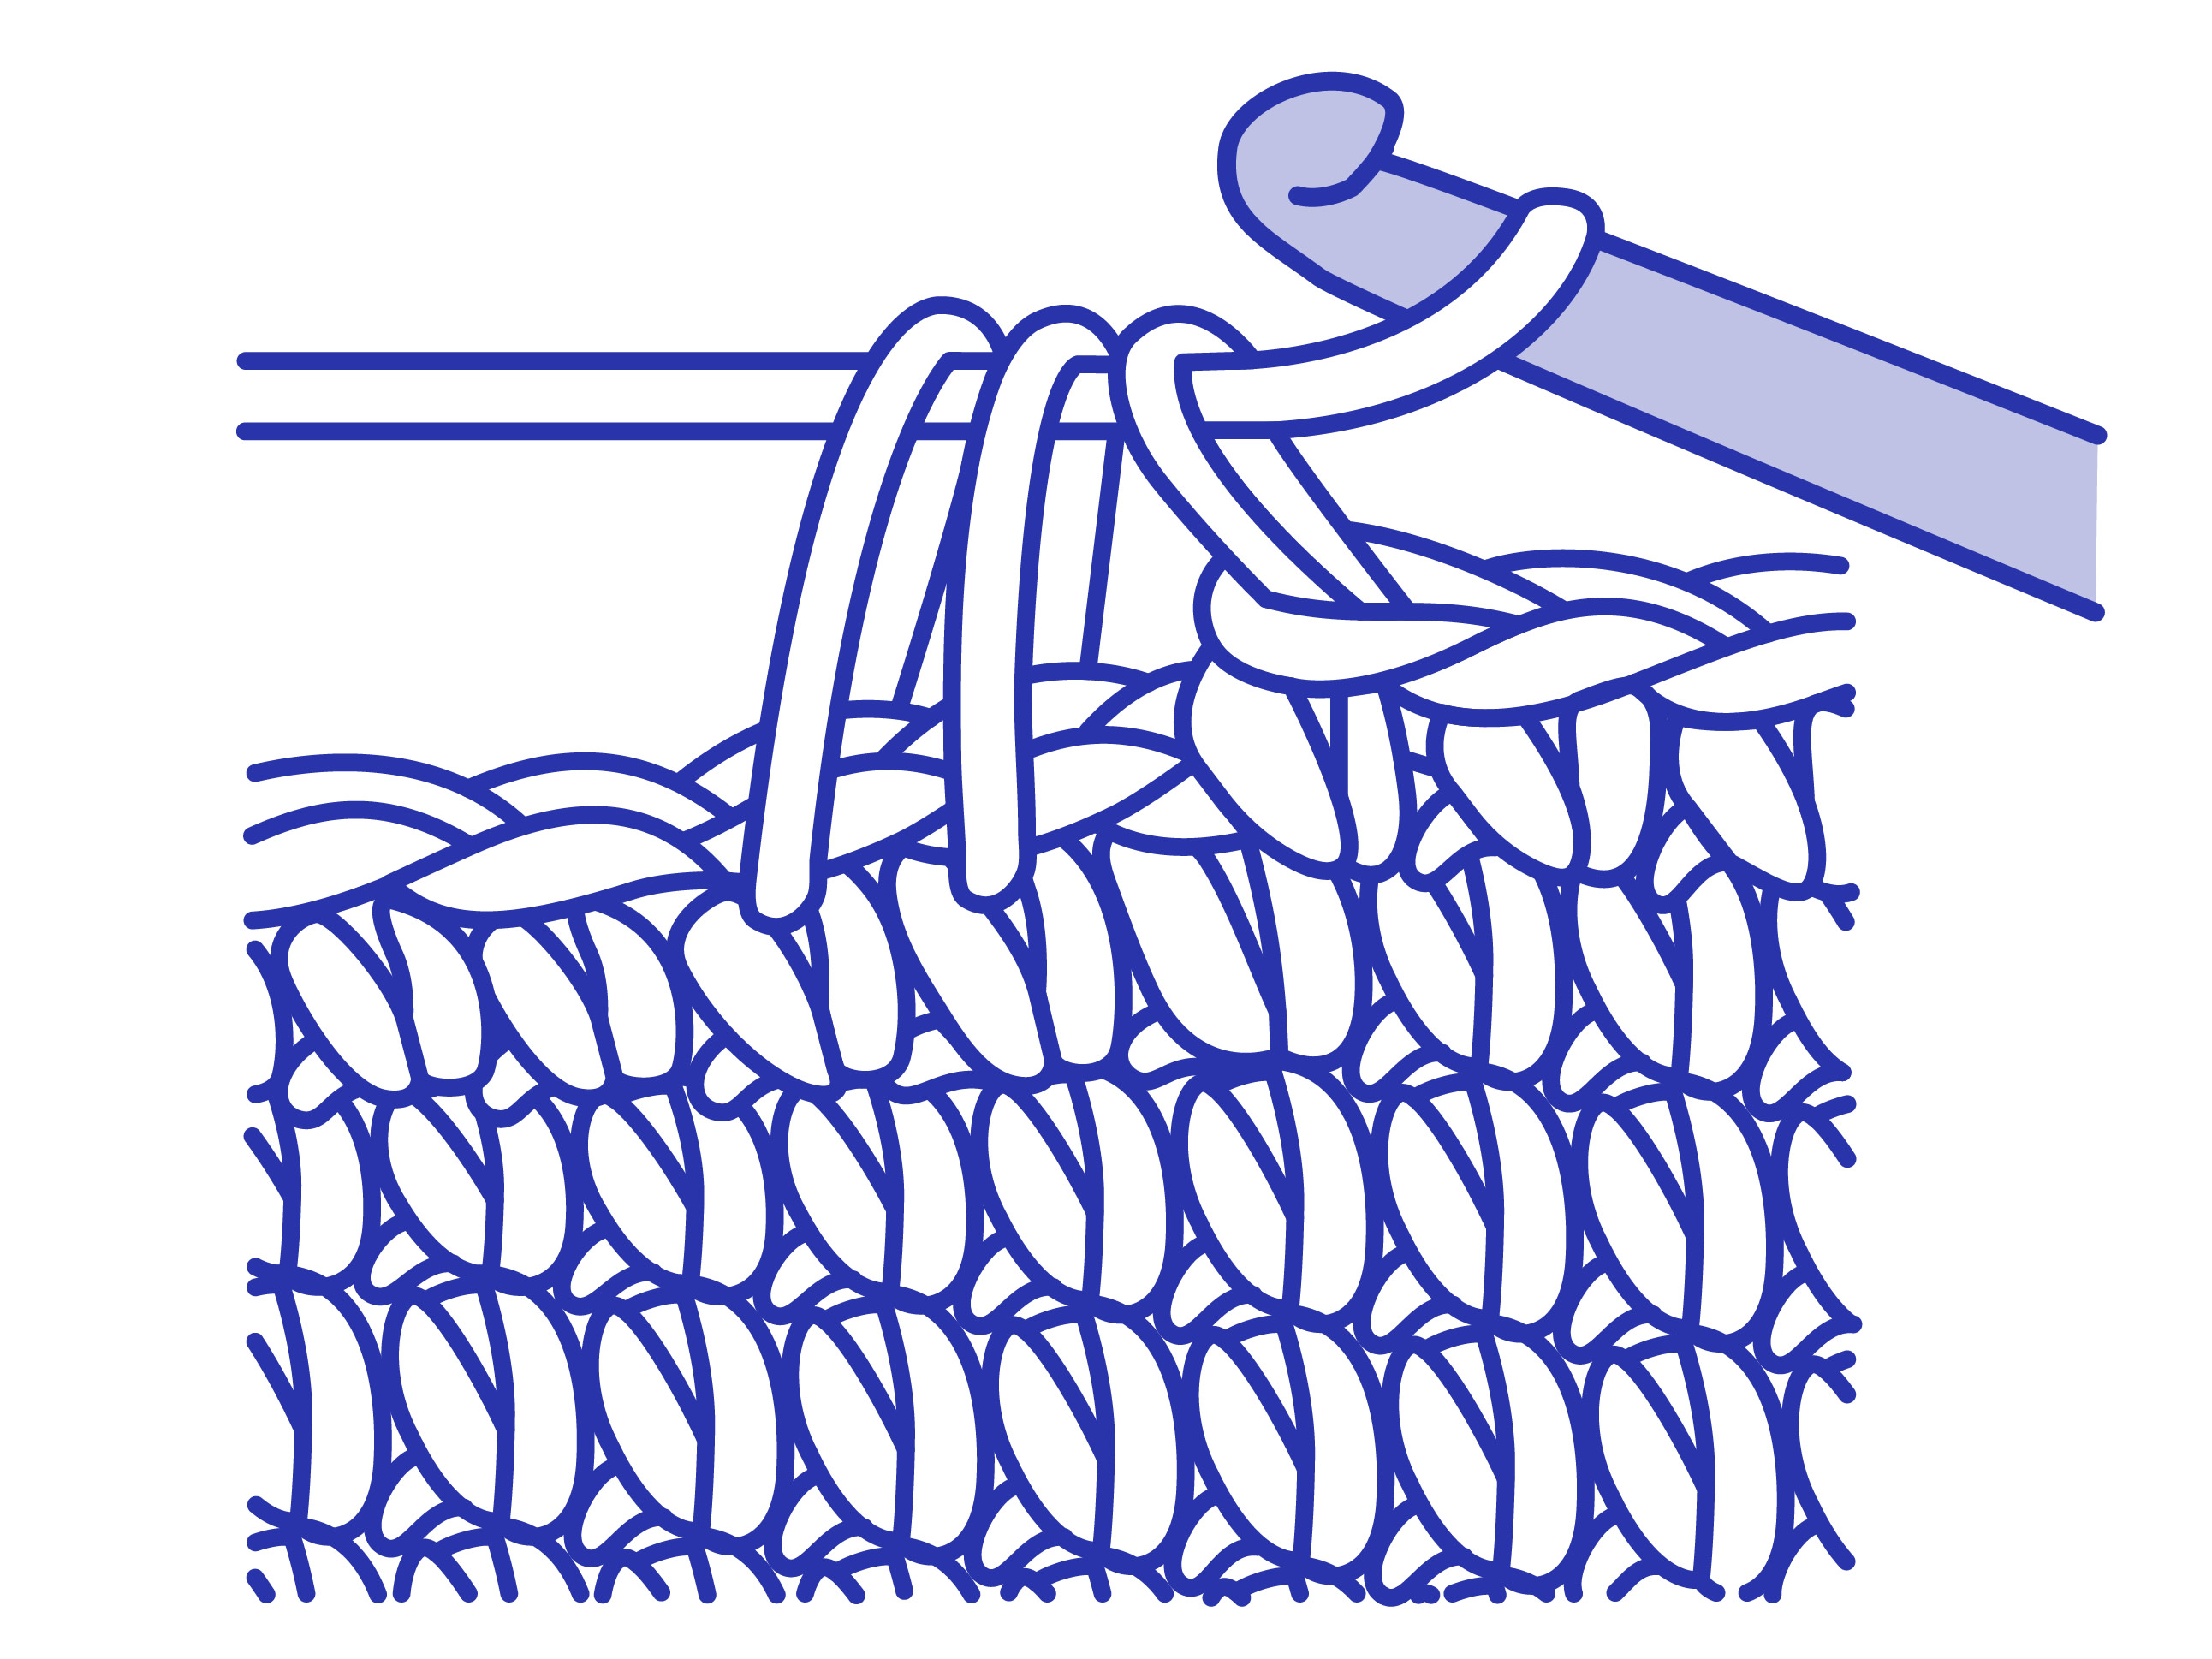
Triple Treble Crochet (US Term: Double Treble Crochet)
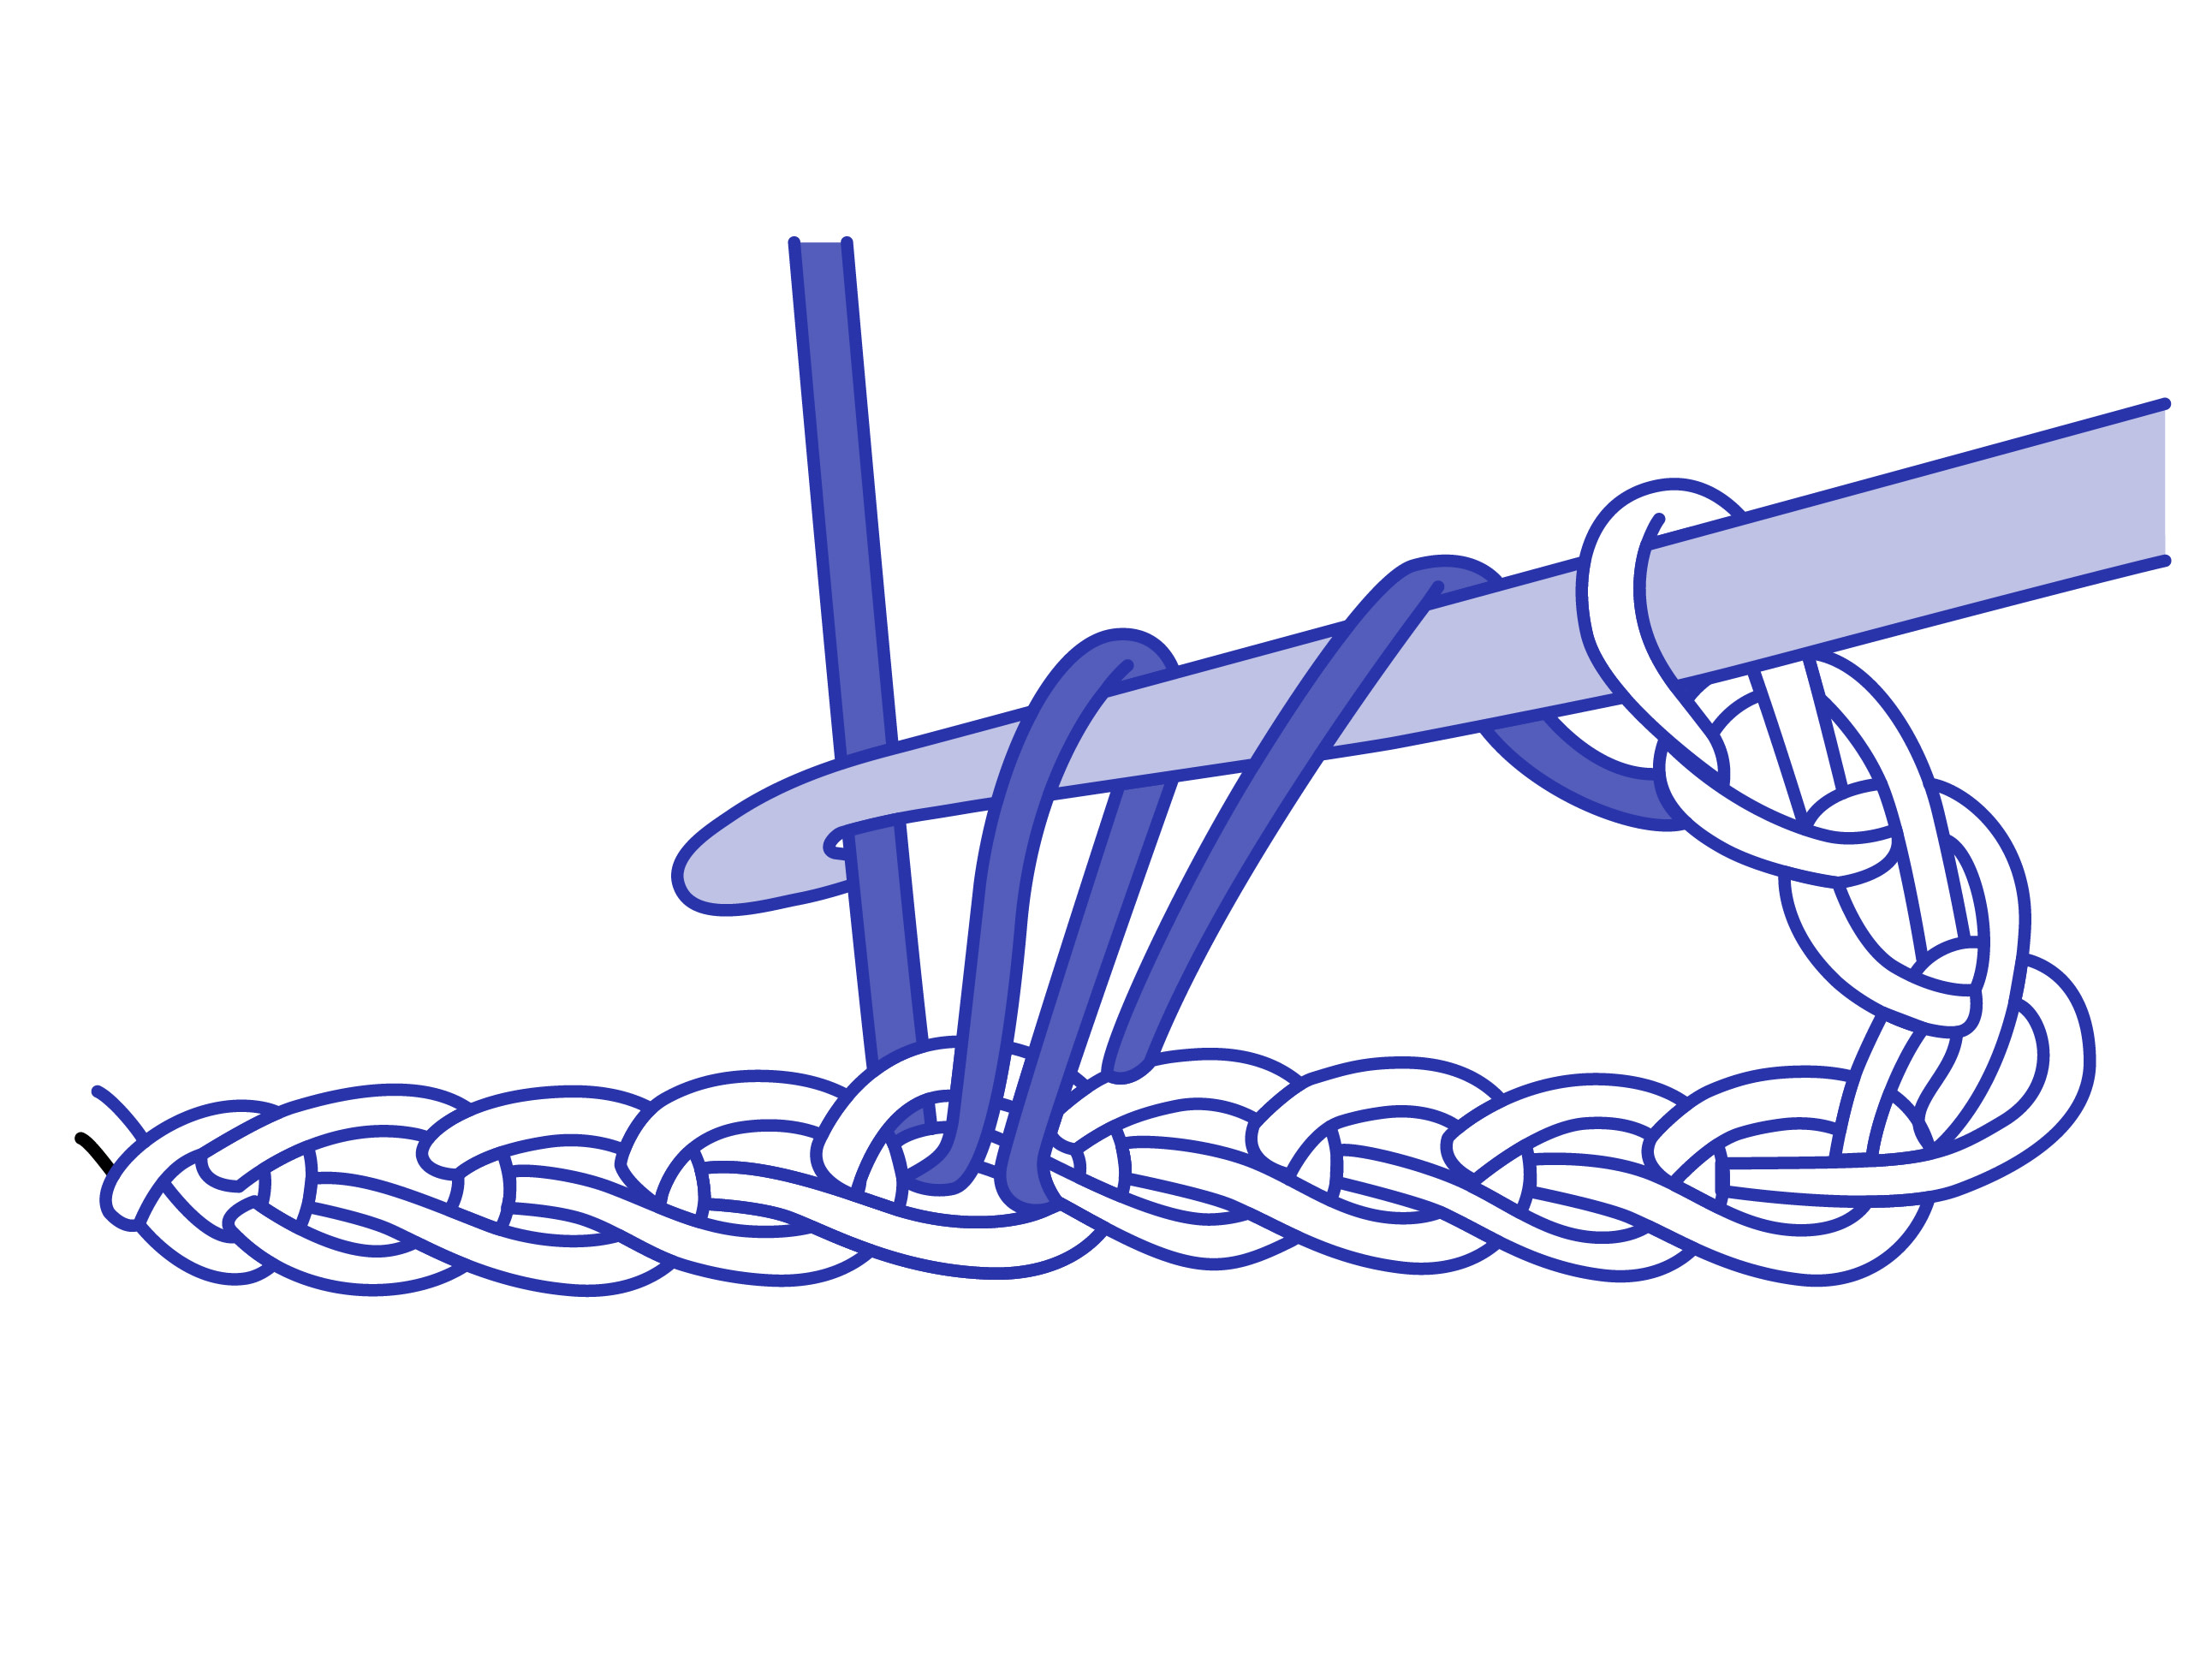
Yarn over hook three times, then insert the hook into next stitch. Yarn over hook and draw yarn through the stitch - you have five loops on the hook.
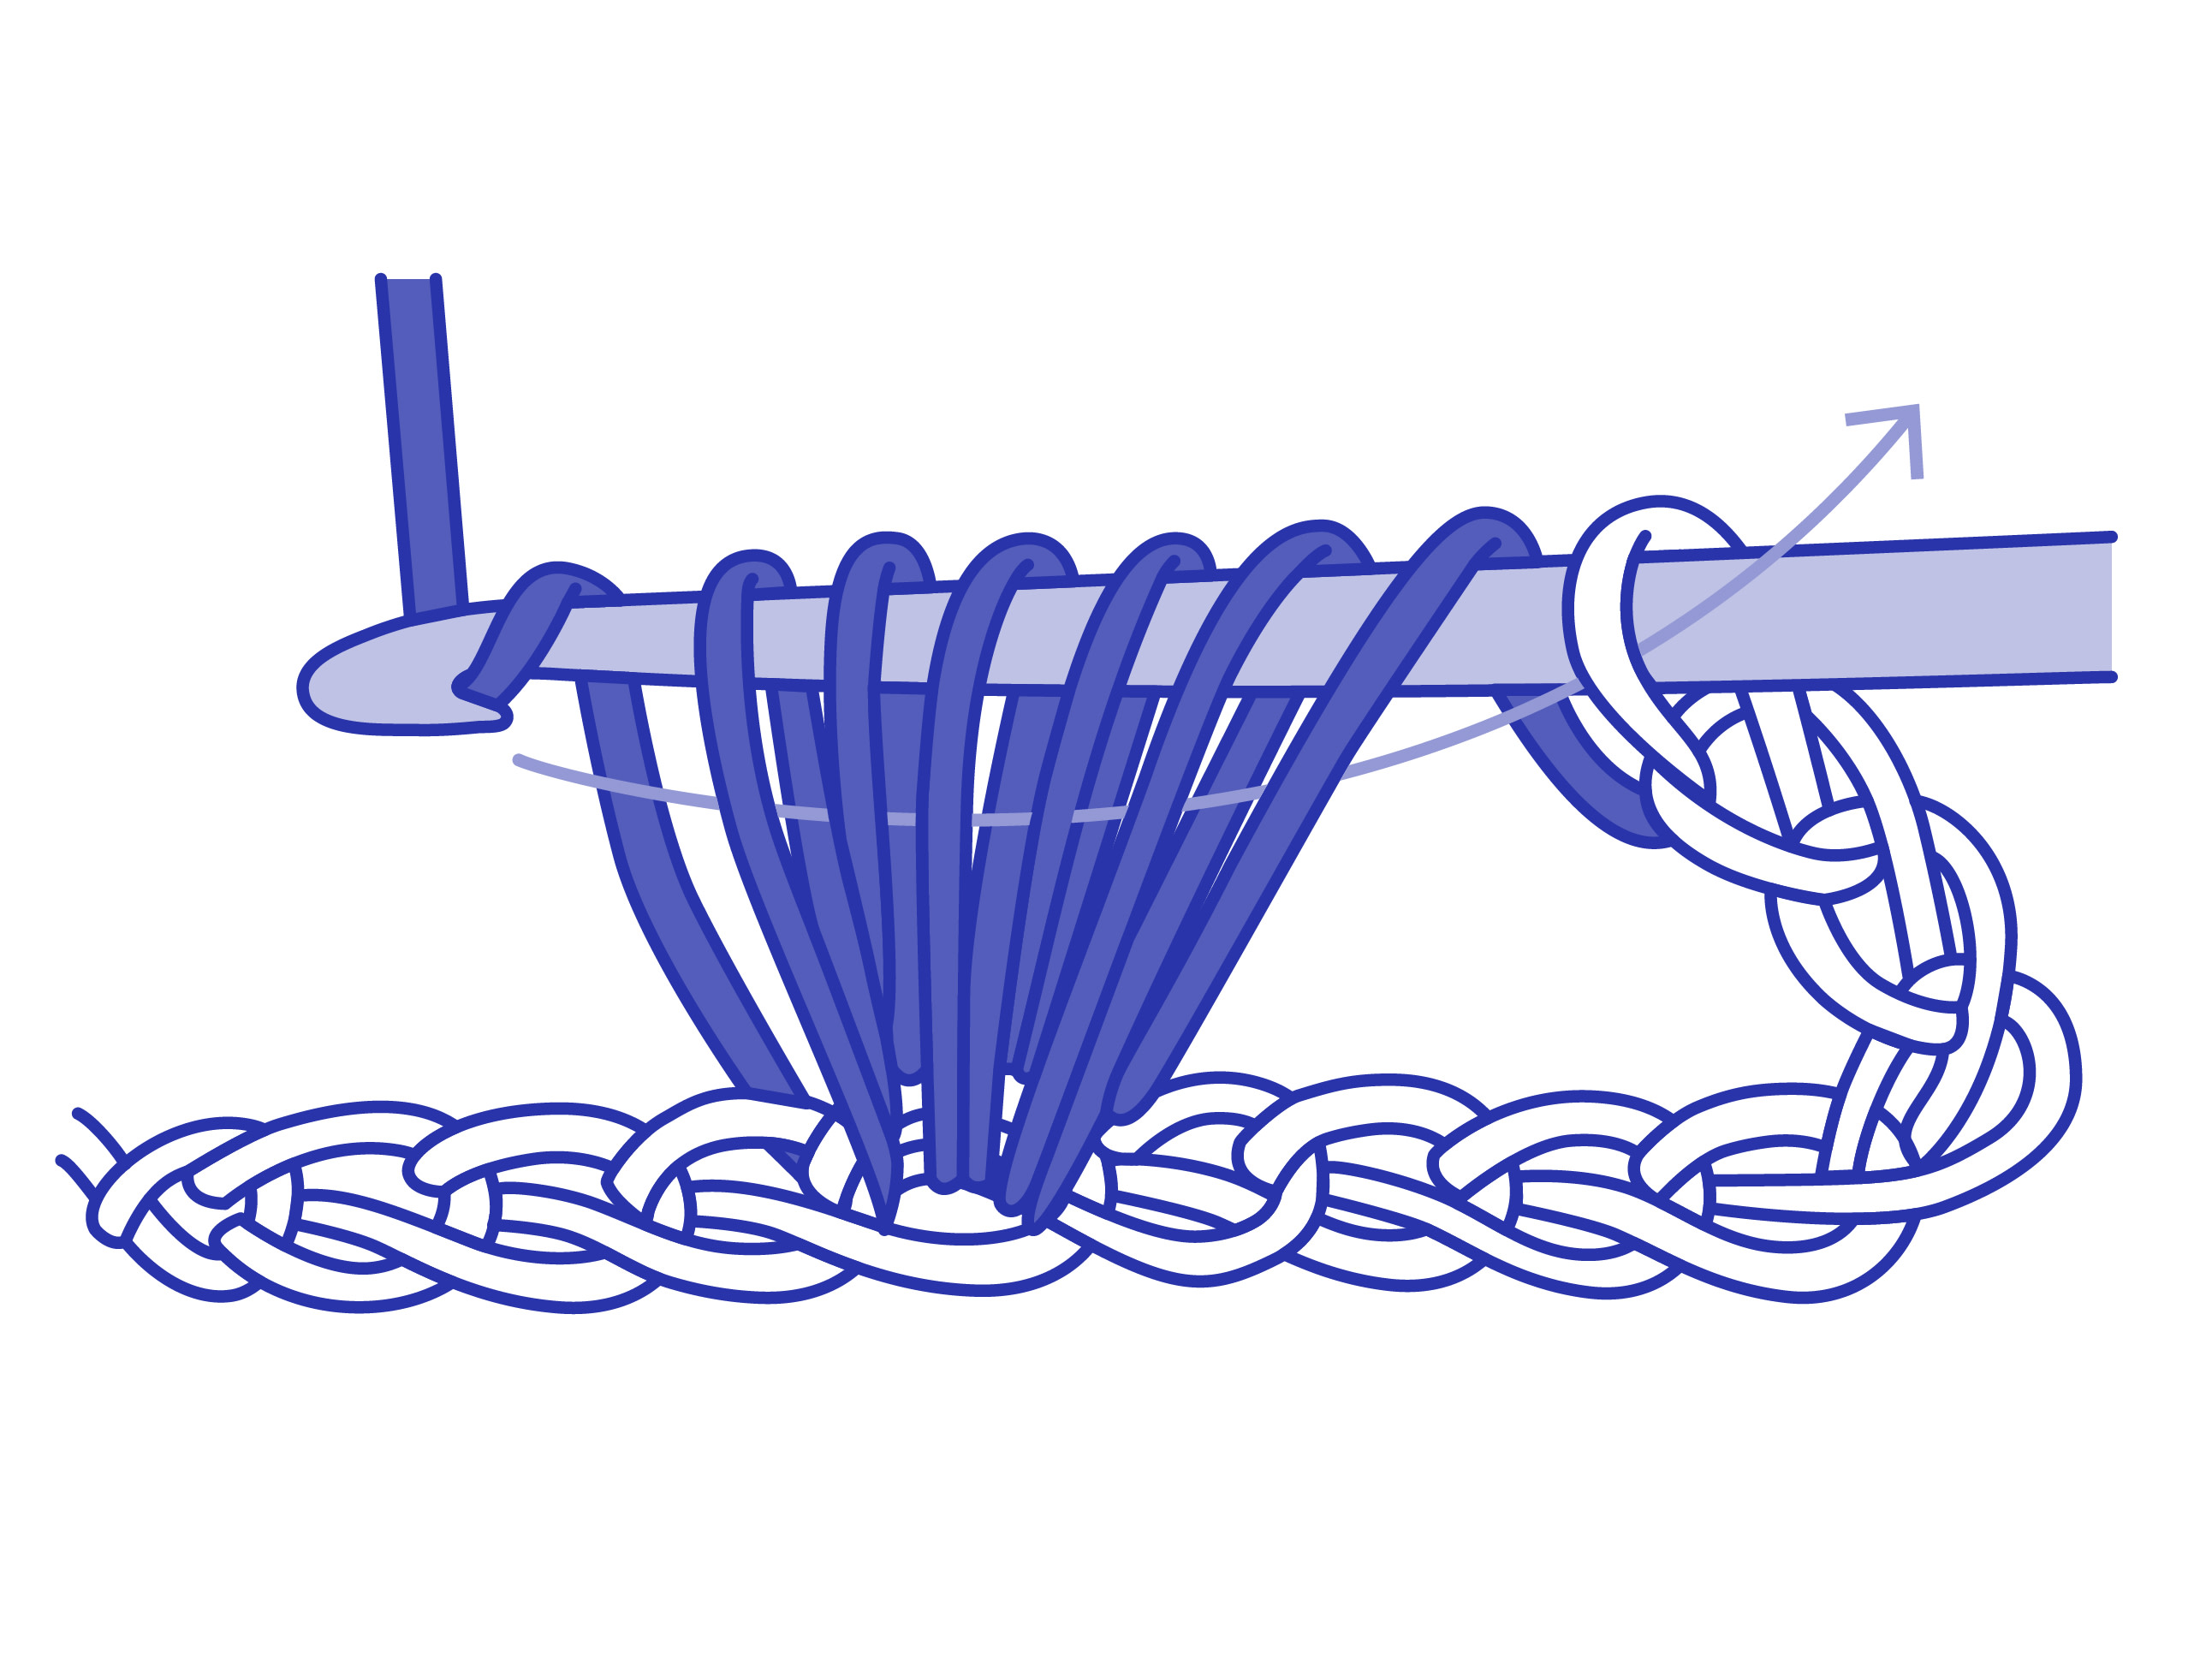
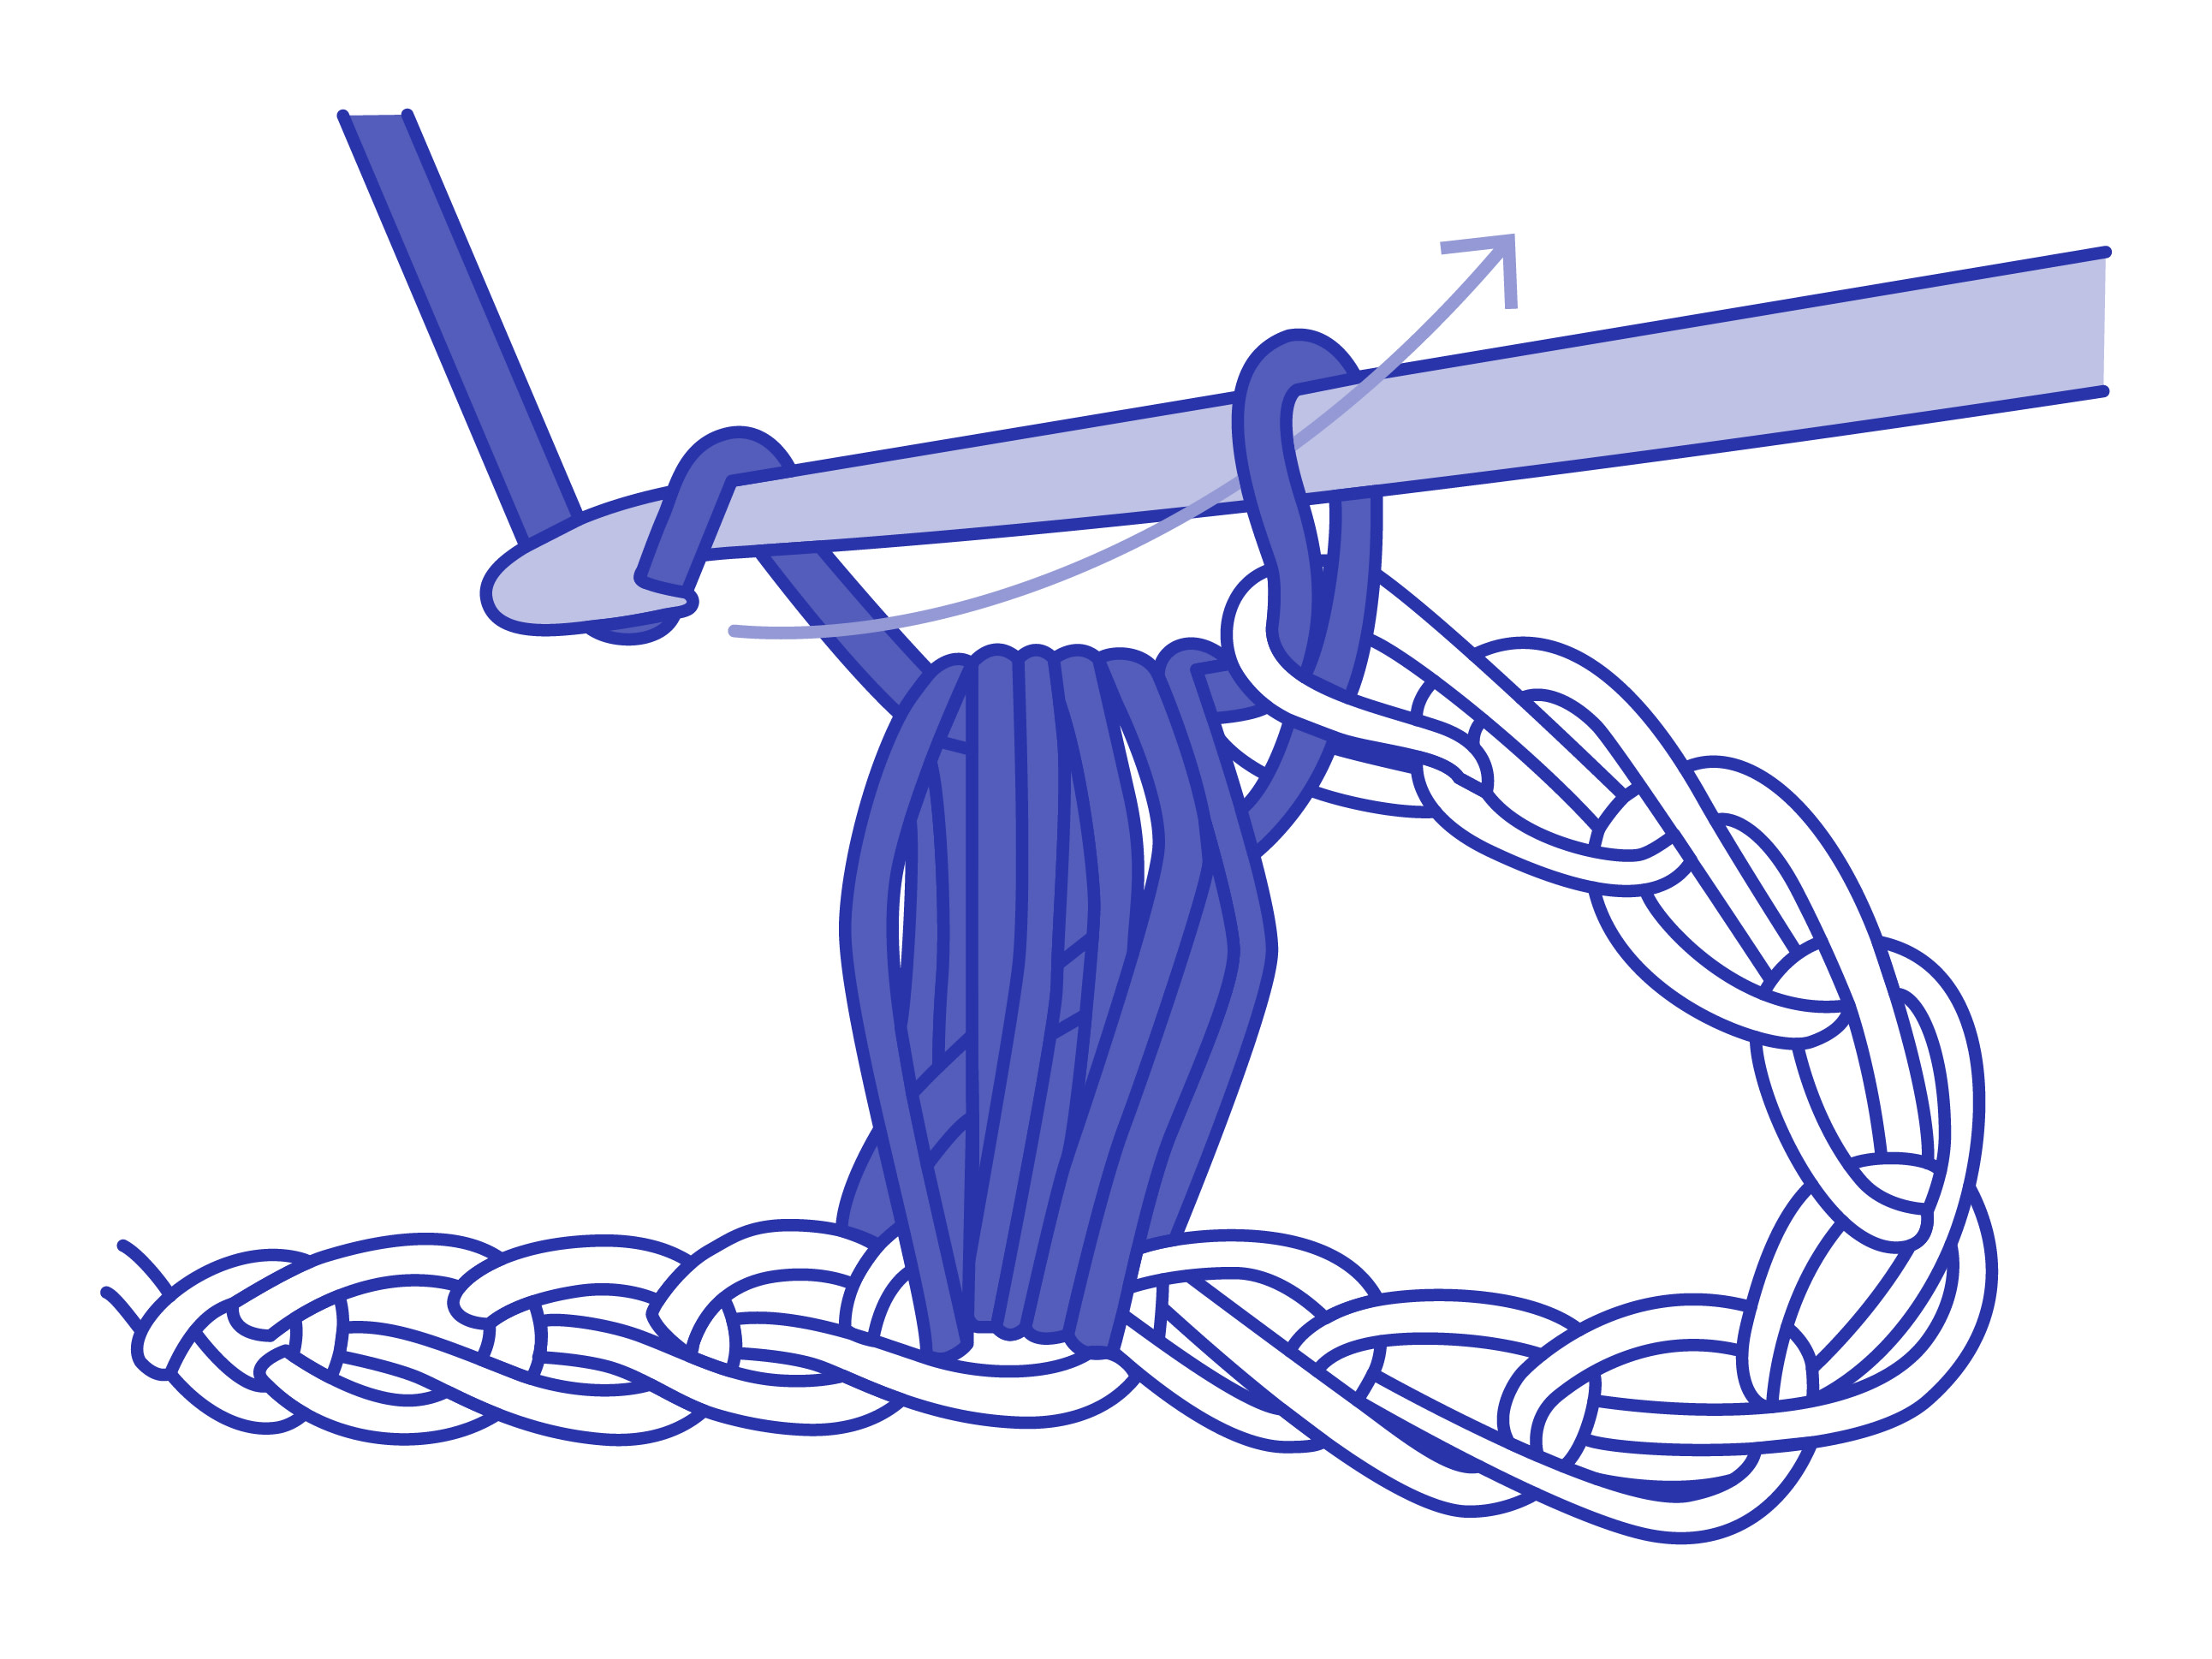
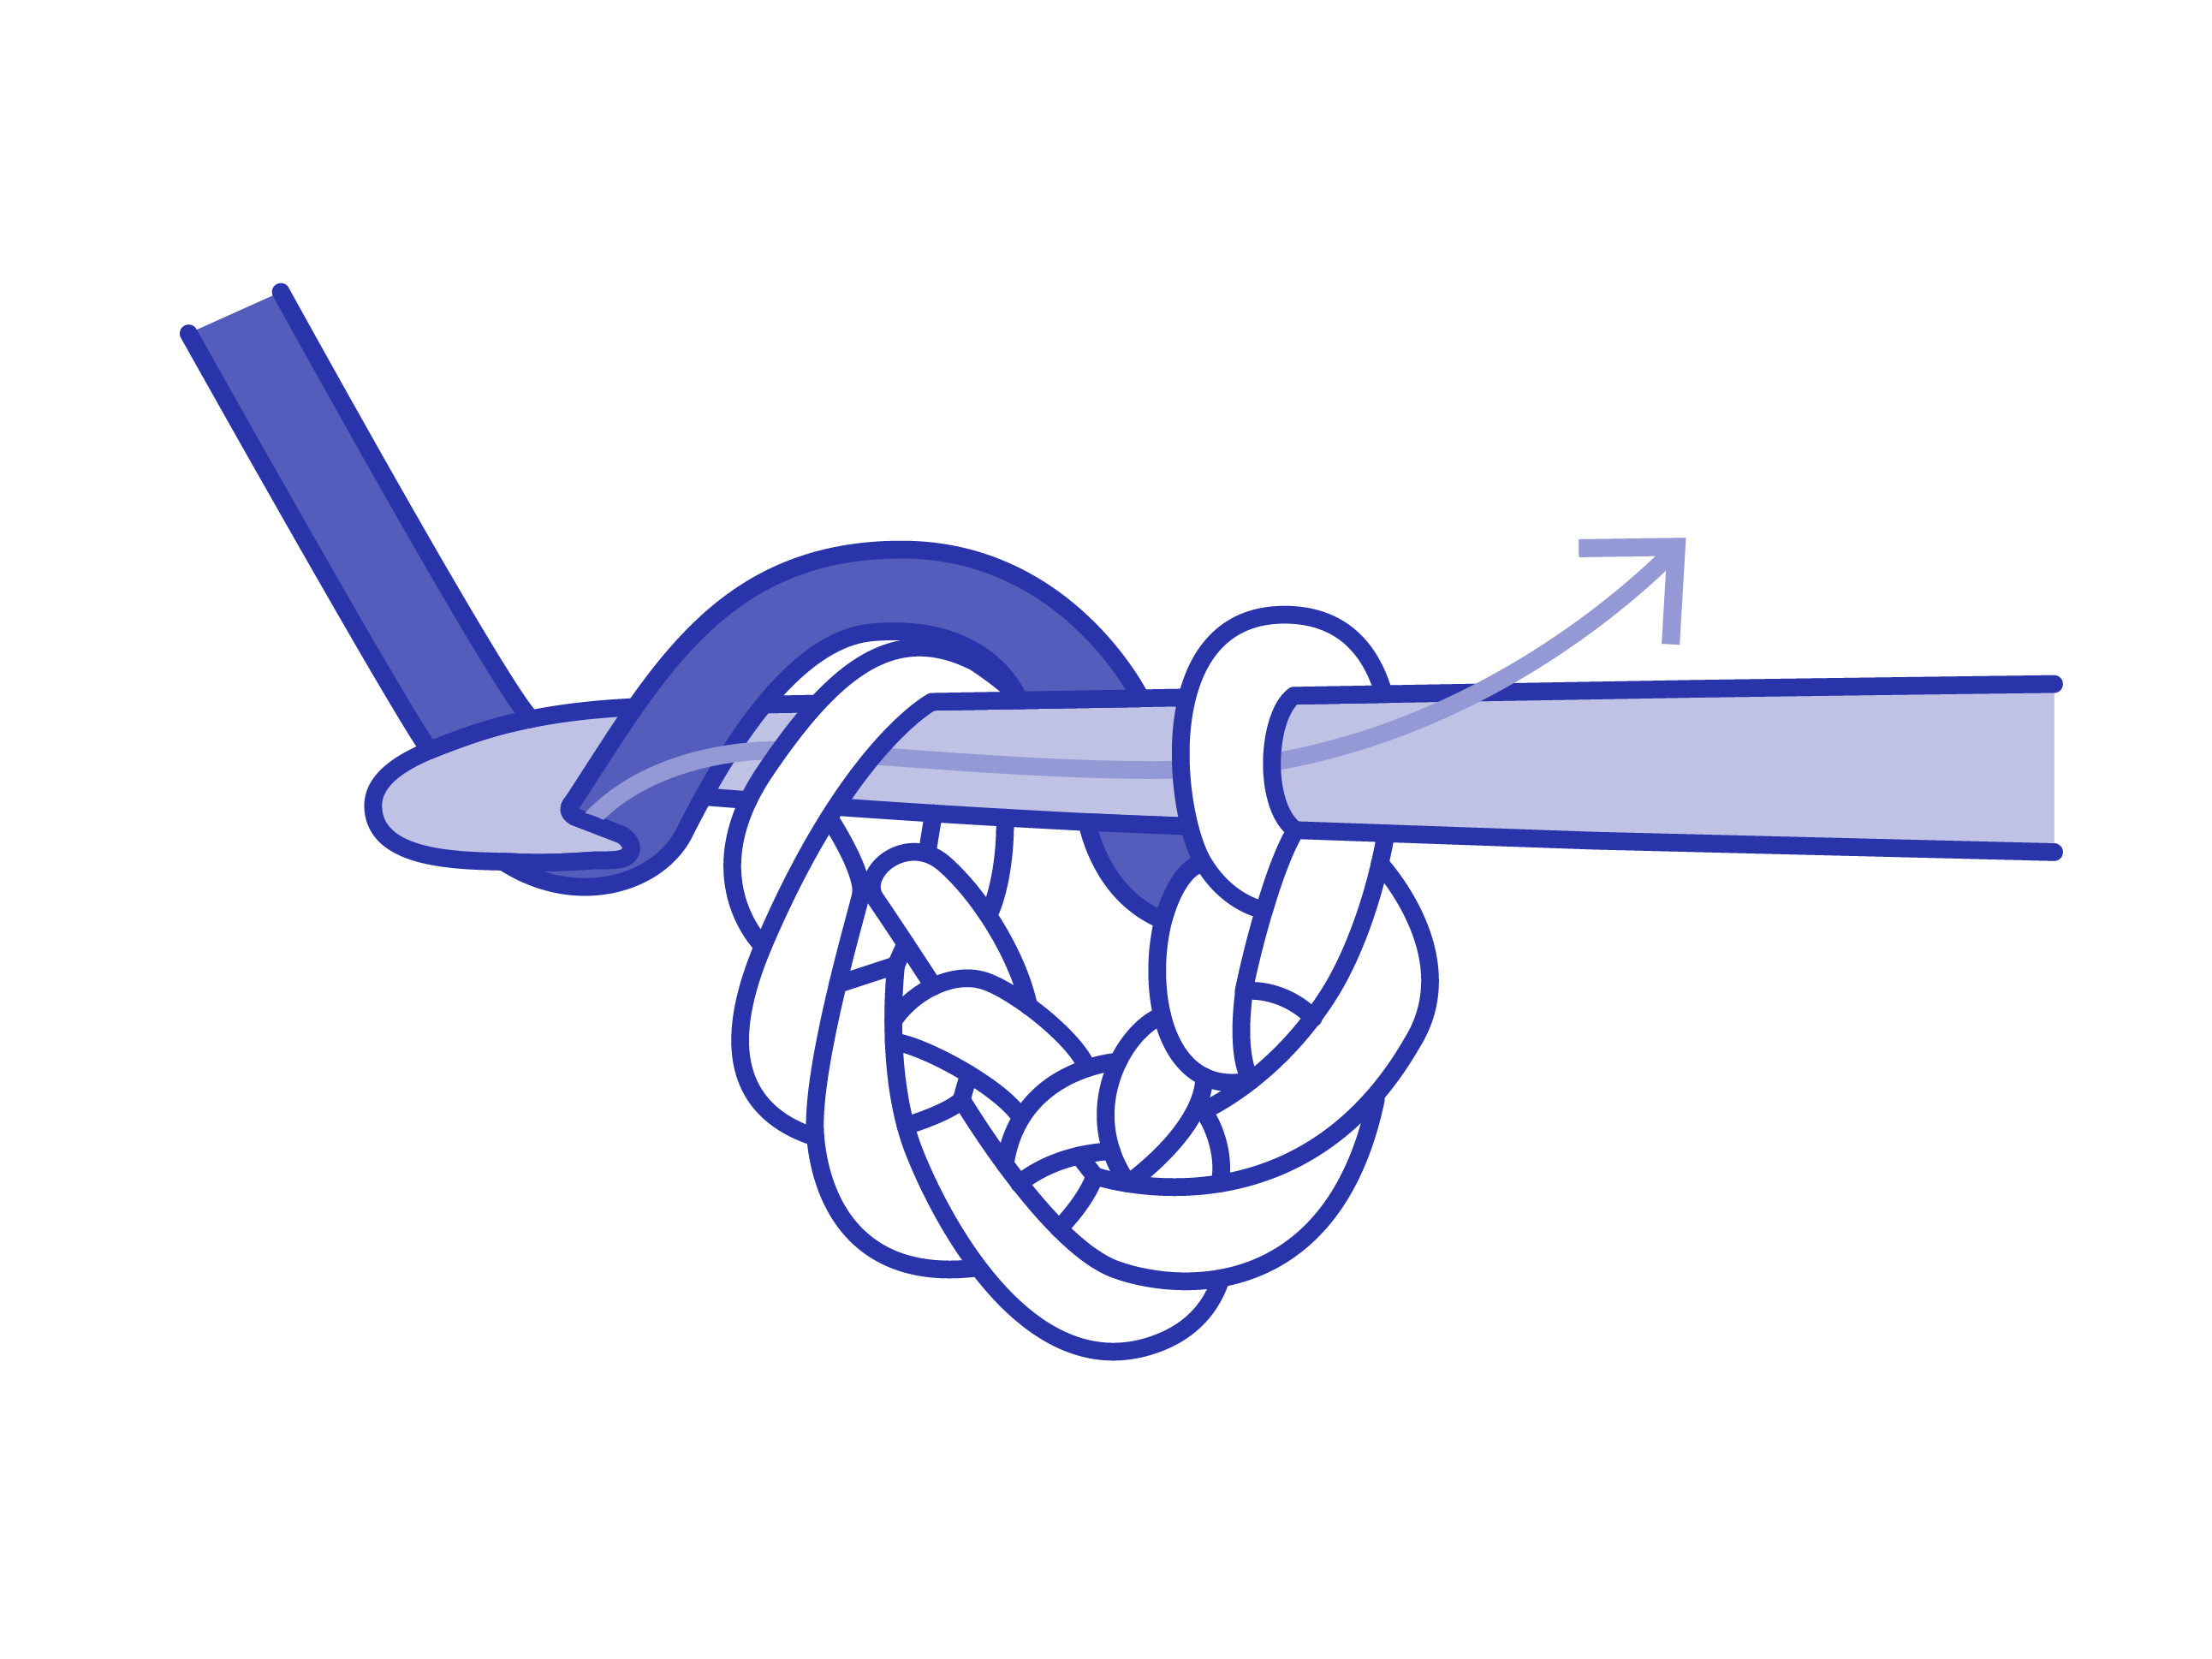
Loop yarn over hook and draw through 2 loops, (there are now four loops remaining on the hook), *yarn over hook and draw through two loops**, repeat from * to ** two more times. This completes one triple treble crochet.
Yarn over hook three times, then insert the hook into next stitch. Yarn over hook and draw yarn through the stitch - you have five loops on the hook.
Loop yarn over hook and draw through 2 loops, (there are now four loops remaining on the hook), *yarn over hook and draw through two loops**, repeat from * to ** two more times. This completes one triple treble crochet.
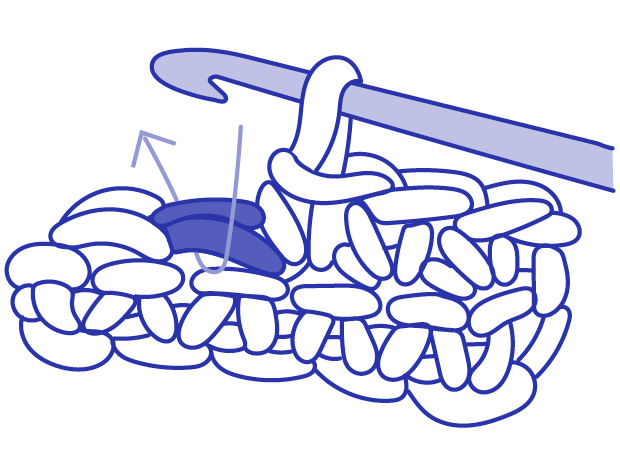
Several Treble (US Term: Double) Into the Same Stitch
3 treble crochet
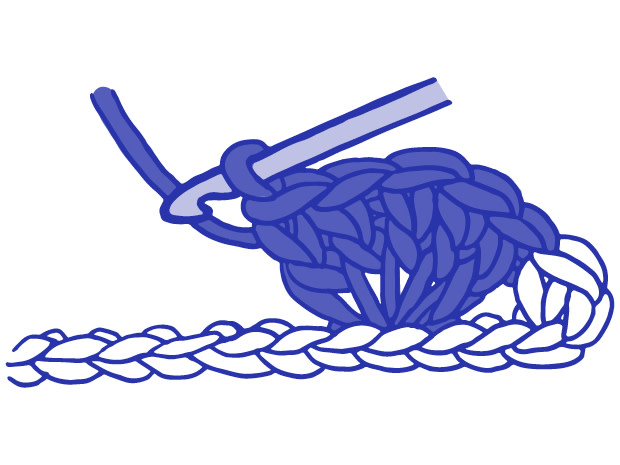
5 treble crochet

Work the number of treble crochets required for the pattern.
3 treble crochet
5 treble crochet
Work the number of treble crochets required for the pattern.
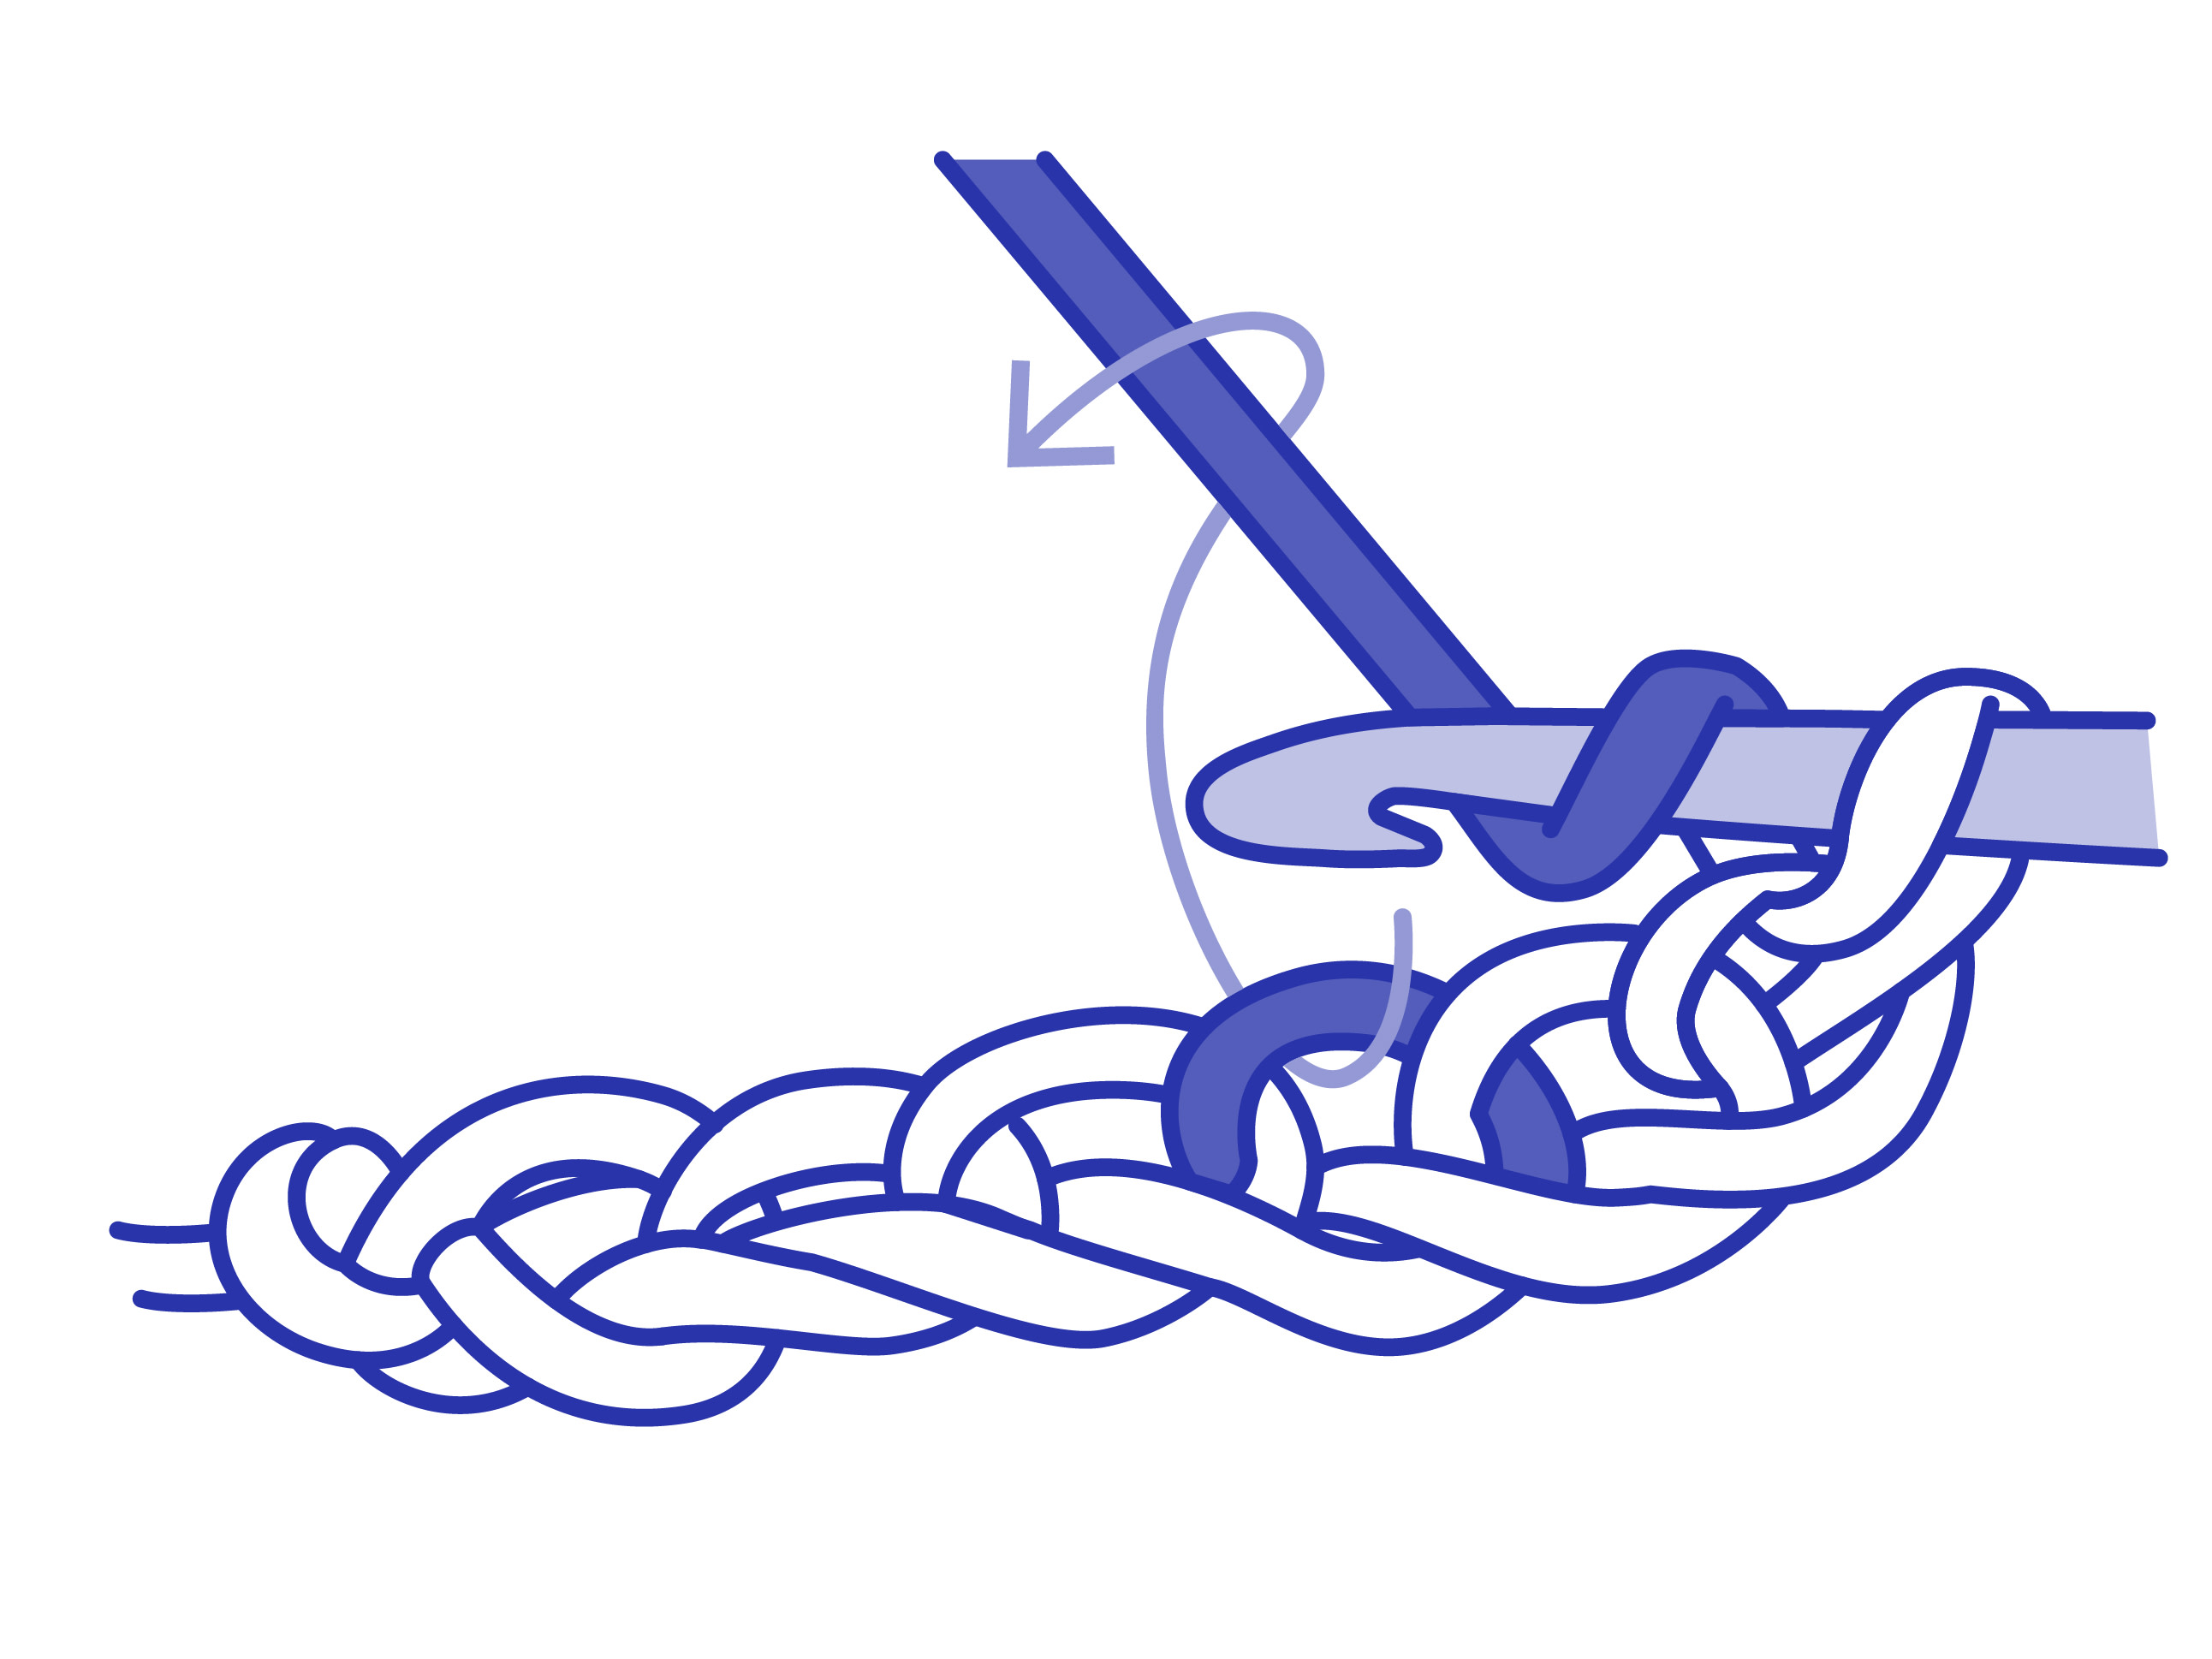
Treble 2 Together (US Term: Double 2 Together)
Work 2 trebles into next stitch leaving last loop of each on hook, yarn over and draw through all 3 loops on hook.
Work 2 trebles into next stitch leaving last loop of each on hook, yarn over and draw through all 3 loops on hook.
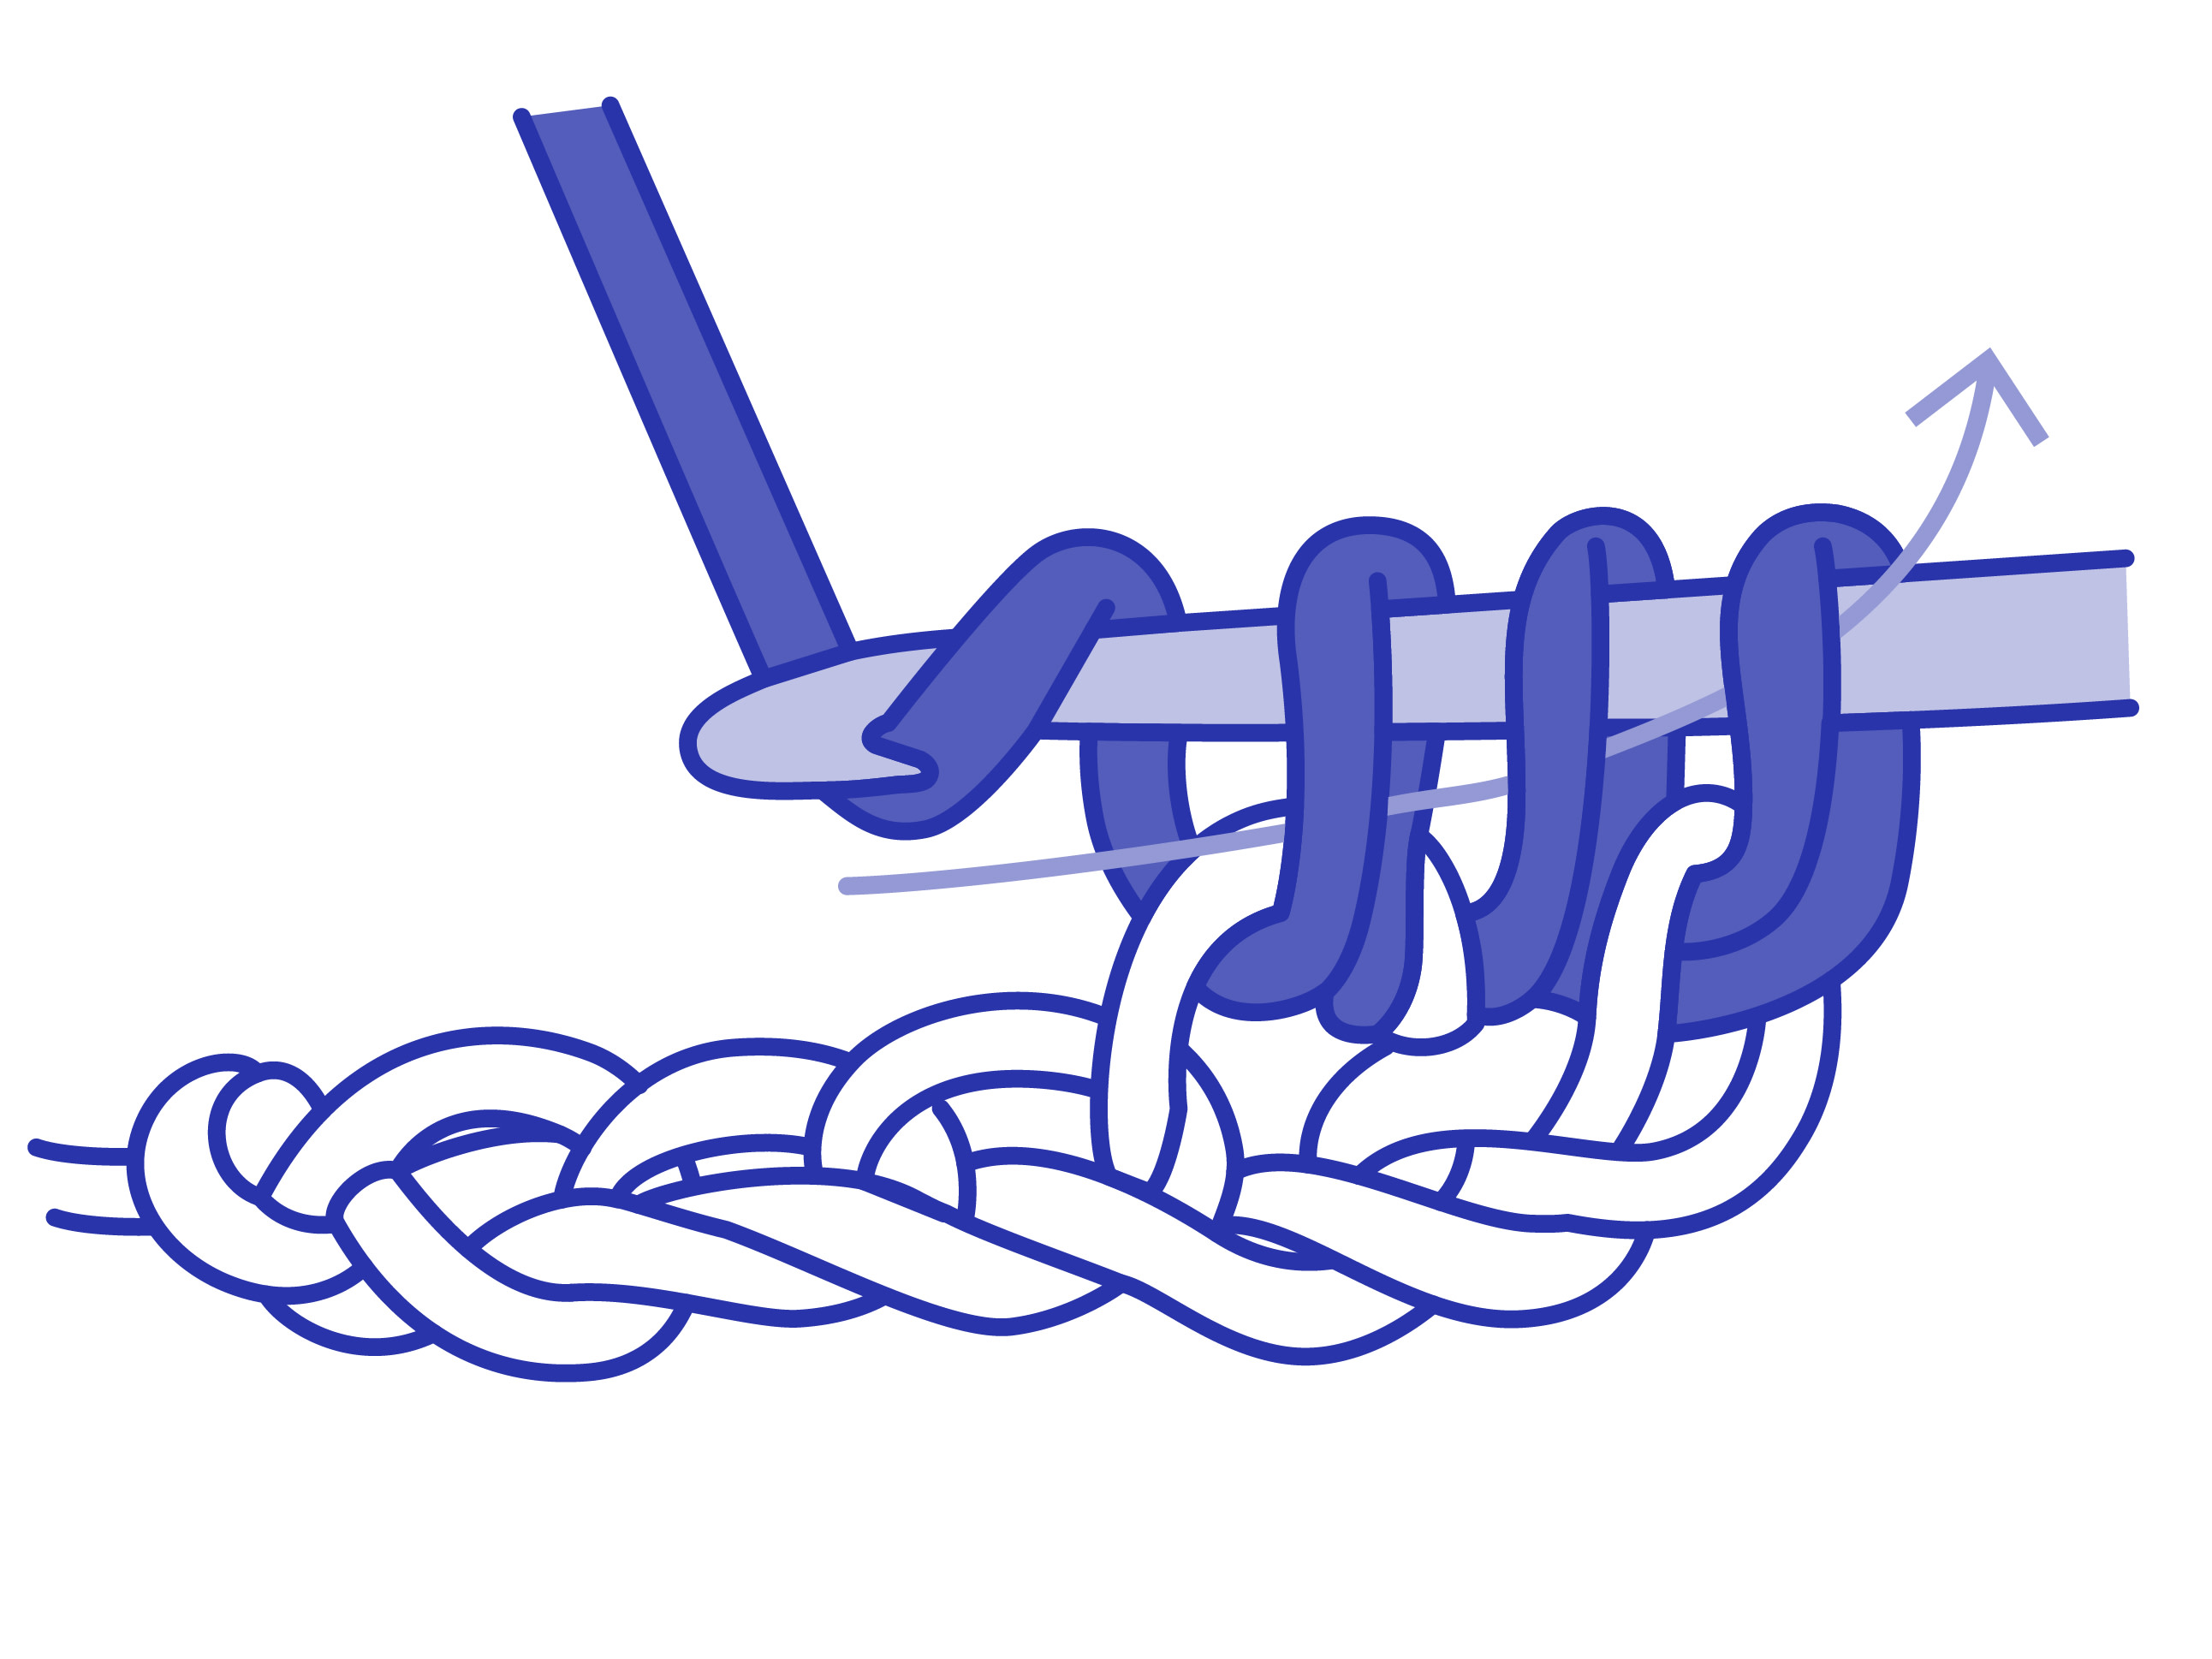
Treble 3 together (US Term: Double 3 Together)
Work 3 trebles into same space leaving last loop of each on hook, yarn over and draw through all 4 loops on hook.
Work 3 trebles into same space leaving last loop of each on hook, yarn over and draw through all 4 loops on hook.
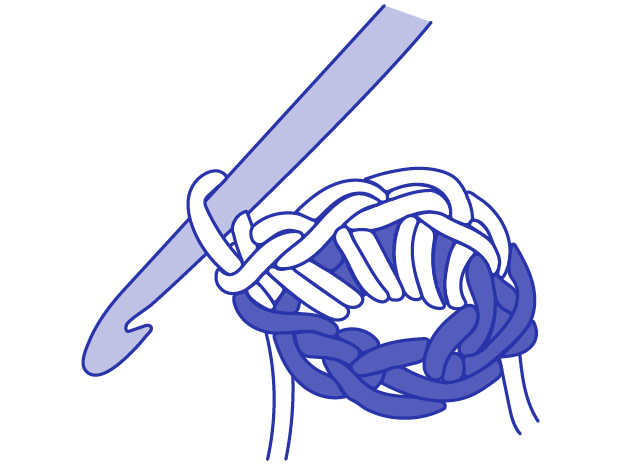
Magic Loop (Magic Ring)
This technique is used for starting off a circular piece and many amigurumi patterns. You start by making a loop with your yarn, and then create your first round of stitches by working into this loop.
With the tail of the yarn in the palm of your left hand, form a loop of yarn around your index and middle fingers. The working yarn is now on the right.

Hold the yarn tightly between your thumb and a finger at the point where the loop overlaps so it doesn’t come undone. Insert your crochet hook into the “magic loop” from front to back. Wrap the yarn around the hook and pull it through.

Make one chain stitch.
With the tail of the yarn in the palm of your left hand, form a loop of yarn around your index and middle fingers. The working yarn is now on the right.
Hold the yarn tightly between your thumb and a finger at the point where the loop overlaps so it doesn’t come undone. Insert your crochet hook into the “magic loop” from front to back. Wrap the yarn around the hook and pull it through.
Make one chain stitch.

Insert your hook into the ring, wrap the yarn around the hook and pull it through. There are now two loops on your crochet hook. Wrap the yarn around the hook again and pull it through both loops. You have now made a Double Crochet stitch.
Repeat step 4 until you have made the number of stitches indicated by your pattern.

Join the round with a slip stitch. Pull on the tail end of your yarn to close the hole in the center of the work - magic!
Insert your hook into the ring, wrap the yarn around the hook and pull it through. There are now two loops on your crochet hook. Wrap the yarn around the hook again and pull it through both loops. You have now made a Double Crochet stitch.
Repeat step 4 until you have made the number of stitches indicated by your pattern.
Join the round with a slip stitch. Pull on the tail end of your yarn to close the hole in the center of the work - magic!
Crab Stitch
Crab Stitch, or reverse UK double crochet, is made by working double crochet stitches backwards.
Working from left to right, insert the hook into the next stitch or space on the right, wrap the yarn around the hook and pull it through. There are now two loops on your hook.
Wrap the yarn around your hook again and pull it through both loops on your hook. You have now completed the first Crab Stitch.
Increase
Increase the number of stitches by working two of the same stitches into the next stitch or space, as indicated in the pattern. For example, if the pattern is being worked in double crochet, the increases are made by making two double crochet stitches into the same stitch or space.
Back Loop Only

Usually, you insert your crochet hook under both legs of the stitch you are working into. When a pattern states ‘back loop only’, just insert the hook under the back loop of the next stitch from the front to the back.
Usually, you insert your crochet hook under both legs of the stitch you are working into. When a pattern states ‘back loop only’, just insert the hook under the back loop of the next stitch from the front to the back.
Bobble Stitch
Bobbles are made by working several open treble crochet stitches into the same stitch or chain space and then closing them together as one stitch.

Begin to make a treble crochet - wrap the yarn around the hook and then insert the hook into the next stitch or space.
Wrap the yarn around the hook and pull it through the stitch or space. There are now three loops on the hook.

Wrap the yarn around the hook again and pull it through the first two loops on the hook. There are now two loops on the hook. Do not complete this stitch, instead return to step one to begin the next treble crochet in the same stitch or space.
When you have made the number of open treble stitches specified in the pattern, you will have several loops on your hook, one for each of the treble crochets, plus the stitch you started with. Close them together by wrapping the yarn around the hook and pulling it through all the loops to complete the bobble.
Begin to make a treble crochet - wrap the yarn around the hook and then insert the hook into the next stitch or space.
Wrap the yarn around the hook and pull it through the stitch or space. There are now three loops on the hook.
Wrap the yarn around the hook again and pull it through the first two loops on the hook. There are now two loops on the hook. Do not complete this stitch, instead return to step one to begin the next treble crochet in the same stitch or space.
When you have made the number of open treble stitches specified in the pattern, you will have several loops on your hook, one for each of the treble crochets, plus the stitch you started with. Close them together by wrapping the yarn around the hook and pulling it through all the loops to complete the bobble.
Half Treble (US Term: Half Double)
This stitch is a taller version of double crochet stitch. It uses a turning chain of 2 stitches.
Wrap the yarn around the hook and then insert the hook into the next stitch or space.

Wrap the yarn around the hook and pull it through the stitch or space. There are now three loops on the hook.
Wrap the yarn around the hook and pull it through all three loops on the hook to complete the stitch.
Wrap the yarn around the hook and then insert the hook into the next stitch or space.
Wrap the yarn around the hook and pull it through the stitch or space. There are now three loops on the hook.
Wrap the yarn around the hook and pull it through all three loops on the hook to complete the stitch.
Two Half Treble (US Term: Half Double) Into One Stitch
Increase the number of stitches by working two of the same stitches into the next stitch or space, as indicated in the pattern. The steps below describe how to increase by working two half treble crochet stitches into the same stitch or space.
Wrap the yarn around the hook, insert the hook into the next stitch or space, wrap the yarn around the hook and pull it through. There are now three loops on your hook.
Wrap the yarn around the hook again and pull it through all three stitches. You have now completed one half treble crochet.
Repeat steps 1 and 2 to make another half treble crochet in the same stitch or space.
Decrease – e.g. Double Crochet 2 Together (US Term: Single Crochet 2 Together)
Decrease the number of stitches by crocheting two open stitches together. This creates one stitch on the next row instead of two. The steps below describe how to decrease double crochet stitches.
Insert the hook into the next stitch or space. Wrap the yarn around the hook and pull it through. There are now two loops on the hook.
Do not complete this stitch, instead, insert the hook into the next stitch or space, wrap the yarn round the hook and pull it through. There are now three loops on the hook.
Wrap the yarn around the hook and pull it through all three loops. You now have two double crochet stitches closed together into one stitch - a decrease.
Puff Stitch
Create a puff stitch by making several loops into the same stitch or space and then close them together as if they are one stitch. The size of the puff will depend on how many loops you create.
Wrap the yarn around the hook and insert the hook into the next stitch or space, pull the yarn through. There are now three loops on the hook.
Repeat step 1 twice (or the number specified in the pattern). There are now 7 loops on the hook.
Wrap the yarn around the hook and pull it through all the loops. Then make one chain to complete the puff stitch.
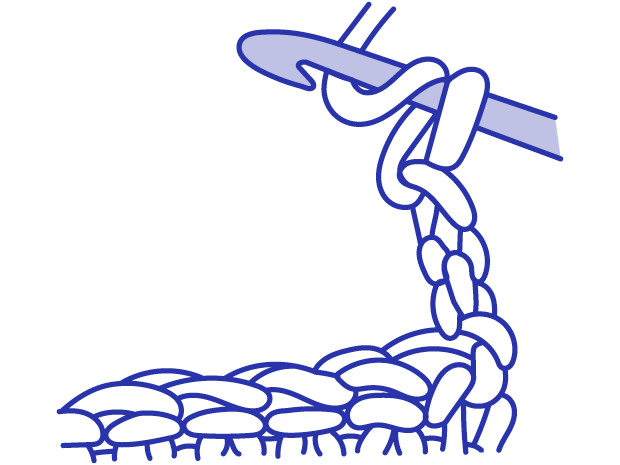
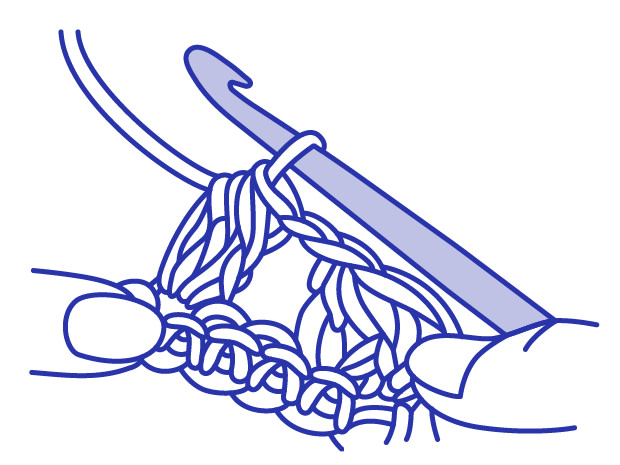
Treble Crochet (US Term: Double Crochet) into a Ring
To crochet into a ring you can either create a magic ring or create a ring of chain stitches. A ring of chain stitches will leave a hole in the middle of your crochet whereas a magic ring can be completely closed.
Start by making the number of chains the pattern indicates. Join the chain into a circle with a slip stitch into the first chain.
Then make three chains. This is the starting chain for the next round of treble crochets and counts as the first stitch.
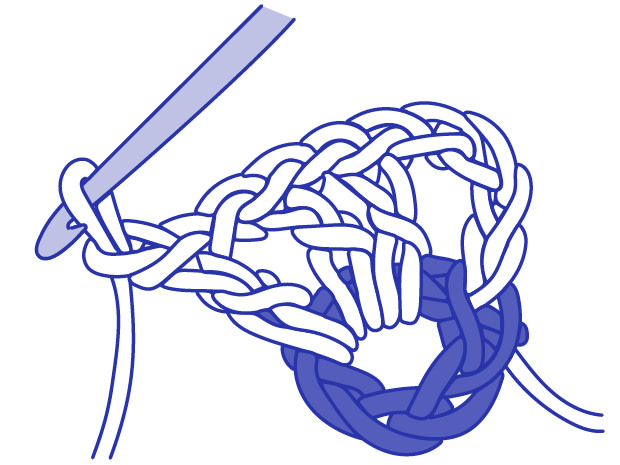
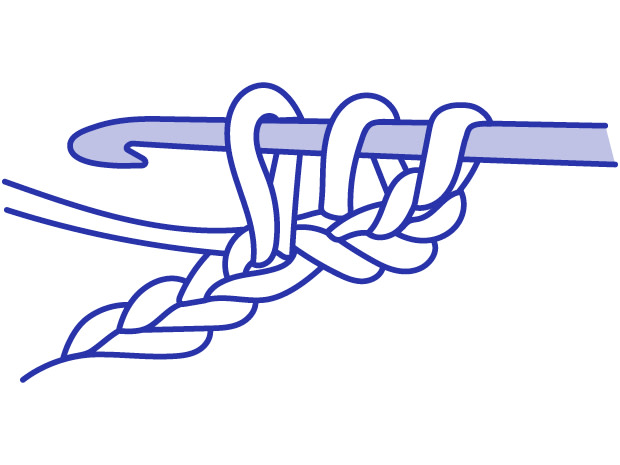
Wrap the yarn over the hook in a clockwise direction. Insert hook into the ring. Catch the yarn with the hook and draw through. You have 3 loops on your hook. Wrap the yarn over the hook in a clockwise direction and draw through the 2 loops on hook. 2 loops remain on your hook. Wrap the yarn over the hook in a clockwise direction once more and draw through the remaining 2 loops. 1 loop remains on your hook.
Now make the number of treble crochet stitches your pattern indicates into the centre of the ring and finish off by working a slip stitch into the top of the starting chain.
Start by making the number of chains the pattern indicates. Join the chain into a circle with a slip stitch into the first chain.
Then make three chains. This is the starting chain for the next round of treble crochets and counts as the first stitch.
Wrap the yarn over the hook in a clockwise direction. Insert hook into the ring. Catch the yarn with the hook and draw through. You have 3 loops on your hook. Wrap the yarn over the hook in a clockwise direction and draw through the 2 loops on hook. 2 loops remain on your hook. Wrap the yarn over the hook in a clockwise direction once more and draw through the remaining 2 loops. 1 loop remains on your hook.
Now make the number of treble crochet stitches your pattern indicates into the centre of the ring and finish off by working a slip stitch into the top of the starting chain.