Learn how to do macramé with DMC. This guide provides step by step diagrams for popular macramé knots. It's designed to be a companion to our video tutorials which can be viewed here. Use the links below to jump to specific knots or scroll through them all for inspiration.
Use these links to jump to the steps and diagrams for key knots.
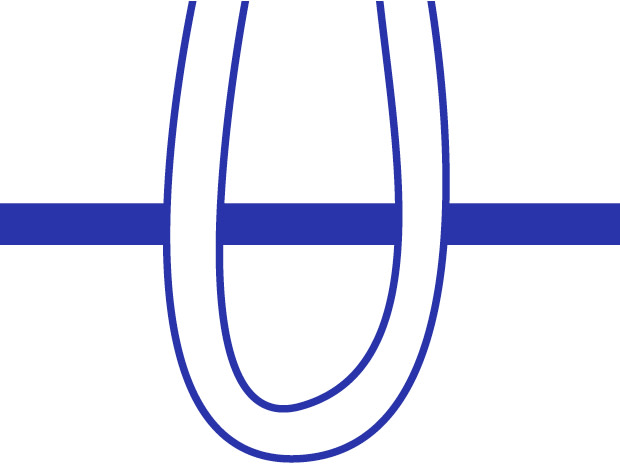
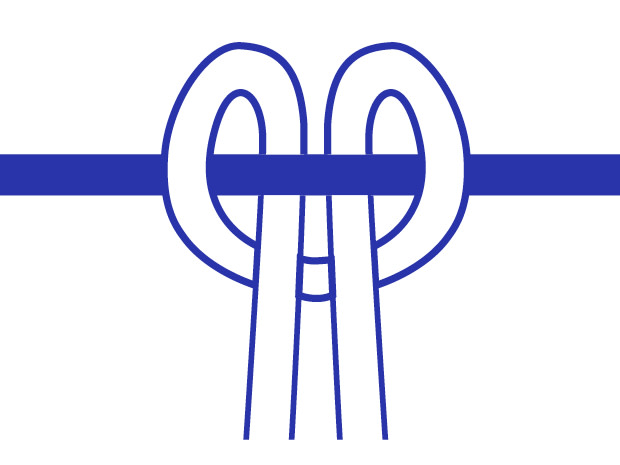
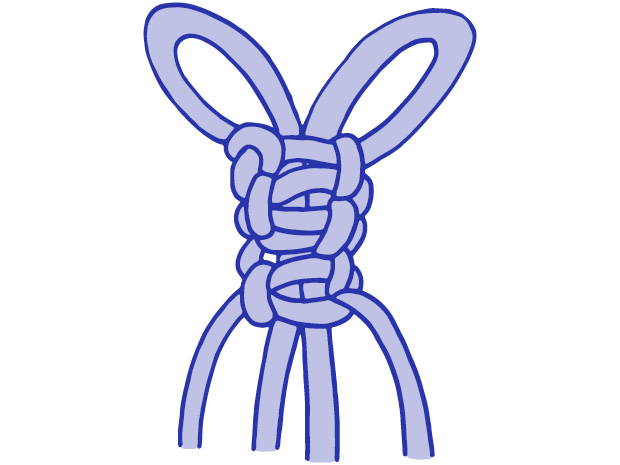
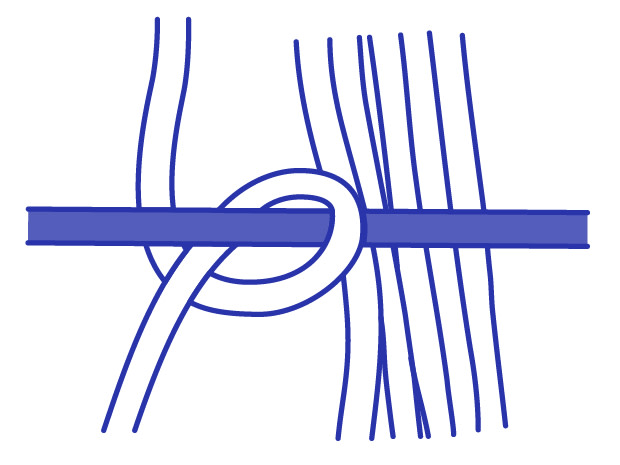
Lark's Head Knot
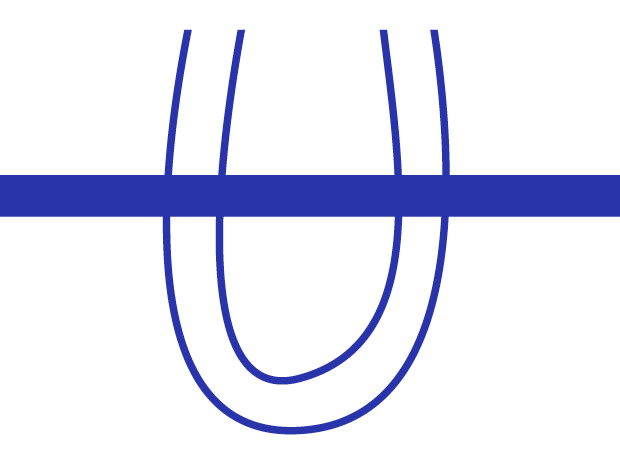
Fold your yarn in half, creating a loop in the center. Place your dowelling on top of the yarn, just above the loop.
Take both ends of the yarn and wrap them over the dowelling and then down through the loop.
Pull on the yarn ends to tighten the knot around the dowelling.
Fold your yarn in half, creating a loop in the center. Place your dowelling on top of the yarn, just above the loop.
Take both ends of the yarn and wrap them over the dowelling and then down through the loop.
Pull on the yarn ends to tighten the knot around the dowelling.
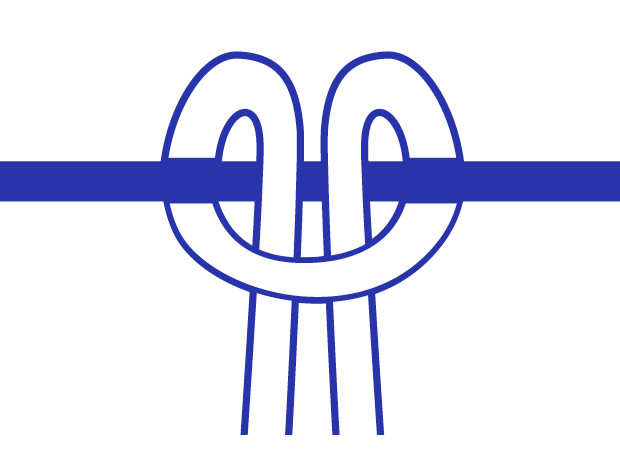
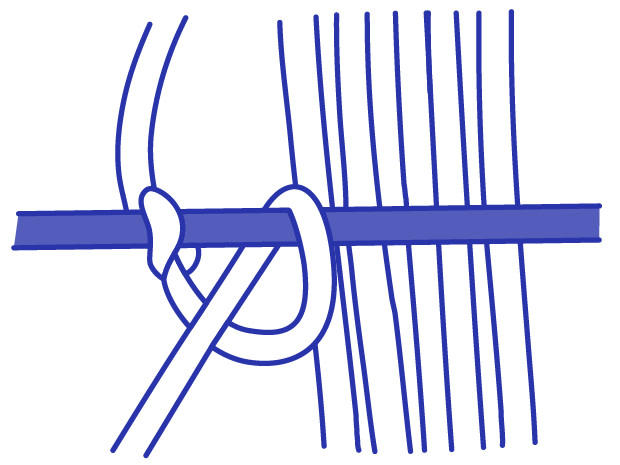
Reverse Lark's Head Knot
Fold the working strand in half and place the central loop over the middle strands (on top). The folded portion should be forward, and the ends heading towards the back of the board.
Bring the two halves towards you, passing under the middle strand and over the folded area of the working strand.
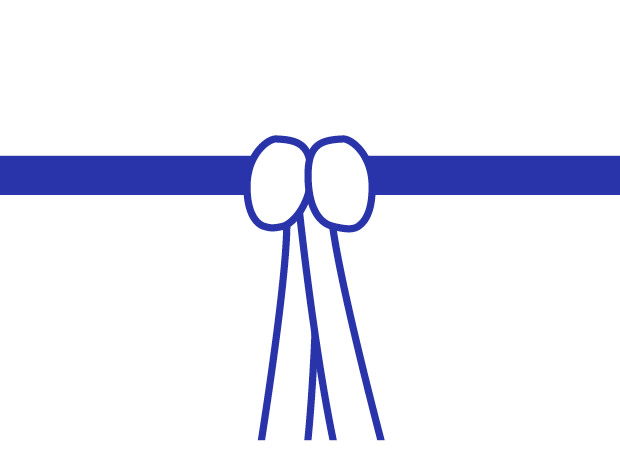
Pull them firmly to tighten the knot.
Fold the working strand in half and place the central loop over the middle strands (on top). The folded portion should be forward, and the ends heading towards the back of the board.
Bring the two halves towards you, passing under the middle strand and over the folded area of the working strand.
Pull them firmly to tighten the knot.
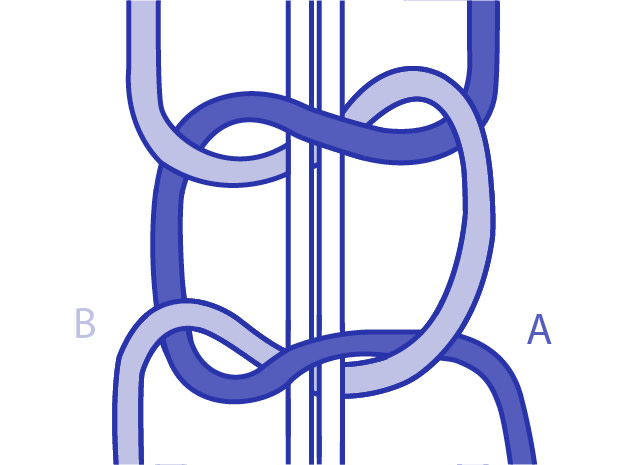
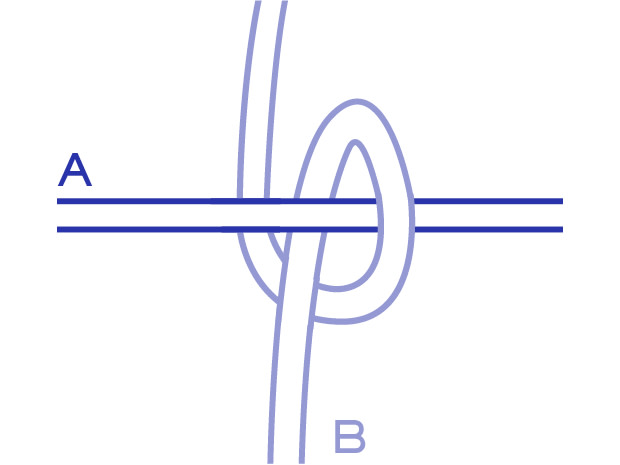
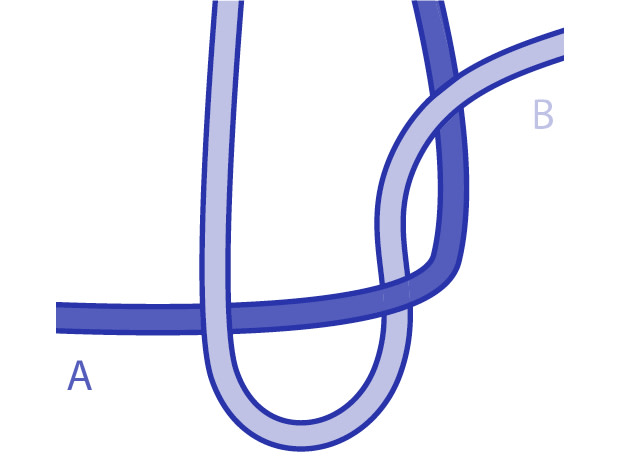
Square Knot (left hand)

Bring A from left to right, over the middle strands and under B.
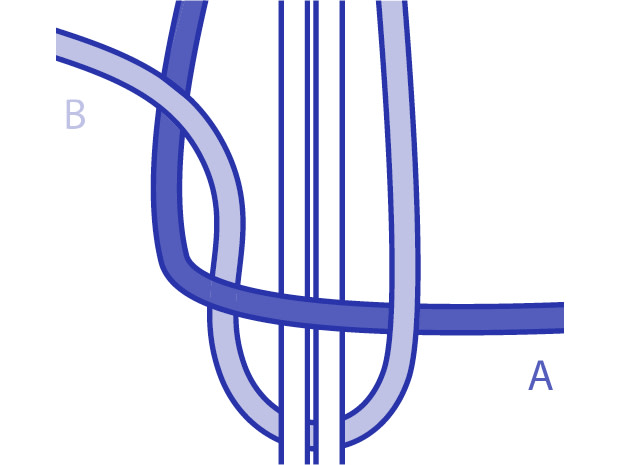
Now bring B under the 2 middle strands and through the loop formed by A. Pull on both A and B to tighten them.
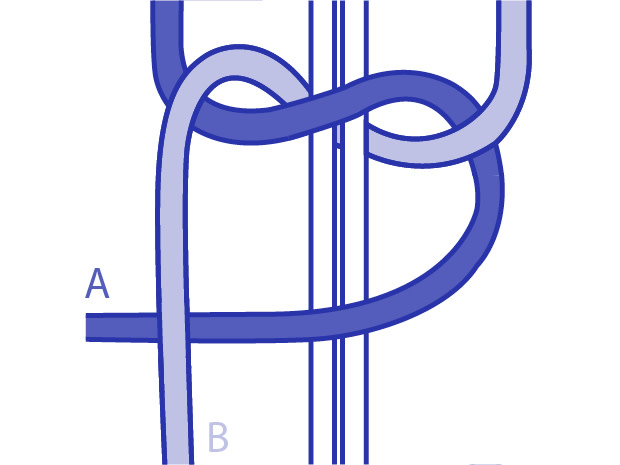
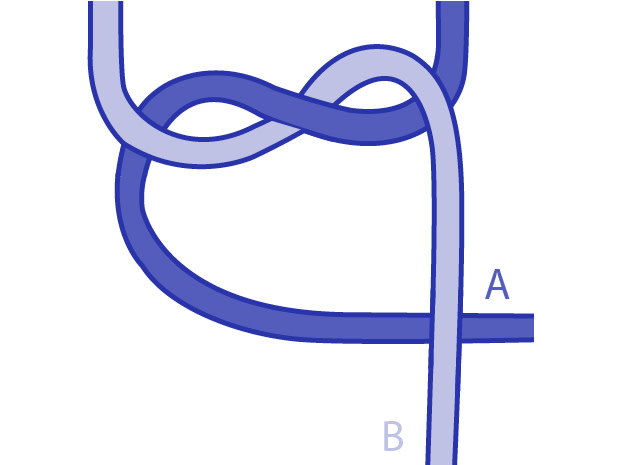
Bring A from left to right, over the middle strands and under B.
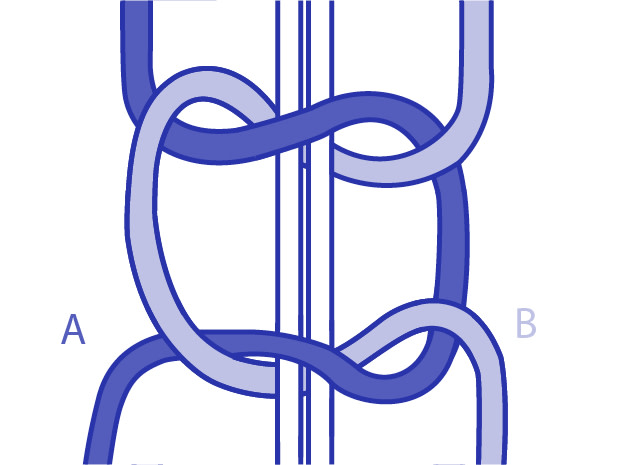
Bring B under the 2 middle strands and through the new loop formed by A. Pull on A and B again to tighten them – you have now made one square knot.
Bring A from left to right, over the middle strands and under B.
Now bring B under the 2 middle strands and through the loop formed by A. Pull on both A and B to tighten them.
Bring A from left to right, over the middle strands and under B.
Bring B under the 2 middle strands and through the new loop formed by A. Pull on A and B again to tighten them – you have now made one square knot.
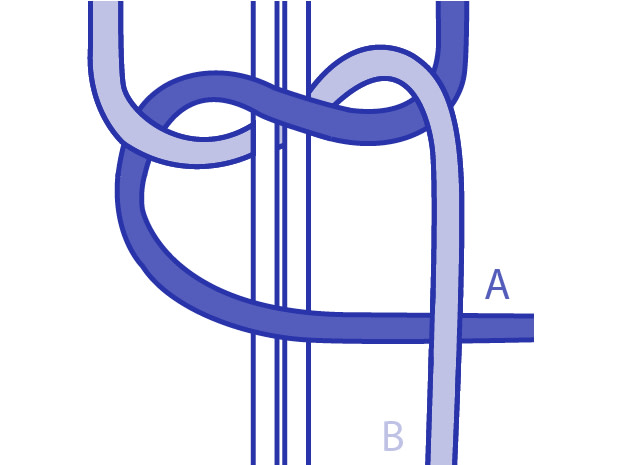
Square Knot (right hand)
Bring A from right to left, over the middle strands and under B.
Now bring B under the 2 middle strands and through the loop formed by A. Pull on both A and B to tighten them.
Bring A from left to right, over the middle strands and under B.
Bring B under the 2 middle strands and through the new loop formed by A. Pull on A and B again to tighten them – you have now made one square knot.
Alternating Square Knot
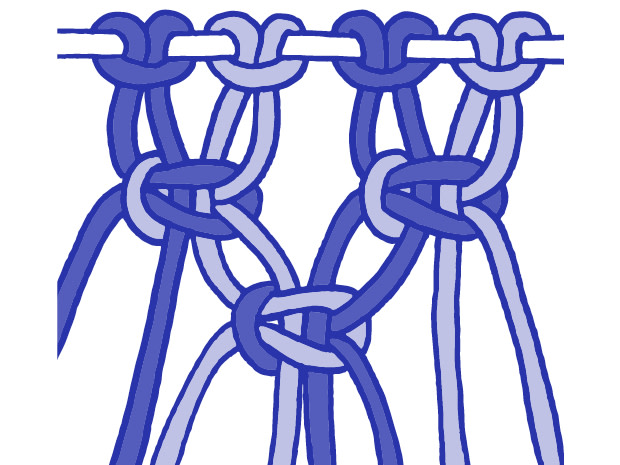
Make a first row of square knots by grouping the cords in 4. Make a square knot in the next row, alternating the knots. Leave (do not work) the first 2 cords of the left side knot, and the other 2 cords of the right side.
Make a first row of square knots by grouping the cords in 4. Make a square knot in the next row, alternating the knots. Leave (do not work) the first 2 cords of the left side knot, and the other 2 cords of the right side.
Twisting Half Square Knot
The twisting half square knot is also called the half knot spiral because it is made with 1/2 of a square knot. When you tie a regular square knot, you alternate the direction of the cords for each half, which keeps it flat. For this design, the cords are moved in the same direction each time, which causes the twisting.
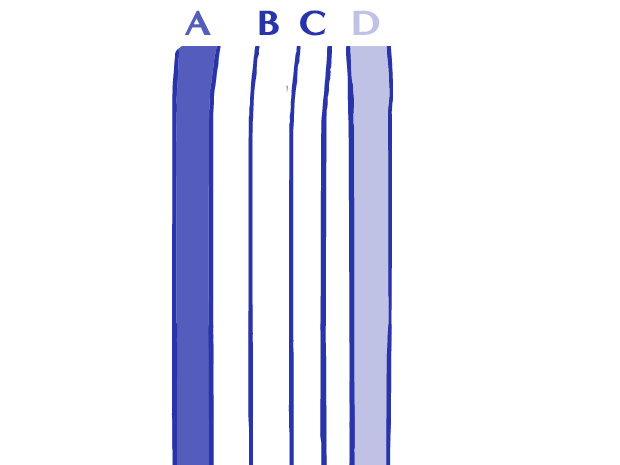
Attach 4 cords vertically to a piece of wooden dowel or alternative. Name them A, B, C and D and make a mental note of it. Cords A and D are the working cords. Nb; The working cords will usually be much longer than the fillers. Complete Step 1 and 2 used for the square knot.
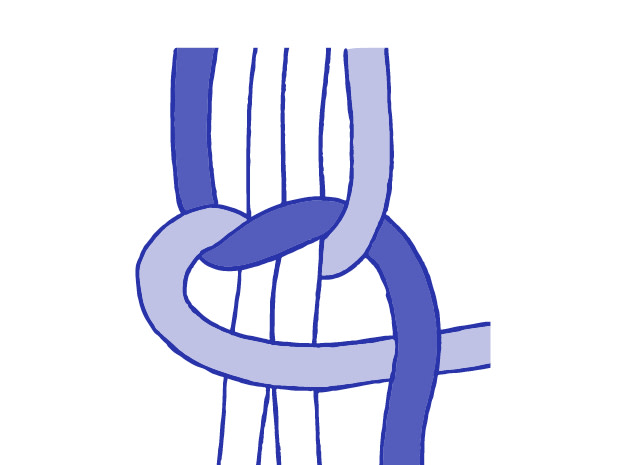
The next Half knot is made the same way, but the two working cords have now switched places. Repeat step 1, moving working cord D. Repeat step 2, moving working cord A.
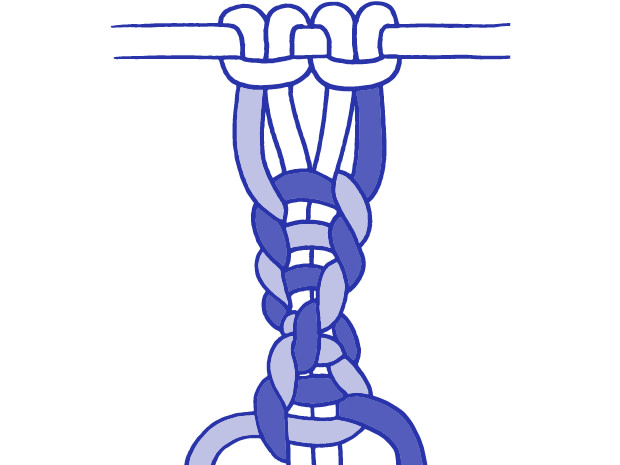
Tie 3 more half knots, always moving the working cord on the left first (step 1). Push the knots close together as you progress. Rotate the knots to the right, so the two working cords switch places. As you create the Spiral, be careful not to tie the half knots in the wrong direction. Nb; The direction is switched in this image so you can see that there is an obvious change in the pattern.
Attach 4 cords vertically to a piece of wooden dowel or alternative. Name them A, B, C and D and make a mental note of it. Cords A and D are the working cords. Nb; The working cords will usually be much longer than the fillers. Complete Step 1 and 2 used for the square knot.
The next Half knot is made the same way, but the two working cords have now switched places. Repeat step 1, moving working cord D. Repeat step 2, moving working cord A.
Tie 3 more half knots, always moving the working cord on the left first (step 1). Push the knots close together as you progress. Rotate the knots to the right, so the two working cords switch places. As you create the Spiral, be careful not to tie the half knots in the wrong direction. Nb; The direction is switched in this image so you can see that there is an obvious change in the pattern.
Barrel Knot
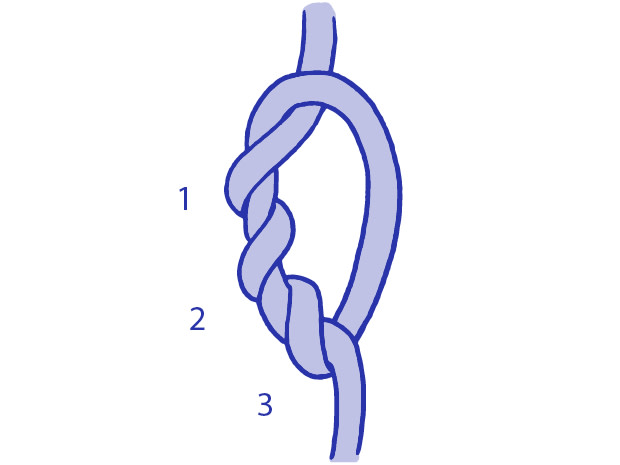
Wrap one of the cords around the other, 1, 2, 3, or more times. The number depends on the remaining thread and the desired knot.
Pull the cord up with one hand and at the same time with the other pull down forming a multiple knot.
Wrap one of the cords around the other, 1, 2, 3, or more times. The number depends on the remaining thread and the desired knot.
Pull the cord up with one hand and at the same time with the other pull down forming a multiple knot.
Button Knot
Use 4 cords. Tie 5 half square knots.

Pass the 2 center cords over and pull them down. A little buttonlike ball will form.
Tie with a square knot.
Use 4 cords. Tie 5 half square knots.
Pass the 2 center cords over and pull them down. A little buttonlike ball will form.
Tie with a square knot.
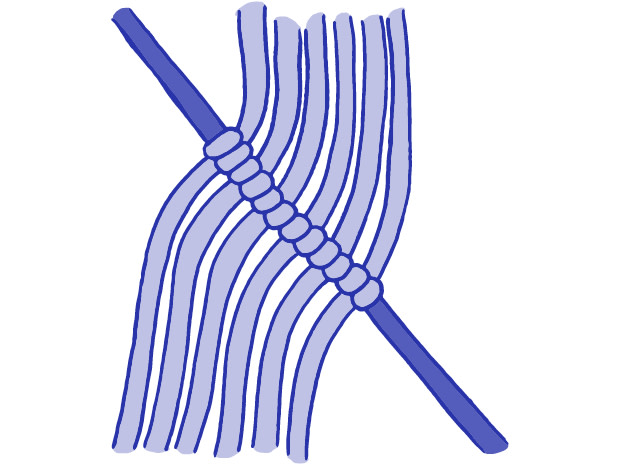
Diagonal Double Half Hitch
The diagonal double half hitch can be used to make diamond and V shapes, as well as zigzags, “s”, chevrons, leaf shapes, and other designs. Place a holding cord to the left of the set and secure it on a diagonal slant. Make sure you stretch it so the cord is tight.
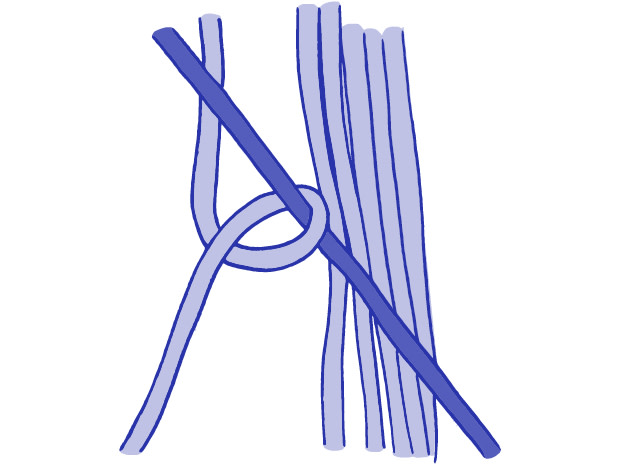
Move the first working cord over and under the holding cord, in a counterclockwise direction. As you pull it left, it should pass over itself. Tighten the knot firmly, making sure the secured section of the holding cord is straight. This is a half hitch.
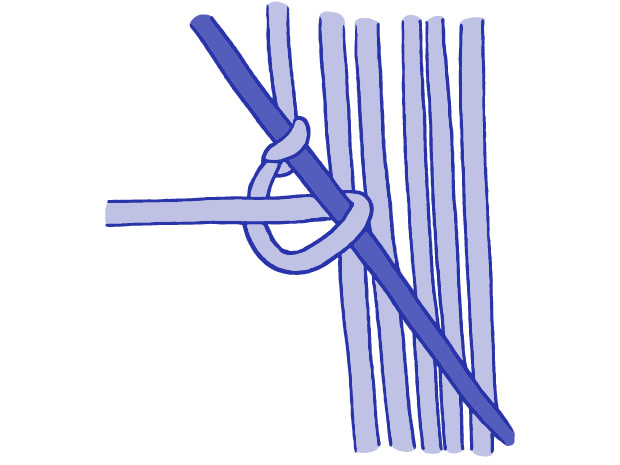
Tie the second half hitch with cord 1, placing it to the right of and below the first knot. Nb; Steps 1 and 2 = Double half hitch.
Repeat steps 1 & 2, tying the next diagonal half hitch with working cord 2.
Move the first working cord over and under the holding cord, in a counterclockwise direction. As you pull it left, it should pass over itself. Tighten the knot firmly, making sure the secured section of the holding cord is straight. This is a half hitch.
Tie the second half hitch with cord 1, placing it to the right of and below the first knot. Nb; Steps 1 and 2 = Double half hitch.
Repeat steps 1 & 2, tying the next diagonal half hitch with working cord 2.
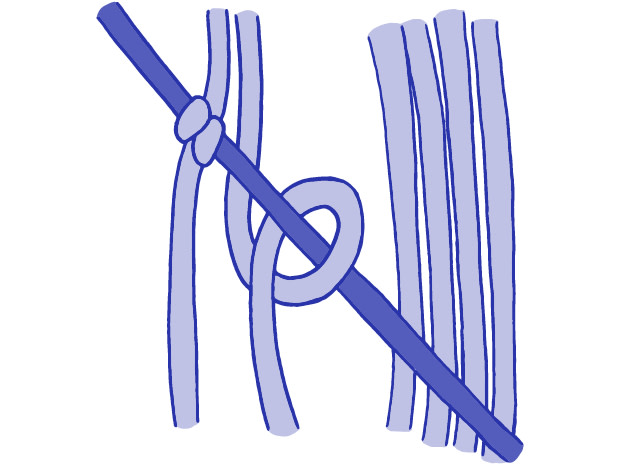
Repeat steps 1 & 2, attaching cords 3-6 to the holding cord.
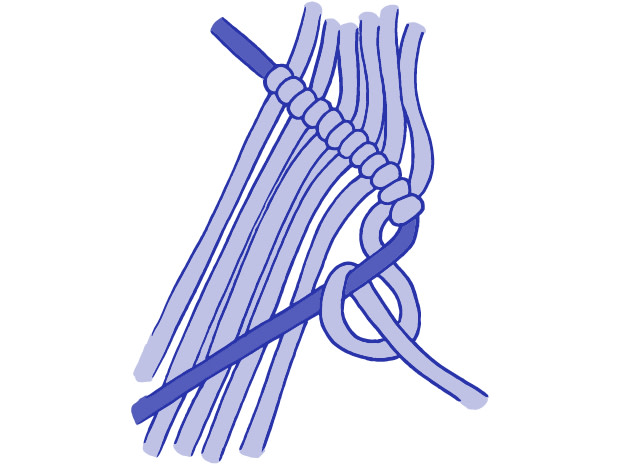
Move the holding cord towards the left, placing it on top of the working cords. Attach cord 6 to it with a clockwise double half hitch, so the end of the cord is pointing right when you finish.
Attach cords 5-1 to the holding cord with a double half hitch. Make sure the segments between the two rows of knots are straight.
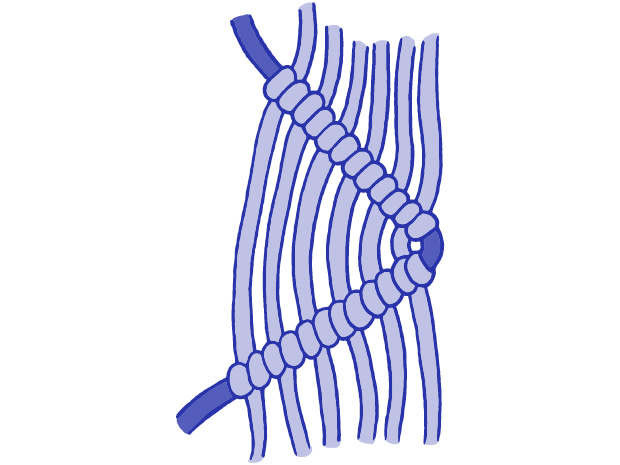
Repeat steps 1 & 2, attaching cords 3-6 to the holding cord.
Move the holding cord towards the left, placing it on top of the working cords. Attach cord 6 to it with a clockwise double half hitch, so the end of the cord is pointing right when you finish.
Attach cords 5-1 to the holding cord with a double half hitch. Make sure the segments between the two rows of knots are straight.
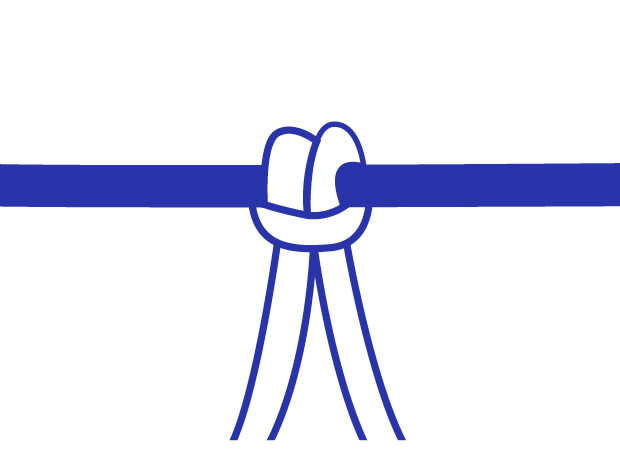
Half Hitch
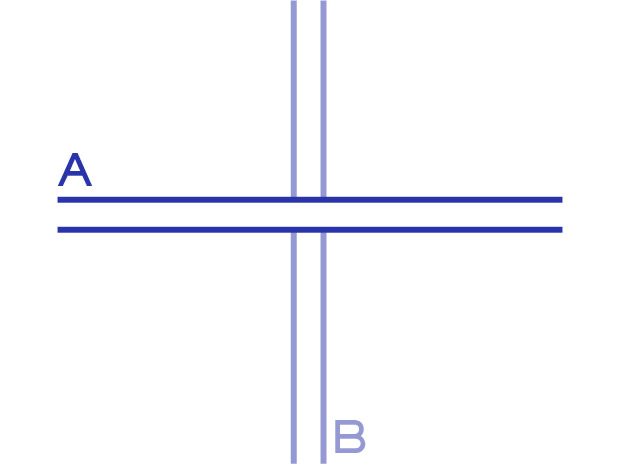
Lay A horizontally. Lay B vertically underneath A so that a cross shape is formed.
Pass B over A and then back under A, to the left of where the pieces intersect.
Lay A horizontally. Lay B vertically underneath A so that a cross shape is formed.
Pass B over A and then back under A, to the left of where the pieces intersect.
Overhand Knot
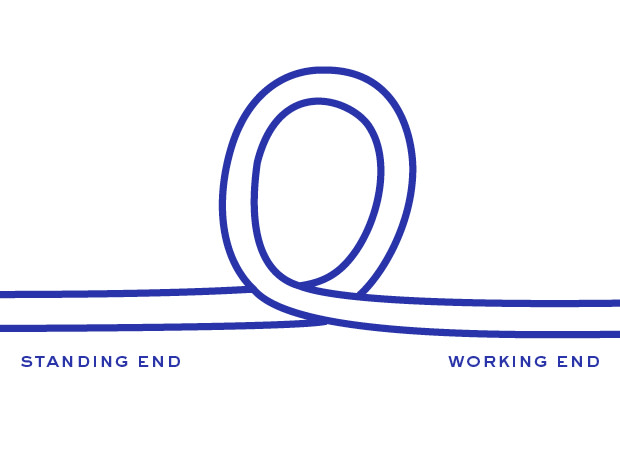
Start by making a loop where you want your knot to be. Cross the working end in front of the standing end.
Now take the working end through the back of the loop and pull the two ends away from each other to tighten the knot.
Start by making a loop where you want your knot to be. Cross the working end in front of the standing end.
Now take the working end through the back of the loop and pull the two ends away from each other to tighten the knot.
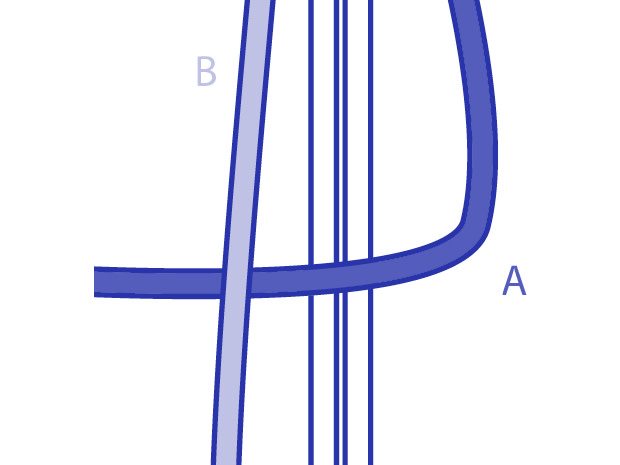
Square Knot Without Middle Strands (right hand)
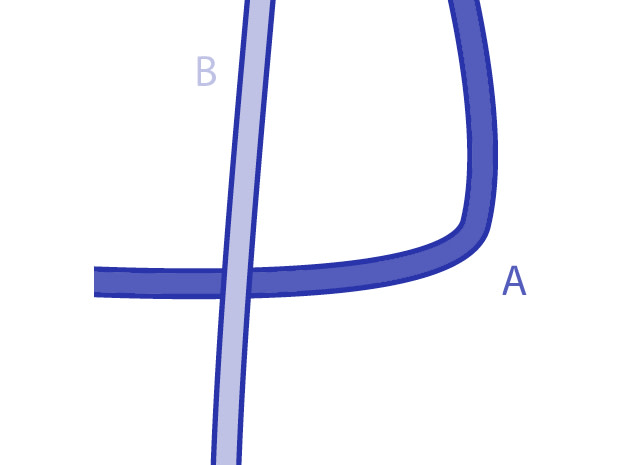
Bring A from right to left, under B.
Now bring B under and over A and pull on both A and B to tighten them.
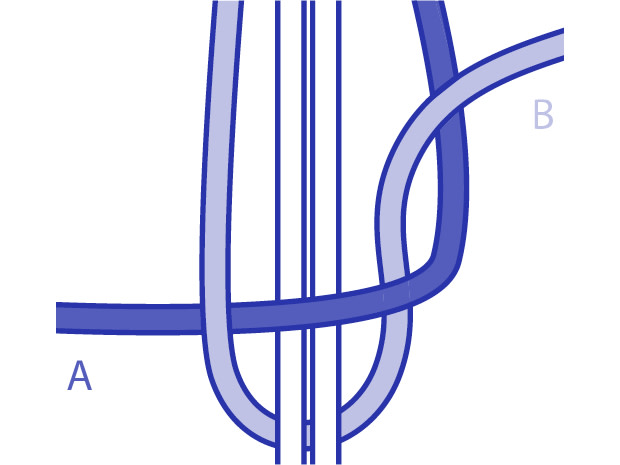
Bring A from left to right and under B.
Bring B through the new loop formed by A. Pull on A and B again to tighten them.
Bring A from right to left, under B.
Now bring B under and over A and pull on both A and B to tighten them.
Bring A from left to right and under B.
Bring B through the new loop formed by A. Pull on A and B again to tighten them.
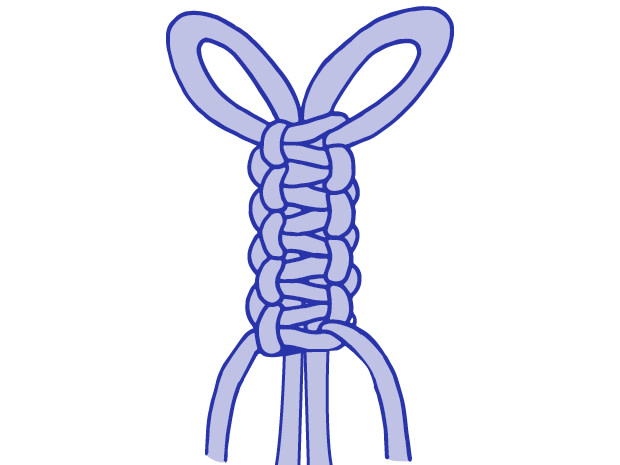
Wrap Knot
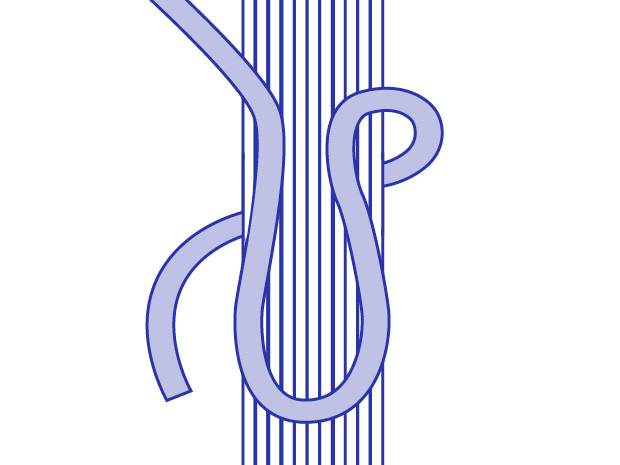
Holding your multiple strands together, lay your working strand on top of the other strands, creating a V shape.
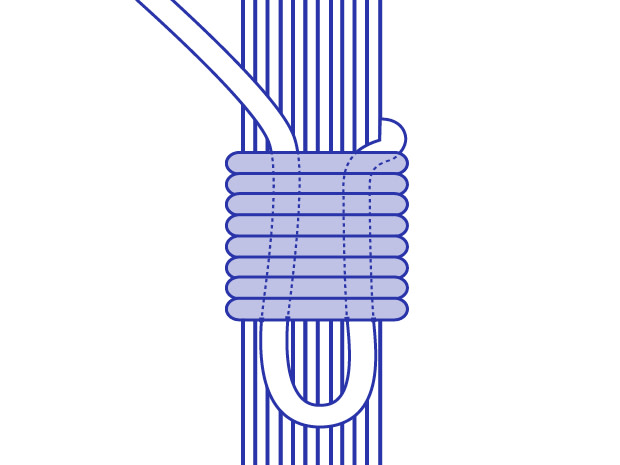
Wrap the long end of your working strand around the bunched strands, trapping the V underneath. Wrap 6 times leaving the bottom of the V visible.
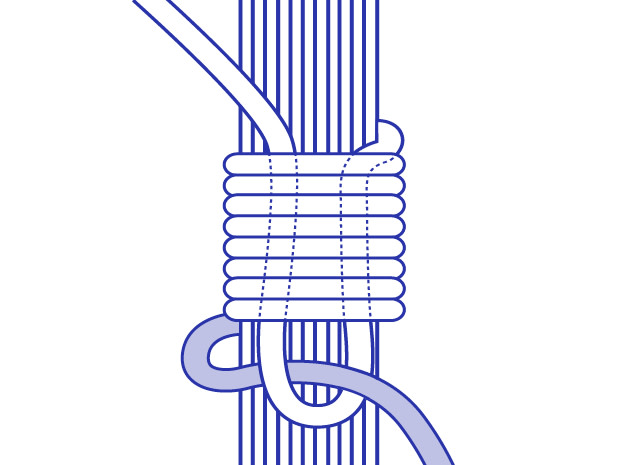
Pass the long end through the bottom of the V.
Holding your multiple strands together, lay your working strand on top of the other strands, creating a V shape.
Wrap the long end of your working strand around the bunched strands, trapping the V underneath. Wrap 6 times leaving the bottom of the V visible.
Pass the long end through the bottom of the V.
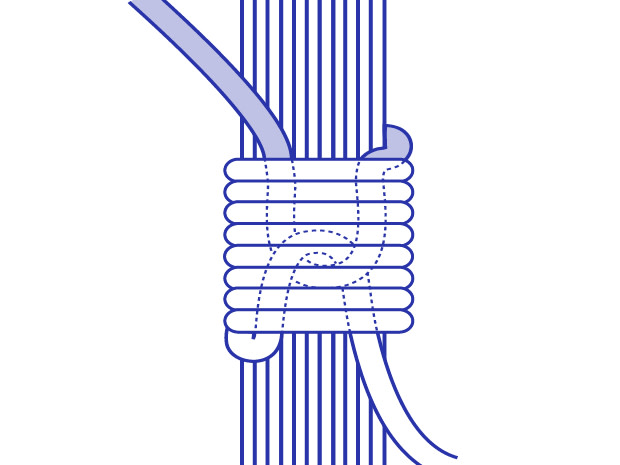
Pull on the short strand at the top of the V until the bottom of the V has been pulled into the center of the wrapped section. You have now secured our wrap knot.
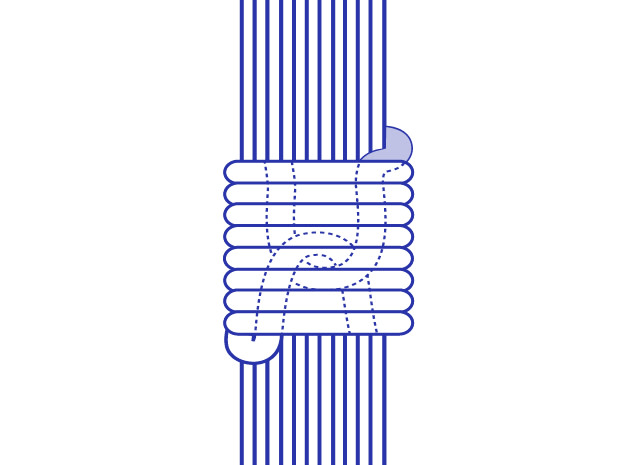
Trim the yarn ends close to the knot.
Pull on the short strand at the top of the V until the bottom of the V has been pulled into the center of the wrapped section. You have now secured our wrap knot.
Trim the yarn ends close to the knot.
Overstitch
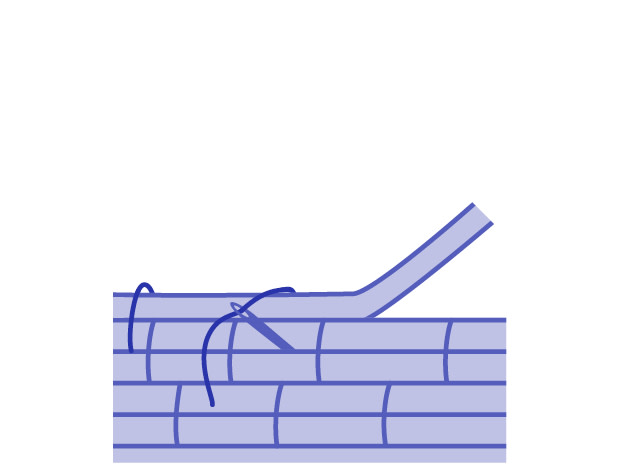
Position your work so the right side is facing you. With the working yarn coming from the wrong side, bring your needle and yarn over the new round of base yarn, then insert the needle from the right side to the wrong side of your work, below the previous round of base yarn. Pull to secure, but don't pull too tightly. This forms one stitch.
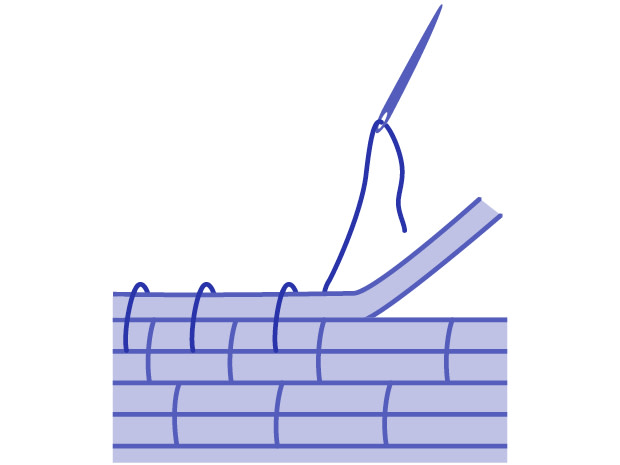
Working in an anticlockwise direction, repeat this process.
Position your work so the right side is facing you. With the working yarn coming from the wrong side, bring your needle and yarn over the new round of base yarn, then insert the needle from the right side to the wrong side of your work, below the previous round of base yarn. Pull to secure, but don't pull too tightly. This forms one stitch.
Working in an anticlockwise direction, repeat this process.
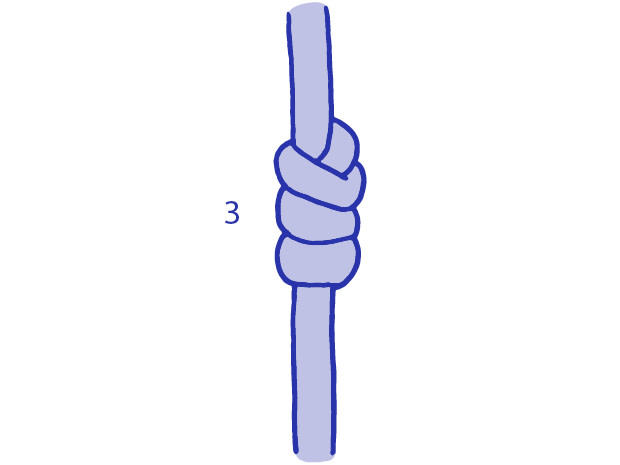
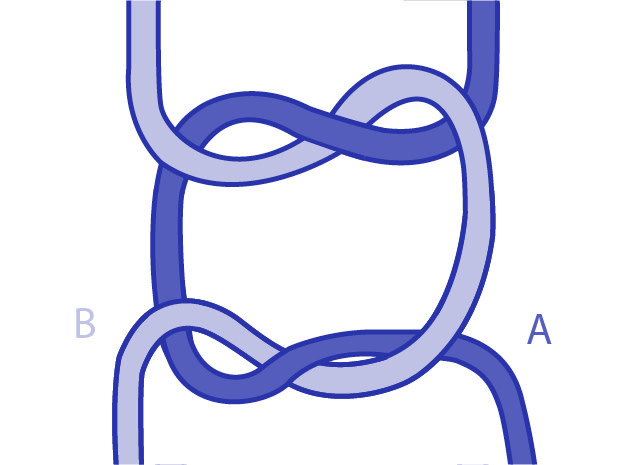
Double Square Knot
A double square knot requires you to make a second square knot directly below the square knot you have just created.
A double square knot requires you to make a second square knot directly below the square knot you have just created.
Alternating Double Square Knot
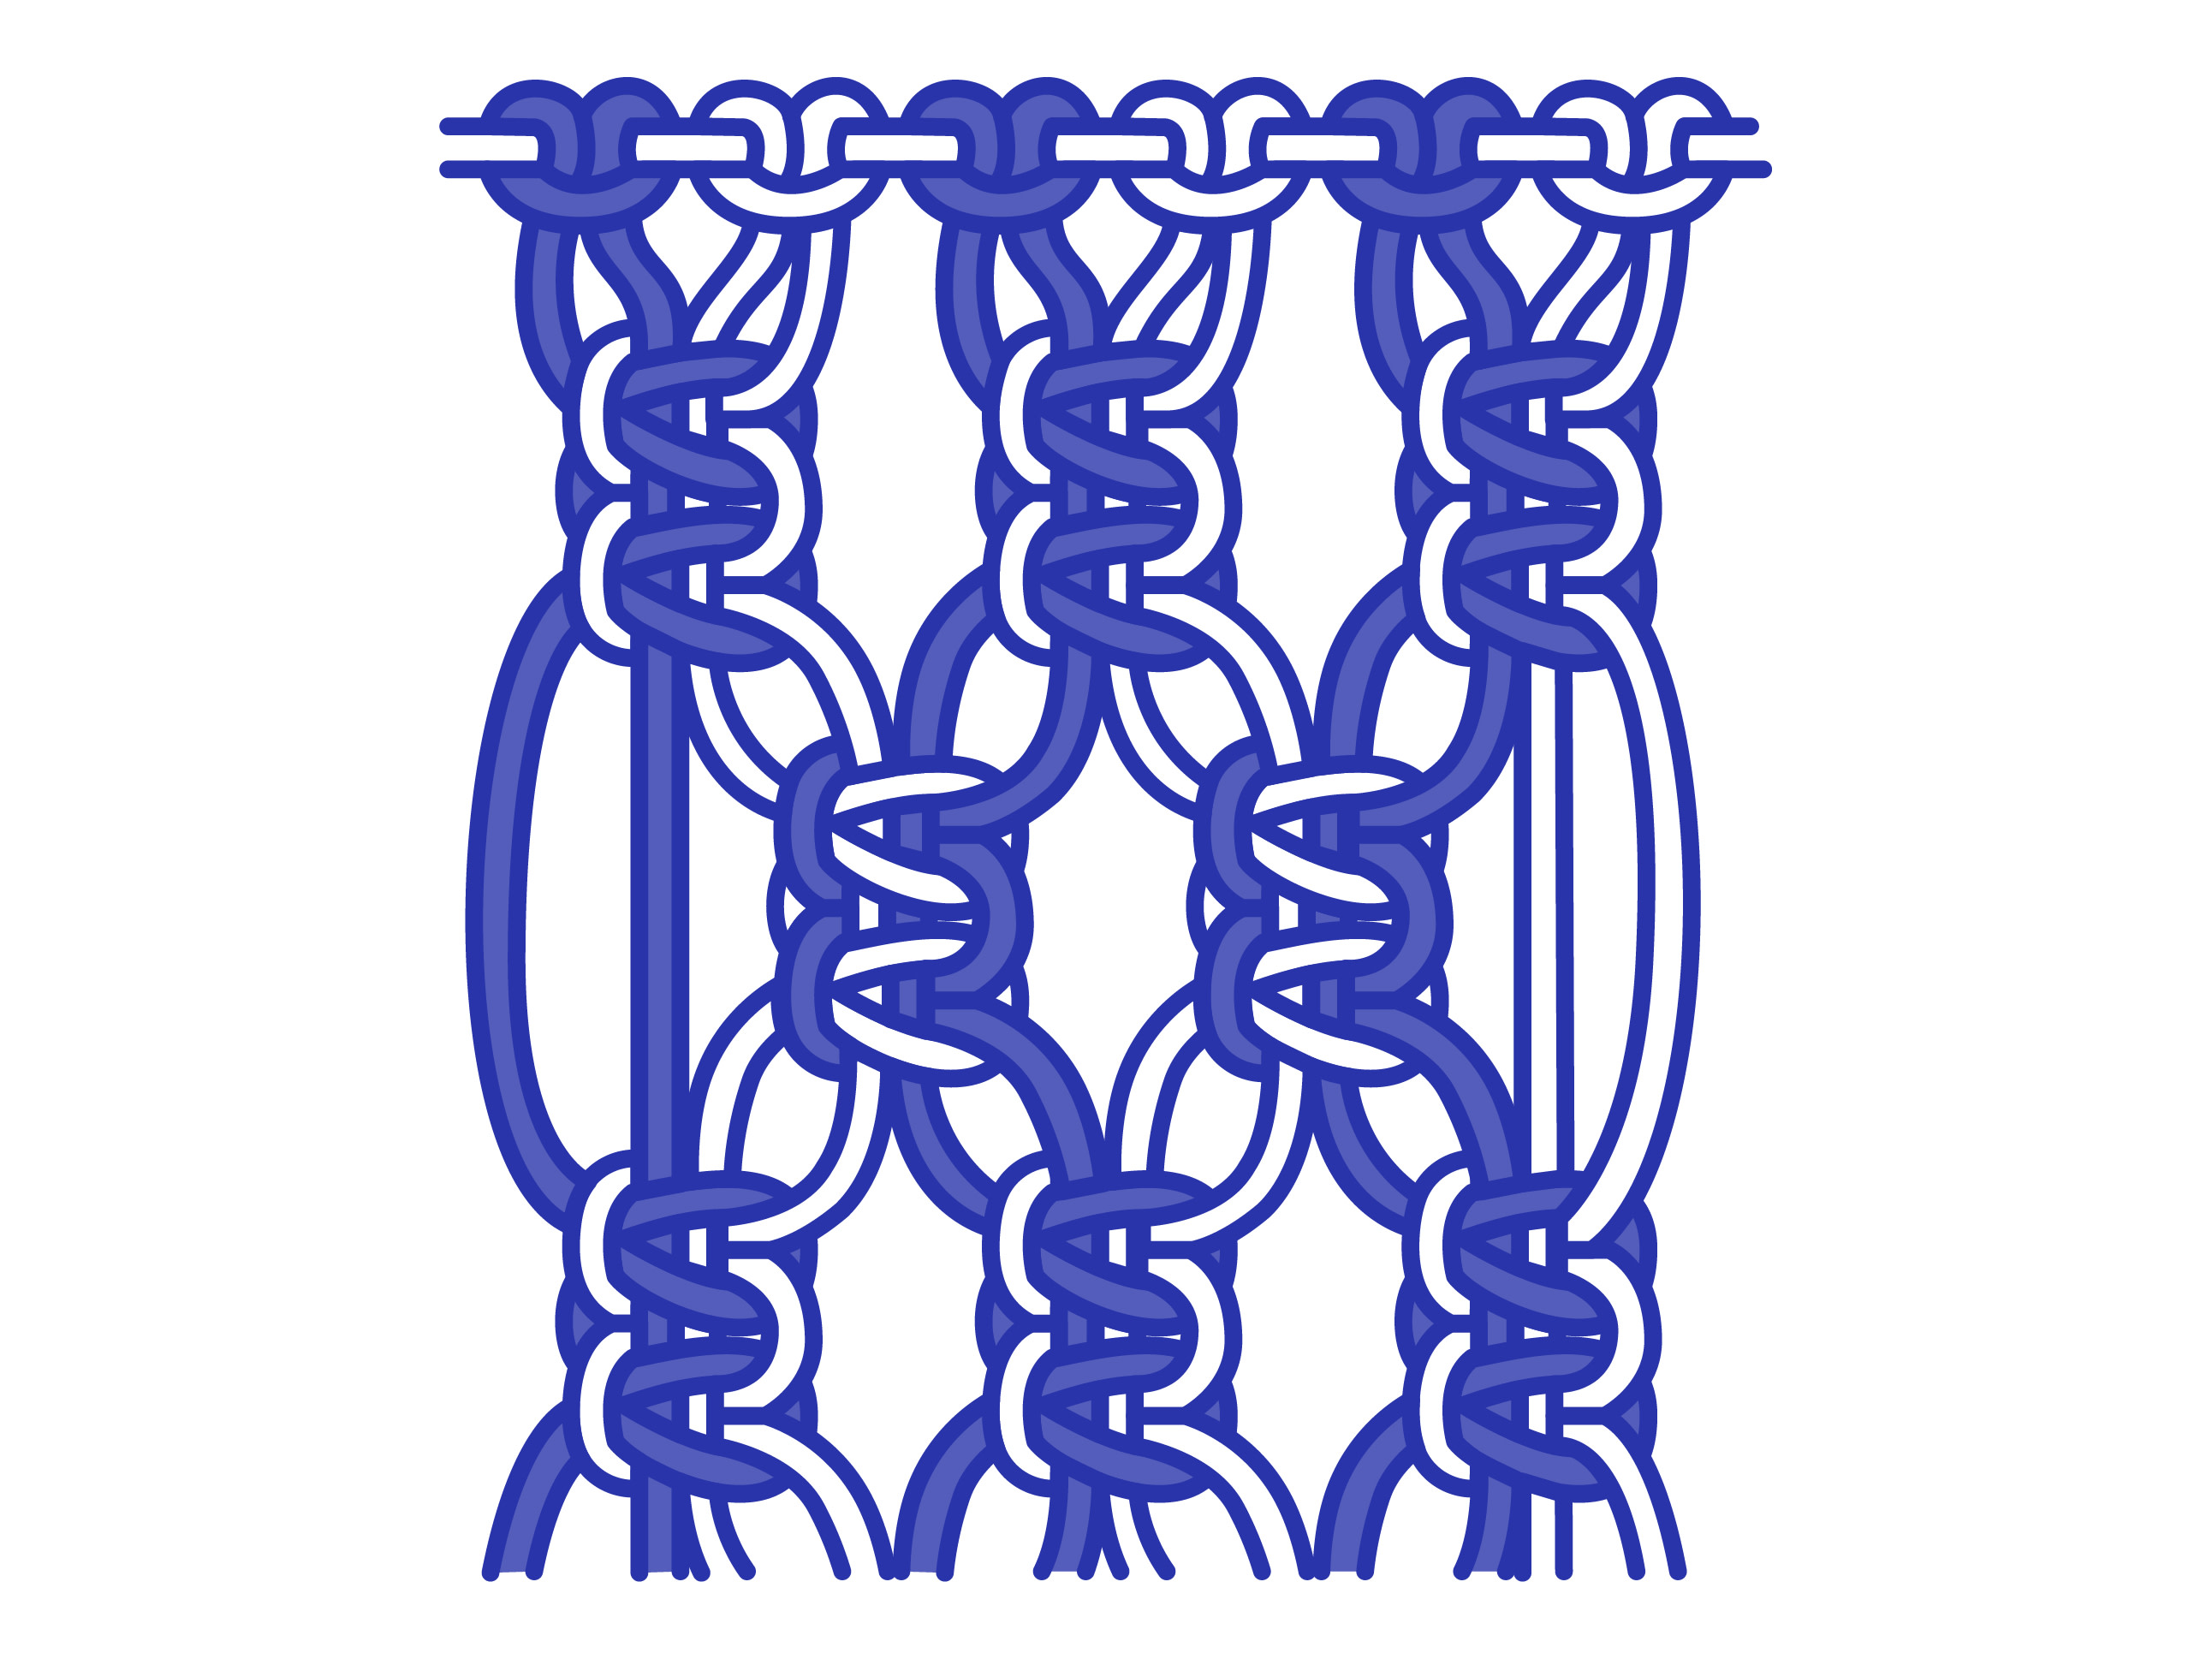
Make a first row of double square knots (two square knots directly below each other). Then make a double square knot in the next row, alternating the knots. Leave (do not work) the first 2 cords of the left side knots, and the other 2 cords of the right side.
Make a first row of double square knots (two square knots directly below each other). Then make a double square knot in the next row, alternating the knots. Leave (do not work) the first 2 cords of the left side knots, and the other 2 cords of the right side.
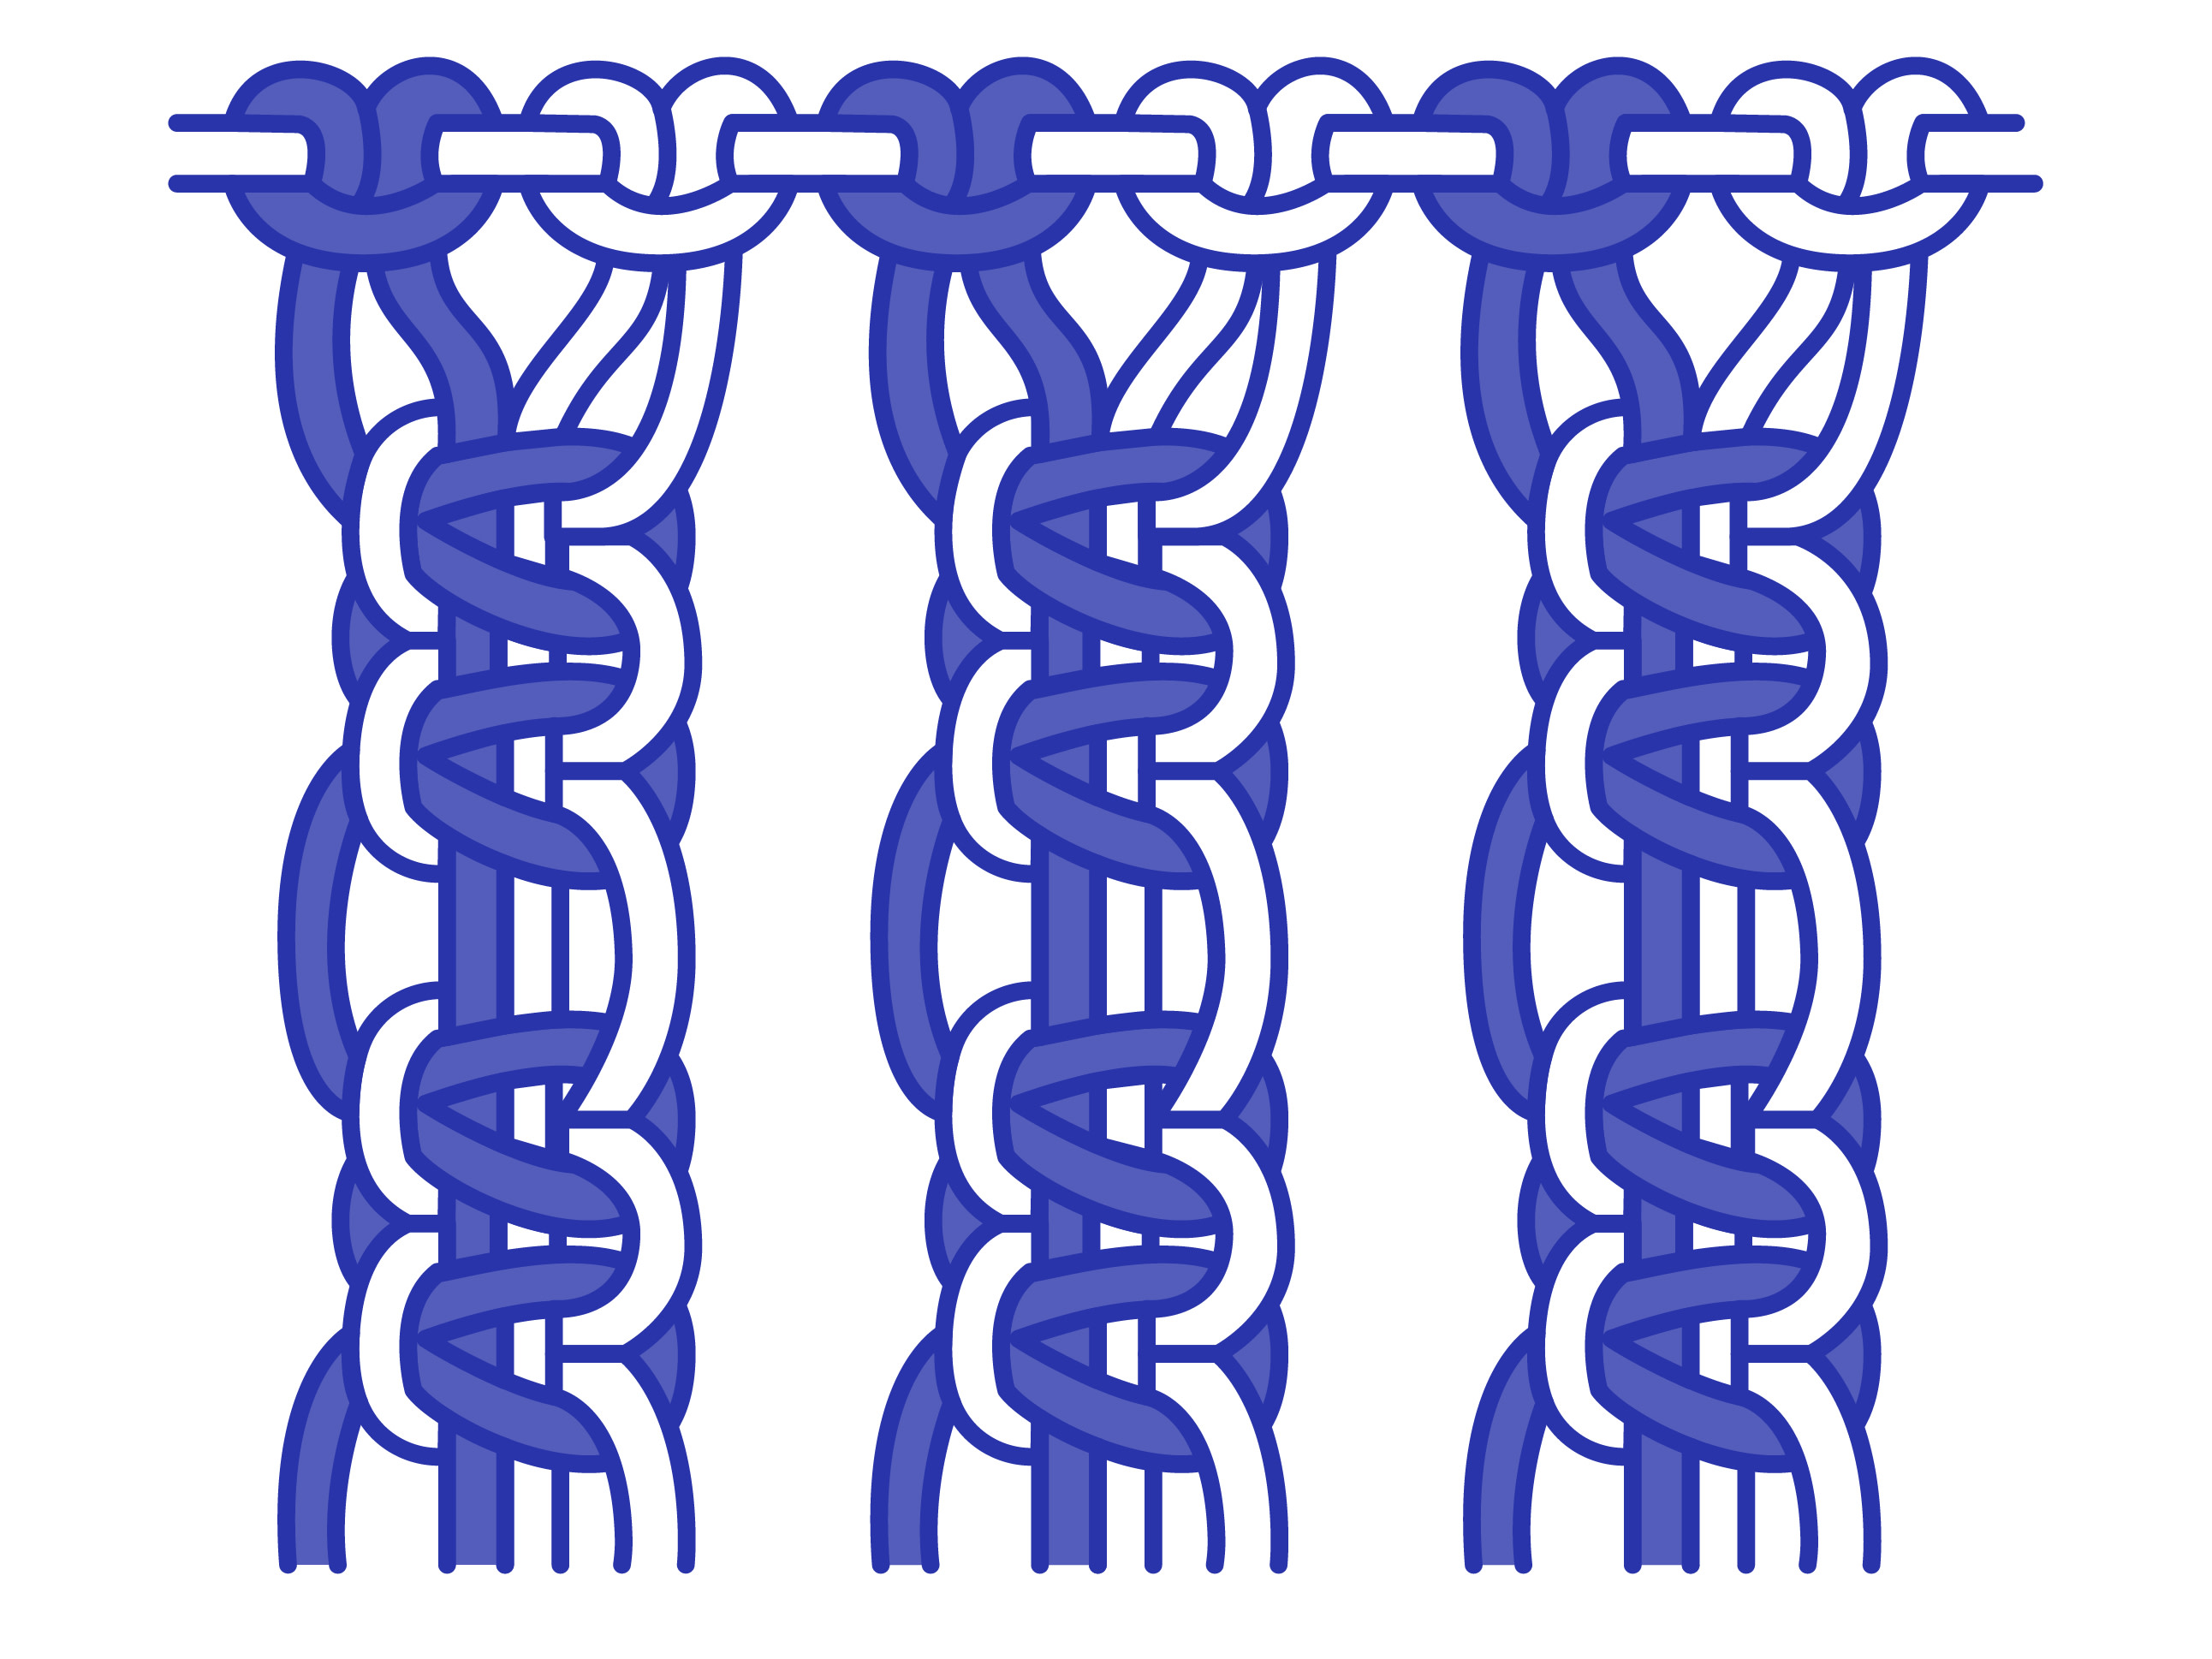
Double Half Hitch Knot (horizontal)
A double half hitch knot, also known as the clove hitch, is where two half hitch knots are worked, one after the other.
Wrap the working cord around the filler cord, then pass the end through the loop created by the working cord. Repeat this once more and pull to secure.
A double half hitch knot, also known as the clove hitch, is where two half hitch knots are worked, one after the other.
Wrap the working cord around the filler cord, then pass the end through the loop created by the working cord. Repeat this once more and pull to secure.